Product Options (v3)
Product Options allow you to sell items that come in several variations, like different colors or sizes. They also provide a way for your shoppers to customize or modify products, like a text field to include a name for personalization, or a checkbox to add an optional insurance fee.
This article covers product options in the v3 Products experience. See Product Options (v2) for information on legacy product options, or learn more about the differences between the two experiences in Comparing V2 and V3 Product Experiences and Considerations.
Variations
Variations are used for products that are available in different colors, sizes, or styles. Each variant can have their own image, price, and weight, and they typically have their own SKU and stock level.
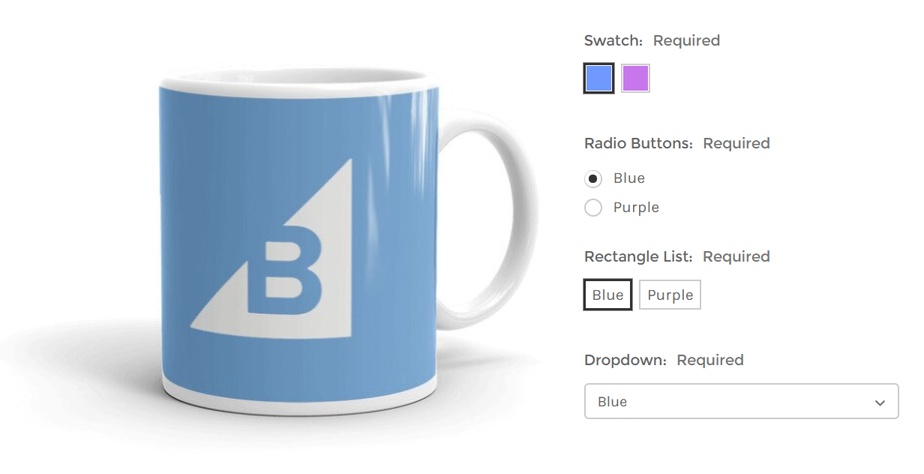
Variant options can be displayed as one of four multiple-choice types:
- Swatch
- Radio Buttons
- Rectangle List
- Dropdown
Below is an example of how a simple color variant option would look on the storefront, using each available type.
Localized Store Experiences: Storefront error messages for unavailable variants display in all of our supported languages. For more information on the default language store setting, see Store Profile Settings.
Creating Variations
Use the following steps to add variant options while creating or editing a product in the control panel.
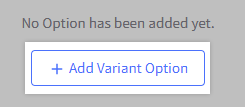
1. In the Variations section, click + Add Variant Option, or click Configure Options to edit an existing variant option.
2. Give your option a name, select its display type, and specify which values should be available.
- Click + Add Another Value for additional values, or click + Add Variant Option to add another group of options.
- Click the remove button ⊝ next to an existing value to delete it.
- The value marked as Default will be pre-selected whenever a shopper visits the product detail page.
- Click and drag the handle ⋮⋮ to the left of options and values to change their sort order on the storefront.
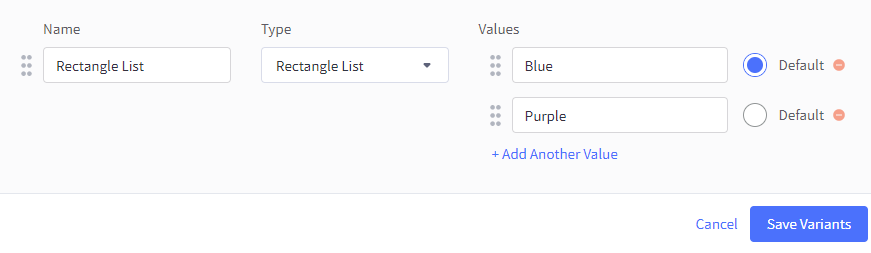
3. When you’re done, click Save Variants.
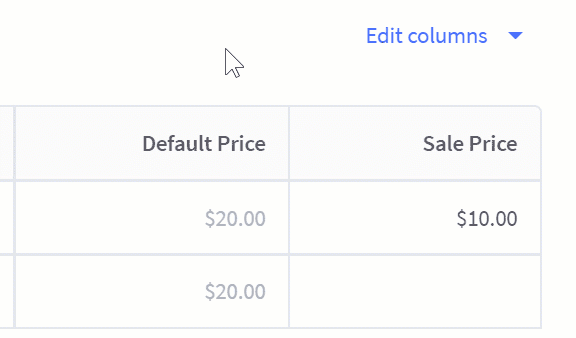
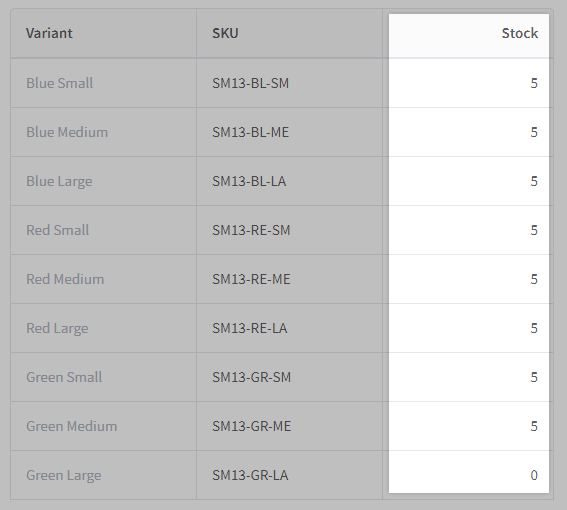
After your variant options are created, all your product’s variations will appear in a table called Variants. This area works like a spreadsheet — you can add, edit, and copy data (like price, image, and SKU) for individual variants. Use the Edit columns dropdown to show or hide additional fields, like Sale Price or Weight.
If you want to copy a cell to the variant rows below it, you can save time by selecting the cell, then clicking and dragging its bottom-right corner to copy it to one or more rows directly beneath it. This works for variant images as well.
SKUS
Stock keeping units, or SKUs, are codes that are used to distinguish individual variants and track inventory. When you create a new variant option, SKUs are automatically generated for all possible variants. You may edit the automatically generated SKUs if you want to assign your own identifiers.

A single product can have a maximum of 600 SKUs/variants. If your product has more than 600 variations, we recommend using a modifier option.
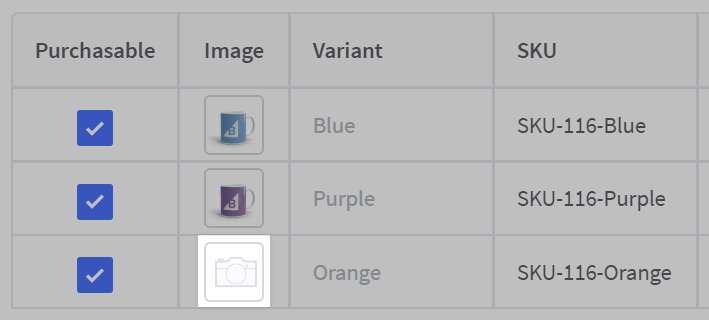
Variant Images
Click the camera icon under the Image column if you want to use a different image for a variant.
- Variants use the product’s main product image, unless a variant-specific image is added.
- Only one image can be assigned to a variant.
Shared Variant Options
If you have several products that use the same variant options and values, you can save time by using shared variant options to set up the option once and then reuse it across multiple products. Keep in mind the following limitations:
- Shared variant options cannot be edited or customized on the product-level.
- Editing a shared variant option will update every product to which it is applied; variants with unique SKUs will be automatically regenerated.
- Shared variant options cannot be deleted if they are currently associated with a product.
Setup
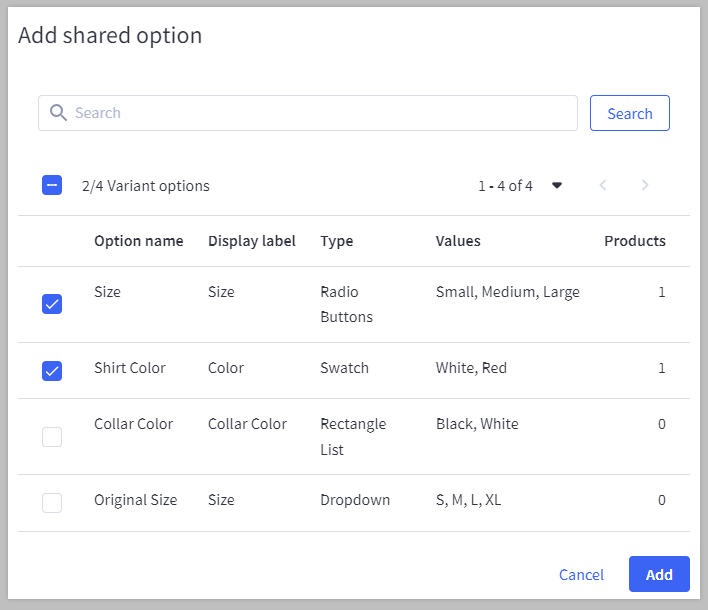
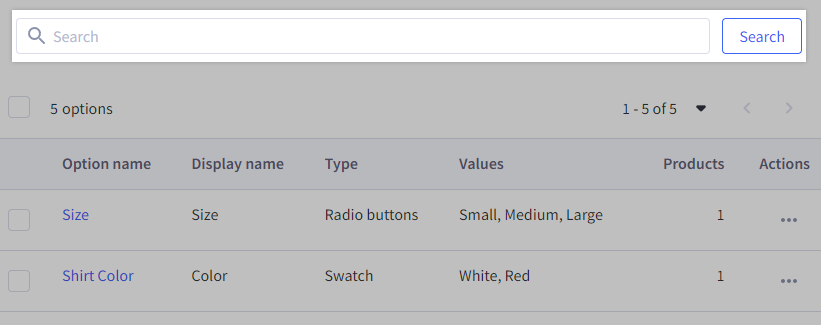
To set up a new shared variant option, go to Products › Product Options and click + Add shared option. To edit an existing one, click the menu button ⋯ beside it and select Edit.
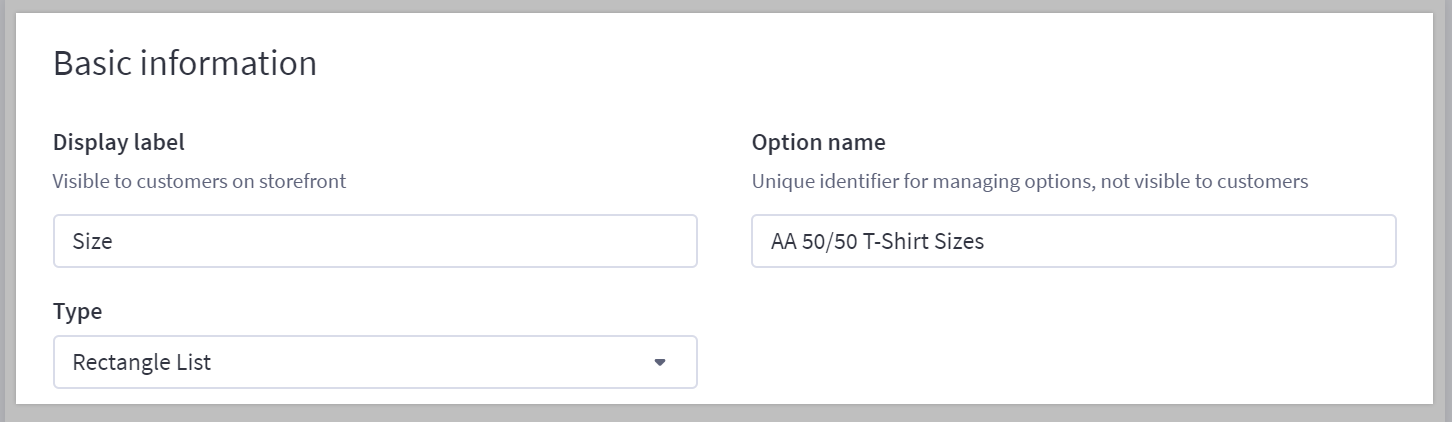
Fill in the following basic information for your option:
- Display label — This text describes the option on the storefront, like Size.
- Option name — This text is used to identify this shared variant option in the control panel only; it is not shown on the storefront.
- Type — Choose the display type of the option on the storefront (Dropdown, Radio Buttons, Rectangle List, or Swatch).
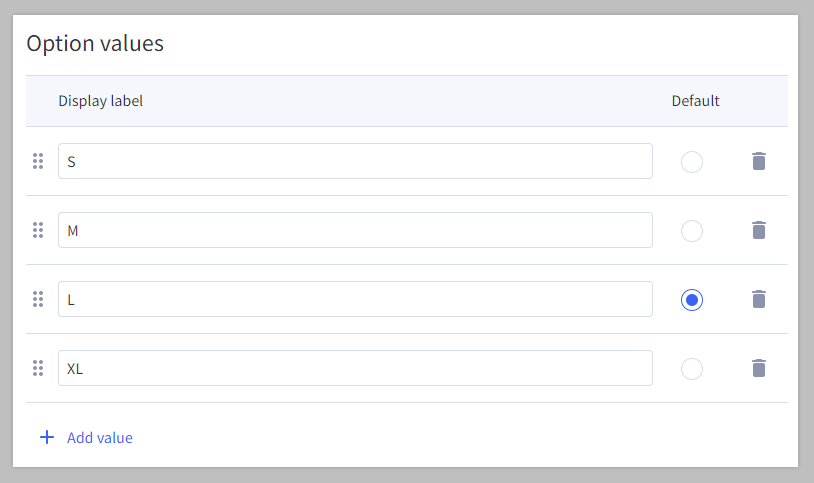
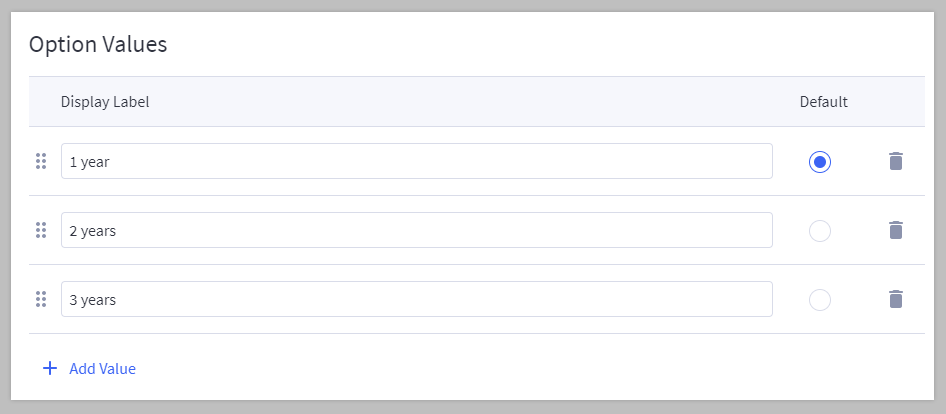
Configure the Display labels and select a Default value for your option. To change their sort order on the storefront, click and drag the handles ⋮⋮ next to values. Note that the sort order cannot be changed once the shared variant option has been created.
Applying a Shared Variant Option
When creating variations on your product, click + Add Shared Variant Options.

Select which of your shared variant options you want to add by checking the box to the left of them. You can locate a particular shared variant option using the search bar at the top. After selecting your options, click Add.
Customizations
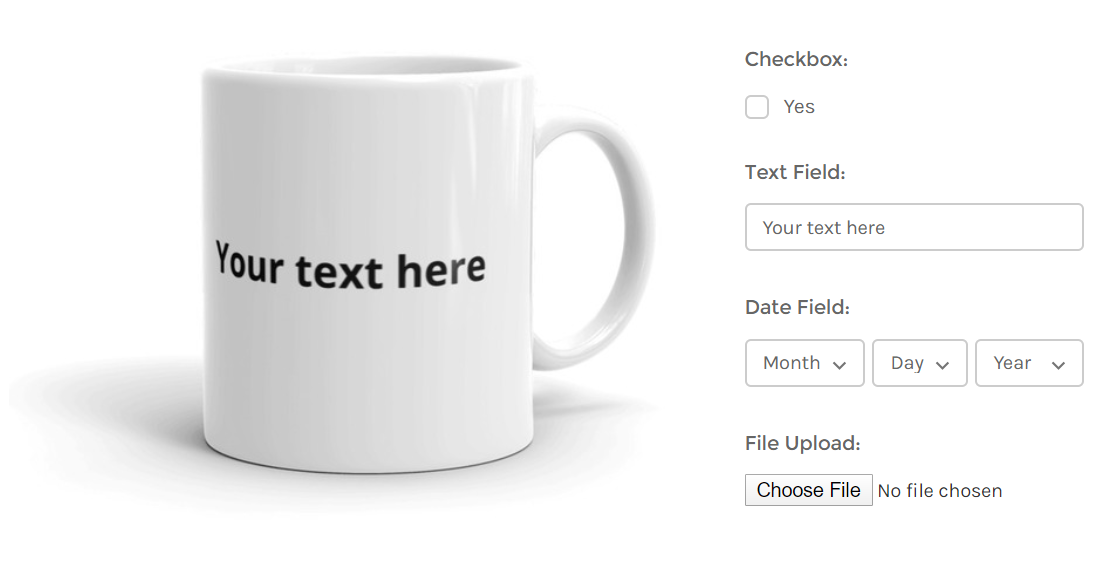
Customizations are used to modify products (or variants) and provide a way to conditionally change their price or weight. For example, if you sell personalized products, you might include a checkbox that adds $5 if shoppers want to add their name, and a text field so they can enter it.
Since customizations modify existing products or variants instead of generating new ones, they do not have SKUs or stock. They can be required or optional for purchase.
The part of a customization option that a shopper interacts with is called a modifier option, and they can be displayed in several ways, depending on their function.
- Multiple Choice — provides a list of values for shoppers to select
- Pick List — allows shoppers to select from a list of other products in your catalog
- Other — can be used to create checkboxes and other fields that let shoppers enter additional product data. Types include a checkbox, text/number fields, date field, and file upload.
Creating Customizations
Use the following steps to add modifier options to your products.
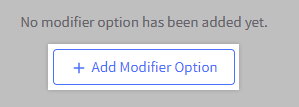
1. Click + Add Modifier Option, or click Configure Options to edit an existing modifier option.
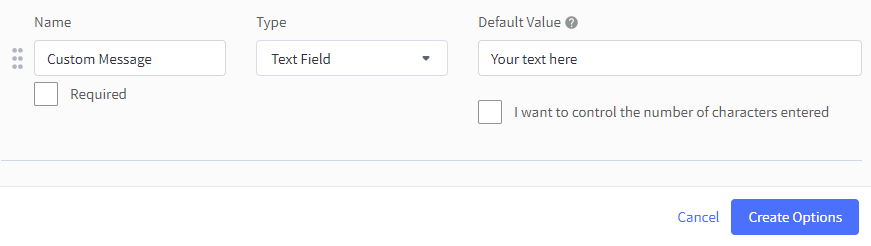
2. Give your option a name, select its display type, and specify which values should be available. You can also enter default text for date and text types. Click + Add Another Value for additional values.
3. When you’re done, click Create Options.
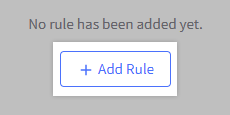
Adding a Rule
If you want your modifier options to change the overall product price or weight when selected, then you can create a rule. The following modifier option types are supported:
- Multiple Choice
- Pick List
- Checkbox
To assign rules to your modifier options, use the following steps.
1. Click + Add Rule after creating a compatible modifier option. To edit an existing rule, click Configure Rules.
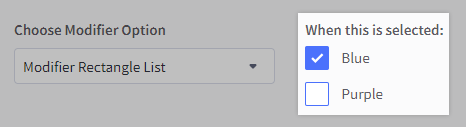
2. Select the modifier option the rule will apply to. If the modifier option is multiple choice, you need to also specify which values will trigger the rule under When this is selected.
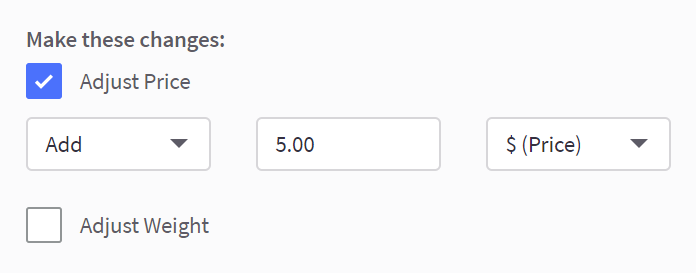
3. Under Make these changes, configure how the price or weight should be adjusted if the modifier is selected.
Shared Modifier Options
Like shared variant options, shared modifier options allow you to set up the option once and then reuse it across multiple products. Keep in mind the following limitations:
- Shared modifier options cannot be edited or customized on the product-level.
- Editing a shared modifier option will update every product to which it is applied.
- Shared modifier options cannot be deleted if they are currently associated with a product.
Setup
To set up a new shared modifier option, go to Products › Product Options. Click the tab for Shared modifiers, then click + Add shared modifier. To edit an existing one, click the menu button ⋯ beside it and select Edit.

Fill in the following basic information for your option:
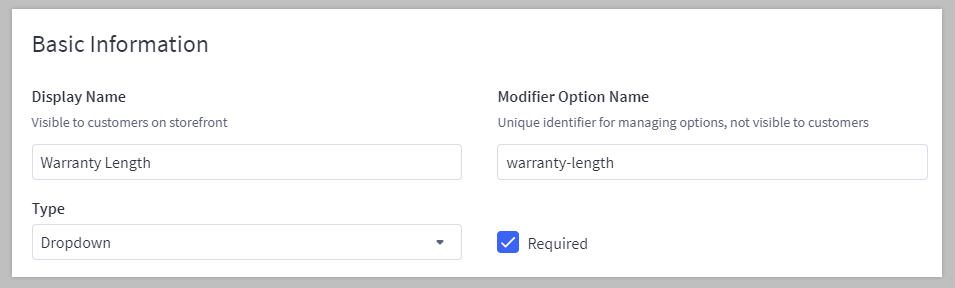
- Display name — This text describes the option and is shown on the storefront, like Add Insurance.
- Modifier name — This text is used to identify this shared modifier option in the control panel only; it is not shown on the storefront.
- Type — Choose the display type of the option on the storefront.
- Required — Check the box to indicate that the modifier option is required for purchase, or leave unchecked if it is optional.
Configure the Display labels for your option. To change their sort order on the storefront, click and drag the handles ⋮⋮ next to values. Note that the sort order cannot be changed once the shared modifier option has been created.
Applying a Shared Modifier Option
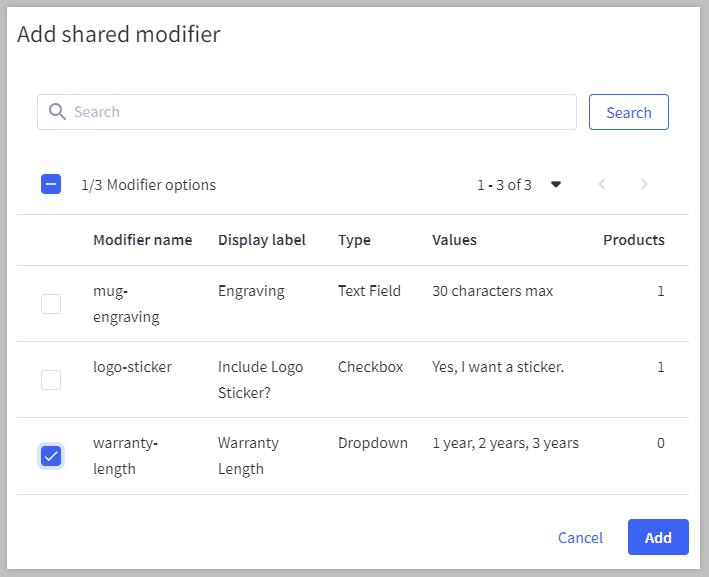
When creating customizations on your product, click + Add Shared Modifier Options.

Select which of your shared modifier options you want to add by checking the box to the left of them. You can locate a particular shared modifier option using the search bar at the top. After selecting your options, click Add.
Option Types
Option types determine how variant or modifier options appear on storefront product pages, as well as how your shoppers interact with them. Variant options can only use multiple choice option types, while modifier options can use any option type.
We’ve provided a list of available option types with their settings below. To learn more about how different options appear in the storefront and which products they are best suited for, see Variants and Modifiers.
Multiple Choice
Multiple choice options allow shoppers to select a particular value for products that come in different variations, like color or size. They can be configured in one of the following display styles:
- Swatch — displays color swatches for shoppers to select. Specify swatch colors by entering a hex code, using the color picker, or uploading an image.
- Radio Buttons — arranges options in a column
- Rectangle List — presents options side by side
- Dropdown — places options in a drop-down list
Checkbox
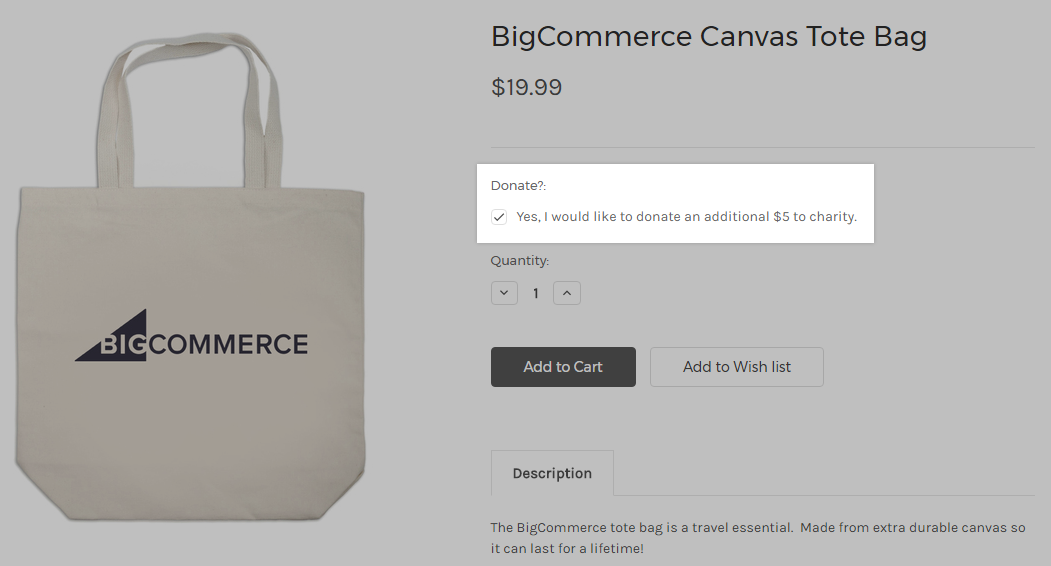
This is the simplest kind of modifier type, which appears as a Yes/No checkbox. Checkboxes have the following settings:
- Field Value — text that appears to the right of the checkbox (like “Yes” or “Include”)
- Radio Buttons — determines whether the box is checked by default when a shopper visits the product detail page
Text/Number Fields
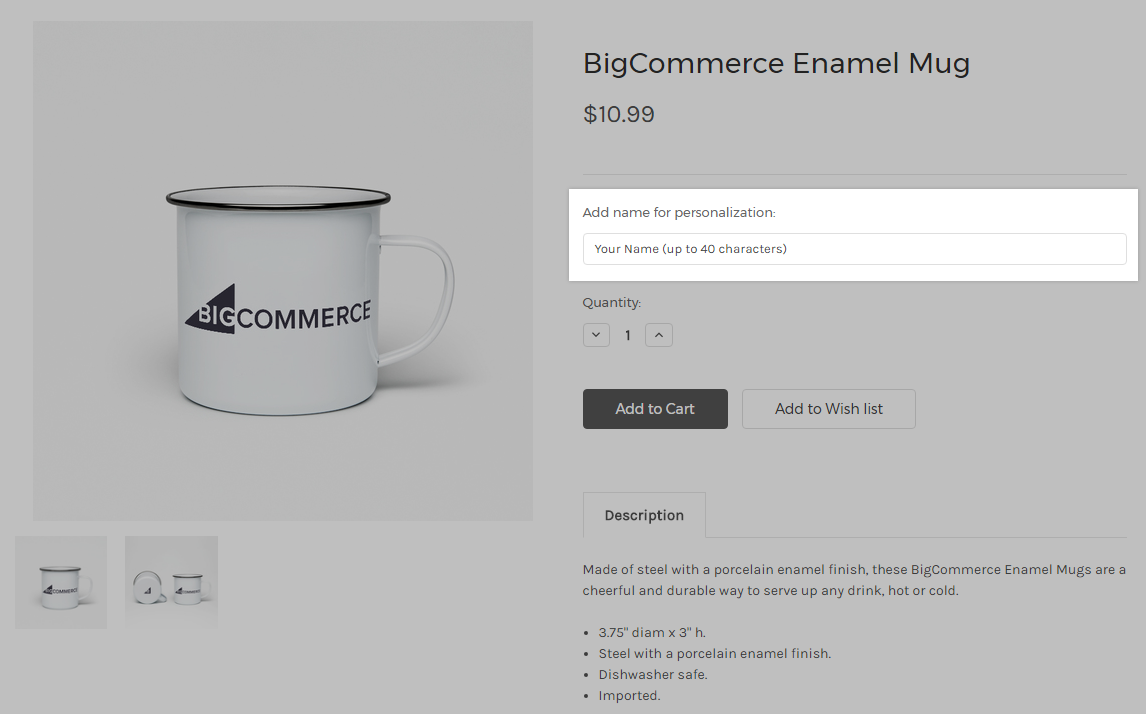
These modifier types allow shoppers to enter text, multi-line messages, or numbers. Text and number fields have the following settings:
- Default Value — optionally enter a Default Value for your text field. This can serve as a quick visual cue to inform shoppers of the type of data that goes there, such as “Add name here”
- I want to control the number of characters entered — assigns character limits to the text field. You can enter a Minimum length, Maximum length, or both
- I want to control the number of lines entered (Multi-line Text Field only) — assigns a Maximum number of lines that can be entered in the field
- Limit numbers by (Numbers Only Text Field only) — assigns a Maximum specifies a maximum value, minimum value, or range of numbers that can be entered
- I want to only allow whole numbers (Numbers Only Text Field only) — prevents shoppers from entering numbers with decimals,like “1.5”
Date Field
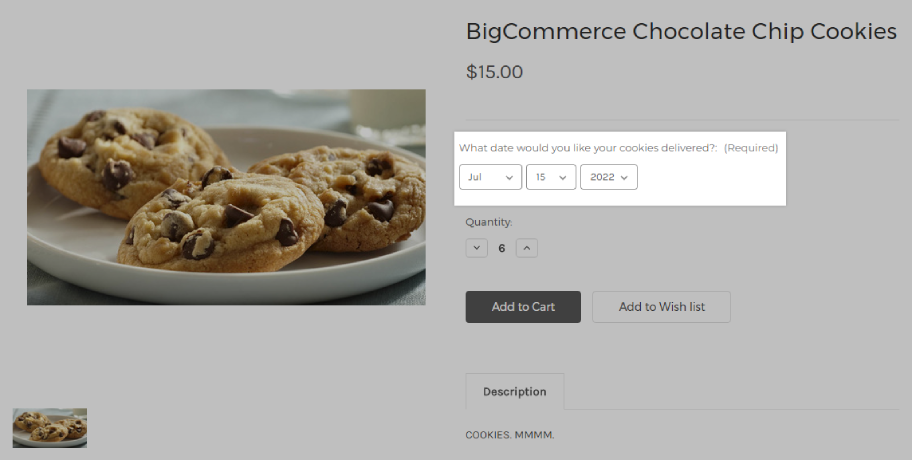
This modifier type allows a shopper to select a date using month, day, and year drop-down menus. Date fields have the following settings:
- Default Value — optionally enter a default date
- Limit Date By — optionally specify an Earliest Date, Latest Date, or a Range of allowable dates
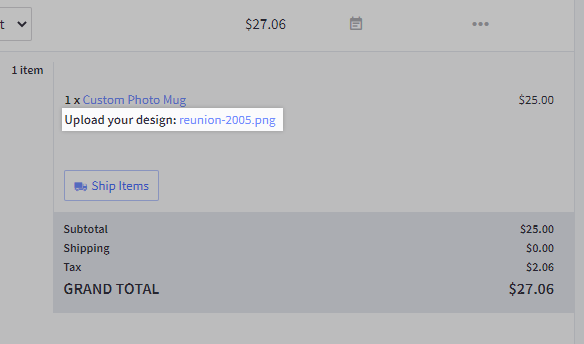
File Upload
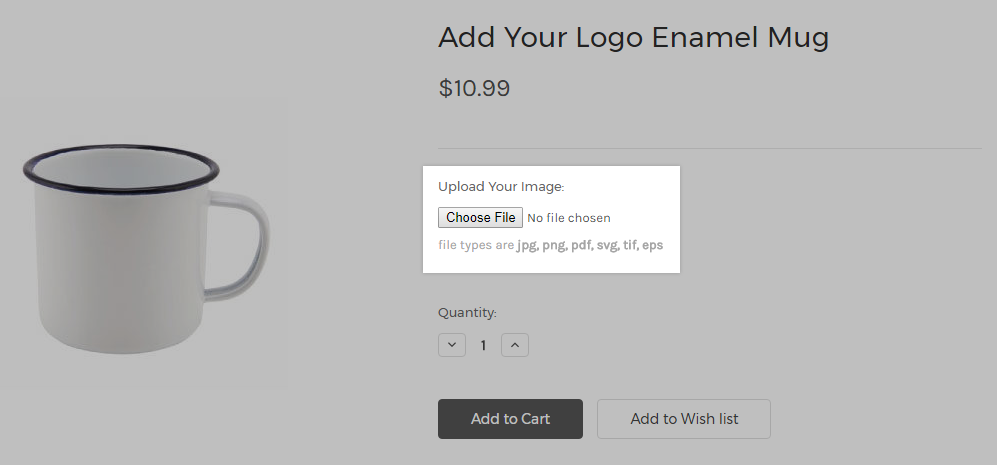
This modifier option allows shoppers to upload a file, which is included as part of the customer’s order details and can be accessed when checking orders.
A maximum of 20 files can be uploaded to a single product. If more than 20 file upload modifiers are added to a product, customers will be unable to add the product to the cart after uploading all files.
Date fields have the following settings:
- Maximum File Size — the maximum file size that shoppers are allowed to upload. This cannot exceed 524,288 KB.
- File Types — allows shoppers to upload any file type, or limits the types of files they are allowed to upload to:
- Images and photos
- Documents and text files
- Other — specify the extensions you want to allow, separated by a comma. For example, pdf,mp3,zip.
Pick Lists
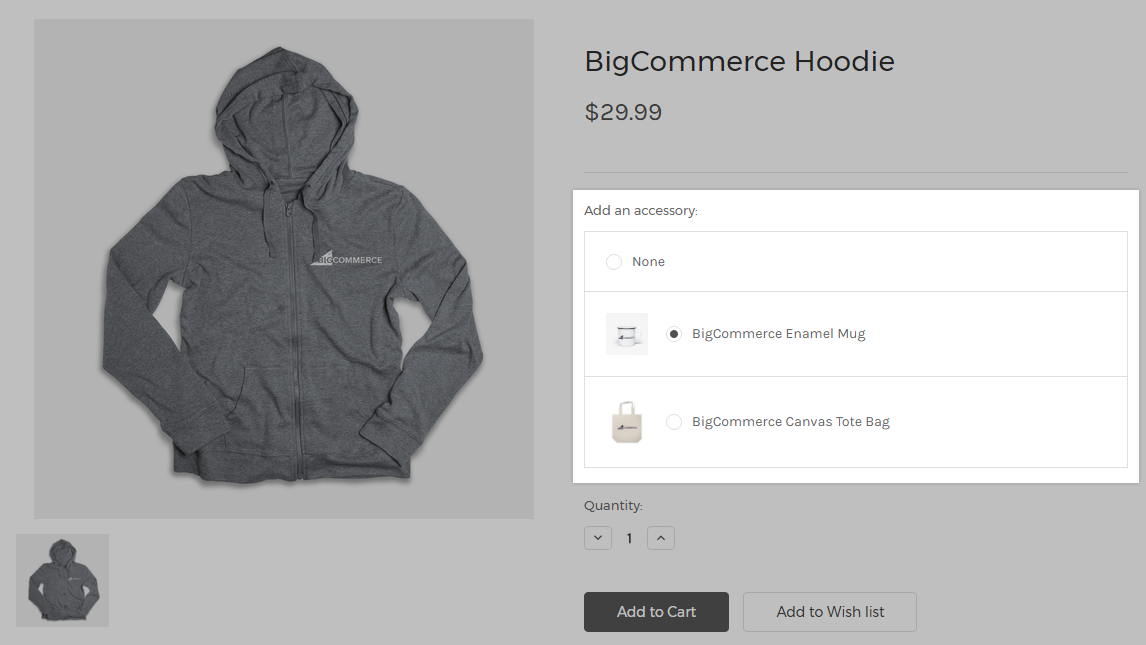
This modifier type allows a shopper to select another product from your store. Pick lists have the following configuration options:
- Products — search for products to add to your pick list. Click and drag the handle ⋮⋮ to the left of products to change their sort order on the storefront, and optionally select a Default product in the list.
- Show product image on Storefront — check this to include product thumbnails in the list
- Adjust inventory for these products when purchased — if products in your list track inventory, check this box if purchasing via the pick list should adjust their stock levels
- Adjust the price based on the chosen option — if checked, the selected pick list product’s price will be added to the base product. If unchecked, selecting a product from the list will not change the price.
- Factor chosen product into shipping calculations — adjust shipping dimensions using the following options:
- None — the selected product will not adjust the base product’s weight or package dimensions (length, width, and/or height)
- Package — the selected pick list product’s dimensions will be added to the base product’s package dimensions
- Weight — the selected pick list product’s weight will be added to the base product’s weight
Note that pick lists have the following limitations:
- Only simple products (products without options) can be included in a pick list. Products with options do not appear when searching for products to add to a pick list.
- Shoppers can only select one item at a time in a particular list; multiple items cannot be selected from the same list.
Importing and Exporting Product Options
Product options can also be created and edited in bulk using a CSV file import. The following option data are supported for import and export:
- Variant options
- Modifier rules
The following data are not supported:
- Modifier options
- Shared variant options
- Shared modifier options
When product options are exported, the way they are represented in the export file is slightly different from how that data is presented in the control panel. See Importing Variants, Images, and Other Complex Attributes for more information on how exported options look, and how to format new options for import.
You can also create and edit product options using the Catalog API.
The modern Import/Export tool is currently available for stores using Multi-Storefront. The latest Import/Export integration provides a simpler importing flow and updating variant-level attributes without needing an extra “rule” row.” See our Modern Product Import/Export guide for more information.
Creating Conditional Options
You may want to set up your products in such a way that when one option is selected, a different option no longer appears. This can be desirable in circumstances when a certain product combination is not available or runs out of stock.
For example, you offer a T-shirt that comes in three colors and three sizes. However, one color is not available in size Large. Performing these steps will make it so that if a customer clicks on Green, the Large option will disappear. Likewise, if they click on the Large option first, the green option will disappear.

To set up conditional options on a product, it must meet the following criteria:
- It must use variant options. Conditional modifier options are not supported.
- The product must track inventory on the variant level.
- Your inventory settings must be set to When an option is out of stock, hide the option.
Once you have confirmed that your product meets the requirements listed above, create or edit your variant options and assign stock to the new variants. Leave the stock levels for the unavailable combination at 0. This will ensure that the variant option is not available for shoppers, while allowing you to easily offer this option in the future, if desired.
FAQ
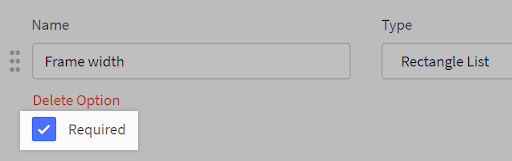
How do I make an option required?
When adding or editing a modifier option, check the Required box to make it required. Variant options are inherently required.
Can I use special characters (like @, #, $, %) in SKUs?
Yes. However, the storefront search does not recognize special characters in search strings. If your customers often search by partial SKU match, we recommend that you avoid special characters in SKUs.
Can I set pick list add-on products to show as a separate line item on the cart, checkout, or invoice?
No, pick list add-on items do not show as separate products, but instead as an option on the base product.
Can I reorder a product's variation list so that color shows before size?
Yes. You can reorder the variations list by clicking Configure Options, then clicking and dragging the option name (such as moving “Color” before “Size”) or values (“Green” before “Blue”). This will update the list order of the variations when editing the product and when viewing it on the storefront.
Will storefront product price ranges include out-of-stock variants?
Yes. Customers will see price ranges that include all of a product’s variants, even ones that have no inventory. To ensure that price ranges are accurate for your products, we recommend either adding in prices for out-of-stock variants or simply removing their prices and allowing them to inherit the base product's price.
Where do I find a customer’s uploaded files when they order products with file upload options?
You can access and download customers' uploaded files from the cart contents listed in the expanded order details when viewing orders in the control panel.
How do I delete an uploaded file associated with an order?
To delete customers’ uploaded files, you will need to access your store using WebDAV. The files are stored in the product_images/configured_products folder.
Can I create conditional modifier options?
No, modifier options do not have SKUs or stock. Because of this, they cannot be set to display conditionally.
How do I locate an option in my shared options list?
To locate a particular shared variant or modifier option, use the search bar at the top of the list. The search results will include shared options with an Option name or Display name matching the keywords you entered.
You can also sort shared options alphabetically by clicking the Option name or Display name columns below the search bar.
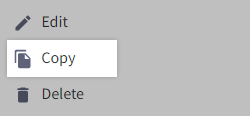
Can I duplicate a shared option?
Yes, click the menu button ⋯ beside the shared variant or modifier option you wish to duplicate, then select Copy. This will open the edit window with pre-filled names, option type, and values from the original option.