Exporting your products to a CSV file allows you to edit product details in bulk and re-import them into your store. This can be a quick and efficient way to perform common catalog-wide tasks, such as updating stock levels, changing product images, and applying special pricing for sales.
Note that the legacy Import/Export tool cannot be used for the following scenarios
- Adding, editing, or removing product videos
- Replacing product digital files
- Creating new products or variants when importing product SKUs
- Editing SKU values when importing product SKUs.
- The following actions when updating product options via import:
- Removing existing variants from a product
- Changing a variant option type
- Adding sale pricing or MSRP
- Changing the option names of existing variants
- Adding variant-level sale pricing or MSRP
- Adding, editing, or removing product modifiers
- Creating modifier rules for fixed price or weight
- Assigning shared variant or modifier options
Requirements and Limitations
Importing existing products has its own set of requirements, although there is some overlap with the requirements for creating new products via import. We’ve included a complete list of these requirements below.
Importing new and existing products in the same CSV file? In order to ensure that your import is successful, you must meet both sets of requirements.
- You must have the following permissions enabled on your user account:
- Manage Products
- Import Catalog Entities
File Formatting Requirements
- You must use a CSV (comma separated value) file type for import. Other spreadsheet file formats, such as XML, are not supported.
- Your CSV file must contain the following columns:
- Product ID
- Product Name
- Category
- A product’s ID must be included in the ID field in order for product updates to be imported successfully.
- Product variant rows must be located directly under the corresponding base product row in order to successfully update variants via import.
- The file size limit for uploaded CSV files is 20 MB.
In addition to the requirements above, there are also specific requirements for updating complex attributes like variants and images in your CSV file. As with base products, if you are creating new attributes and updating existing ones in the same CSV file, you must meet both the “creating” and “updating” requirements.
- Variant and modifier rule requirements
- Image requirements
- Digital file requirements
- Product SKU requirements
The requirements for updating existing category assignments are the same for assigning categories to new products. See Importing Variants, Images, and Other Complex Attributes for more information.
Variant and Modifier Rule Requirements
These requirements are for updating existing variants on the Products v3 experience. If your store uses the v2 experience, see Importing Product Options (v2).
- You must include the ID in order to update a variant’s SKU or Rule row.
- The ID value is required for updating existing modifier rules. However, you must leave the ID field blank when creating new rules for existing modifiers.
- Your CSV file must include the Product Code/SKU column in order to create rules for existing variants or modifiers.
- Each variant SKU must be unique.
- Each product can have a maximum of 600 variants.
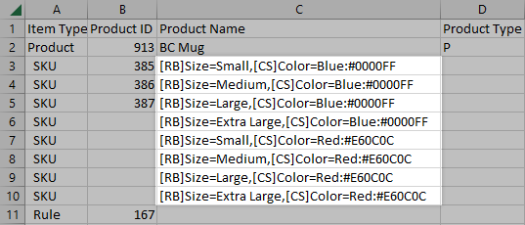
- Separate multiple options for a single variant in the Product Name column with a comma when formatting. For example, a variant that is small size and blue color would look like [RB]Size=Small,[CS]Color=Blue:#0000FF.
- Swatch options require a color hex code for colors and a URL for patterns.
- Image files for pattern type swatches should be uploaded to the product_images/import folder using WebDAV. The file name and URL in the CSV must match exactly.
- The maximum file size for swatch images is 8 MB.
- Adding and editing rules is supported for the following modifier option types:
Image Requirements
- The maximum file size for product and variant images is 8 MB.
- The optimal size for product images is 1280 x 1280 pixels. Secondary product images (like thumbnails) will be created from the original image file you upload.
- A base product can have a maximum of 1,000 images.
- Only one image can be added per variant.
- You must include the Product Image ID column for image updates to be imported successfully.
- Image URLs must link to a file that is online and publicly accessible. Supported file types are JPEG/JPG, GIF, WebP, and PNG.
- Image file names and URLs can have a maximum length of 1,024 characters and must be “HTTP” or “HTTPS”.
- Use a full image URL or the file name of an image in the product_images/import folder of WebDAV.
- If you've created a subfolder in product_images/import and added images to it, you must include that folder's subdirectory with the file name (like folder_name/image.png).
- Image file names are restricted to a-z, 0-9, - and _. They cannot contain any spaces or special characters.
Digital File Requirements
- If you’re importing digital files from WebDAV, you must add them to the product_downloads/import folder, and you must use the file name and extension in the Product File field, such as filename.pdf.
- If you’re importing digital files with a URL, the file you link to must be publicly accessible.
- Non-HTTP/HTTPS file URLs are not supported.
- The maximum size for digital products is 512 MB.
Product SKU Requirements
- When importing product SKUs, your CSV file must contain the following columns:
- Product SKU
- Stock Level
- The file size limit for uploaded CSV files is 20 MB.
Editing Product Information in Your CSV File
To get started, export your desired products to a CSV file. For catalog updates, we recommend using the Bulk Edit export template, but you can create a custom export template to reduce the unnecessary data in the file as long as it still meets the import requirements. For instance, you can create a template with the Item Type, Product ID, Product Name, Price, Cost Price, Retail Price, and Sale Price fields to quickly update your catalog pricing.

While editing your products in the CSV file, make sure that you are using the correct formatting for each field. Formatting issues, such as improper field separators or unsupported special characters, can lead to incorrect or missing product data. See Supported Product Fields for a complete list of exportable fields and how to format them.
In the following sections, we’ll discuss helpful tips for updating complex attributes.
Updating Product Variants
Product variant information is organized into SKU and Rule rows in the CSV file. Each row type supports the following variant attributes:
| Item Type | Supported Attributes |
|---|---|
| SKU |
|
| Rule |
|
Keeping the Option Set and Option Set Align fields in your CSV file can cause duplicated variants upon import. Delete these columns from your file before importing, or create a custom export template that excludes them.
SKU rows include several fields which are reference-only, and cannot be updated via import:
- Product ID — Changing or removing a SKU row’s ID value will lead to import errors.
- Product Name — Changing an option's name in your CSV will result in a new option being created upon import. Update option names in the control panel or via the API.
- Weight and Price — Variant weight and price are displayed in the SKU row, but must be updated in the Rule row.
To add a new variant to an existing product in your CSV file, create a new row under the existing SKU rows and give it an Item Type of SKU.

Entering information for the new variant follows the same formatting rules for creating variants on new products in your CSV file. However, the option types and names in the Product Name field of the new variant must match those of the existing variants in order to prevent the creation of a new variant option with non-purchasable variants.
For example, to add an Extra Large size variant for the “BC Mug” product depicted above, you would give it a Product Name of “[RB]Size=Extra Large”.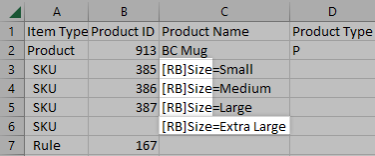
Note: Upon import, new variant option values will appear at the bottom of their option list on the product’s storefront display page, even if they are added above existing SKU rows in the CSV file.
To add a new variant option to an existing product, you will need to add that option to the Product Name of your existing variants in addition to creating new SKU rows. If you don’t update your existing SKU rows, the product will have variant option combinations that don’t correspond to a unique variant and cannot be purchased on your storefront.
Using the example above, if we wanted to add Red and Blue color swatch options to the “BC Mug” product, it would look like this:
Updating Variant Rules
Like SKU rows, Rule rows use the Product ID field to ensure that changes are imported successfully. However, the Product Code/SKU field associates the rules with their corresponding variants, and is required for updating existing rules and adding new rules to existing variants.

When updating variant rules in your CSV file, use the same format as you would when creating a new Rule row. When adding rules to a variant that already has rules, enter the information on the existing rule row, rather than creating a new row. For example, to add an image to a variant with a unique price, you would enter the image URL or file name in the Product Image File - 1 cell of the variant’s Rule row.

Creating and Editing Modifier Rules
If you’ve created a product with modifier options in your control panel, any price or weight rules assigned to your modifiers will be present when exporting your products to a CSV file. These rules appear in Rule rows that are not associated with a variant SKU.
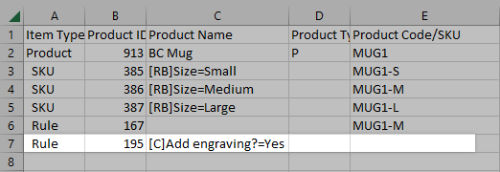
Editing modifier rules uses a similar format to variant rules. However, you can only adjust the modifier’s price and weight using the [ADD] or [REMOVE] adjustment tags; setting a fixed amount is not supported. As with variant rules, enter multiple rules for a single modifier on the same Rule row, rather than creating individual rows for each rule.
To create a new rule for an existing modifier, add a row under the existing rule rows and give it an Item Type of Rule. Since this is a new rule, the Product ID field should be blank.

In the Product Name field, enter the modifier’s option type, name, and value, using the format in the table below.
| Option | Type | Format | Example |
| Multiple Choice | Radio Button | [RB]OptionName=Value | [RB]Size=Small |
| Dropdown | [S]OptionName=Value | [S]Flavor=Vanilla | |
| Rectangle List | [RT]OptionName=Value | [RT]Cut=Square | |
| Swatch | Color | [CS]OptionName=Value:#hexcode | [CS]Color=Blue:#0000FF |
| Multiple Colors (up to three) | [CS]OptionName=Value:#hexcode1|#hexcode2 | [[CS]Color=Blue-Red:#0000FF|#E60C0C | |
| Pattern | [CS]OptionName=Value:URL | [CS]Pattern=Plaid:http://mybcstore.com/ product_images/import/ plaid.jpg | |
| Checkbox | [C]OptionName=Value | [C]Add engraving?=Yes | |
| Pick List* | [PI]OptionName=Product Name:Product ID | [PI]Add-On=BigCommerce Sticker:123 |
* If you’ve configured the pick list option to adjust the price or weight based on the selected product, it will take priority over any rules added via import.
After entering the modifier information, add your price and weight rules to the row before uploading the CSV file to your store.

Updating Product Images
When exporting products with images, the following image attributes can be present on the CSV file, depending on the export template you selected:
- Product Image ID* — this must be present in order to update an existing image’s details
- Product Image Path* — the image’s WebDAV file path; this field is called Product Image File in the Bulk Edit template. The image file path is present regardless of how the image was added to the product, and it is different from the file name and extension used to add images via WebDAV.
- Product Image Description* — the alt tag for the product image
- Product Image Is Thumbnail* — use Y or N to indicate which image should be used as the product thumbnail
- Product Image Sort* — specifies the order that images should appear in, using whole numbers. Images are sorted from lowest to highest value. If left blank, the field will be set to "0".
- Product Image ID (read-only) — the WebDAV file name and extension of the image. Like Product Image Path, this is present even if you didn’t add the image by uploading it from WebDAV.
- Product Image ID (read-only) — the image’s URL on your storefront
* These fields are available in the Bulk Edit template.
If you are adding images to an existing product, use the same steps as you would for adding images to new products.
To replace an existing image on a product, remove the existing image file in the Product Image Path field and replace it with the new image’s URL or file name. If you are using the Bulk Edit template or a custom export template built from the Bulk Edit template, this field will be called Product Image File instead. It can be found after Product Image ID in the CSV file.

Do not edit the image ID value When replacing an existing image, leave the image ID as its original value. If the Product Image ID field is blank, a new image will be created instead of updating the existing image.
Since the Product Image File and Product Image URL fields are reference only, you do not need to manually update their values when replacing a product image. These values will update automatically when you import your CSV file.
Updating Digital Products
When exporting digital products, you can update the following fields in your CSV file:
- Product File Description
- Product File Max Downloads
- Product File Expires After
Using a custom export template, you can also view the following read-only fields:
- Product File Path
- Product File Total Downloads
Unlike other attributes, digital files do not have an assigned ID in the CSV file. This means that you cannot replace a digital file via CSV import. If you add a different file in the Product File field, it will be created as a new file upon import, rather than changing the previous file.
Adding multiple files to a product? Create new columns in your CSV for each digital file, increasing the number each time you make a new column. See Importing Variants, Images, and Other Complex Attributes for more information.
Uploading Your CSV File
After you’ve made your desired updates in the CSV file and saved your changes, navigate to Products › Import in the control panel. Click Choose file to select the updated CSV file from your computer, or select Use a file already on the server to import a CSV file previously added to the import_files folder of WebDAV. This is recommended if you are performing an import with a larger or complex catalog.

Under Import Options, select your preferred import settings.
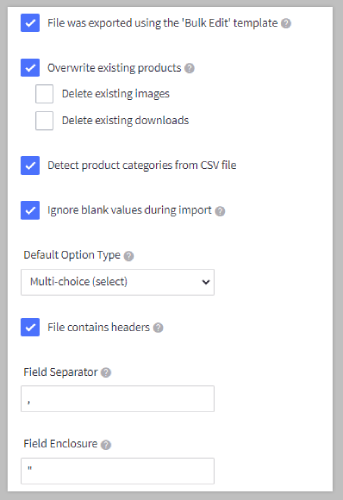
Be careful when importing products. The options for Delete existing images and Delete existing downloads should not be enabled. These settings can delete your existing product images and digital product files. As such, these settings should only be enabled during very specific product import situations. Once deleted, there is no way to recover these files from the BigCommerce control panel. We recommend keeping a local backup of your files or using a backup-and-restore app like Rewind for automatic backups.
- File was exported using the 'Bulk Edit' template — If you exported your file using the Bulk Edit template, or are using our sample CSV, check this box to preselect the rest of the Import Options settings and bypass the Link Import Fields step.
- If you used a custom export template with column names that differ from those listed in the table of supported fields, checking this box will preselect the correct Import Options settings, but you may need to manually match your CSV columns in the Link Import Fields step.
- Overwrite existing products — If checked, your products will be updated upon import. This is checked by default if you selected File was exported using the 'Bulk Edit' template. In order to apply your product edits, this must be checked.
- Delete existing images and Delete existing downloads — These will delete all of the product images and digital product files referenced in your CSV file. Once images and files are deleted, there is no way to recover them from BigCommerce. Enabling this setting is not recommended for most import cases.
- Detect product categories from CSV file — Enable this if you want the import to auto-detect category names. If you neglected to fill in the Category field in your CSV, uncheck this box to view a list of existing categories, and select the category you want your products to be assigned to.
- Ignore blank values during import — Unchecking this setting will delete the data associated with any blank field in your import file. We strongly recommend keeping this setting enabled when importing existing products.
- For example, if you left a product’s description blank and unchecked this setting, the product’s description would be deleted from your store without any alert.
- Default Option Type — This is used if you’re trying to create options via import and you haven't specified the option type correctly in the file. It will allow you to select a single type of option to use, but we recommend specifying the option type in your CSV file.
You can typically leave the following settings alone. They are used if you are uploading a spreadsheet and need to specify the import settings.
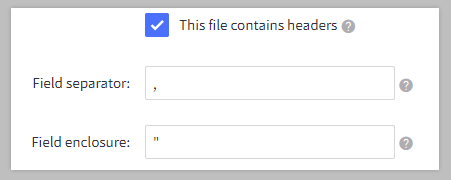
- File contains headers — Does the file contain column headings? This setting is enabled by default.
- Field Separator — By default, the Import/Export tool uses commas (,) as a field separator. If you’ve created a custom export template that uses a different separator character, enter it here.
- Field Enclosure — This character is used to tie phrases together (such as "Socks and Shoes"). By default, the Import/Export tool uses quotation marks (" ") as a field enclosure. If you’ve created a custom export template that uses a different enclosure character, enter it here.
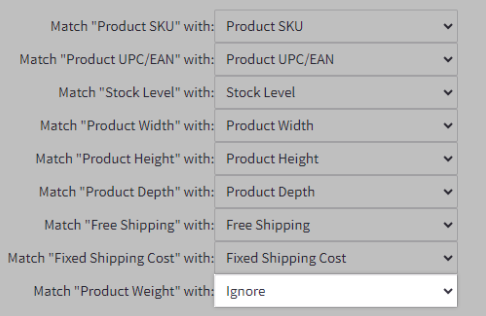
After configuring the Import Options settings, click Next to proceed to the Link Import Fields page. From here, you can confirm that each product field is matched with the correct column in your CSV file. This is especially important if you created a custom export template that wasn’t copied from the Bulk Edit template. Select the appropriate column name from the drop-down menu of each field, or leave it as Ignore to omit data for that field.
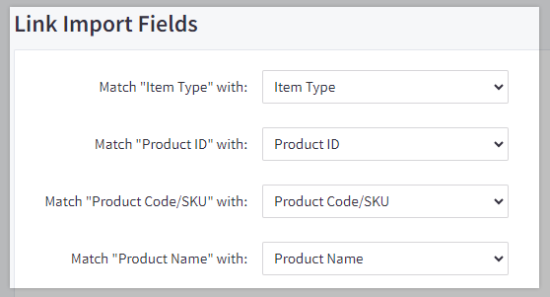
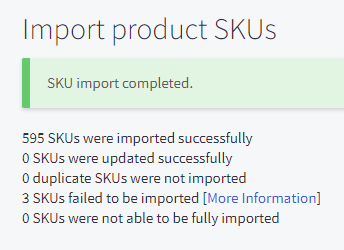
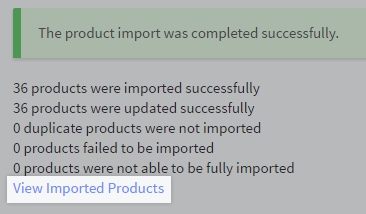
Click Next when done, and then click Start Import to import your CSV file. When the import is complete, you will see a summary of the products that were imported. To see the updates to your products and make additional edits in the control panel, click View Imported Products.
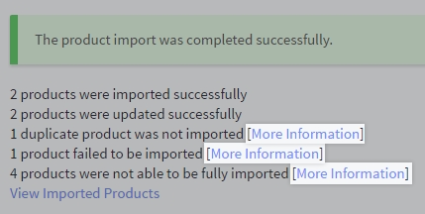
If any products failed to import, or if some of the attributes could not import successfully, a More Information link is included, which provides a report of all import errors. Make any necessary corrections in your CSV file and re-import it into your store.
Importing Product SKUs
If you want to make stock updates or adjust catalog shipping information, you can export a CSV file of product and variant SKUs from your control panel. This includes limited fields by default, such as Stock Level and Fixed Shipping Cost, without needing to create a custom export template.
Pro Tip! If you regularly receive product inventory data from an external spreadsheet, you can transfer the stock levels to your CSV export file by using your spreadsheet program’s lookup tool, such as Excel’s VLOOKUP function, to transfer stock levels from one spreadsheet to another.
We recommend using the Product SKU column for your lookup values, as they will be an exact match in both spreadsheets and ensure proper data transfer.
After exporting SKUs and making your desired updates, navigate to Products › Import Product SKUs in your control panel. Upload the product SKU export file from your computer, or select Use a file already on the server to import a CSV file previously added to the import_files folder of WebDAV.

Configure your import settings, such as whether or not your CSV file contains headers, and which field separator and enclosure characters are used. If you used the built-in SKU Inventory Management template to export your SKUs, you can use the default settings. Click Next when you’re ready.
As with importing other product information, you will be prompted to confirm that each field is matched with the correct column in your CSV file. To exclude a field from the import, select Ignore from the drop-down menu.
Click Start import to begin uploading your SKU updates. Once the import is complete, you’ll see a summary of the successful updates, as well as a report of any errors that occurred.
