Whether you're creating new products from scratch or using a CSV file from a distributor, importing is the fastest way to add new products to your store. To import new products, you will need to list their details in a CSV file.
Need an example? You can use our sample template to get started. Feel free to leave out any columns that you don't need. As long as you have the required fields listed below, the file will import successfully.
Note that the following actions are not supported when creating products via CSV import:
- Certain product attributes, such as videos and bulk pricing rules, cannot be imported. See Supported Product Fields for a complete list of supported attributes.
When creating options via CSV import, the following actions are not supported:
- Adding sale or retail (MSRP) pricing
- Creating product modifiers
- Assigning shared variant or modifier options
Requirements and Limitations
In order to format your products for import, you'll need access to a spreadsheet program that supports either CSV or XML files such as Excel, Numbers, or Google Sheets.
The Numbers app uses semicolons (;) its default field separator (delimiter). To prevent import errors, set semicolons as your field separators when uploading your CSV file, or use a different spreadsheet program.
To import new products to your store, you must have the following permissions enabled on your user account:
- Manage Products
- Import Catalog Entities
File Formatting Requirements
- The file size limit for uploaded CSV files is 20 MB.
- You must include the following fields in your CSV file to create new products:
- Product Name
- Category (the field must be included, but the values can be left blank)
- You must leave the Product ID field blank for new products.
In addition to the considerations listed above, see the list below for requirements specific to importing variants, images, and digital files.
We will cover how to import products with these attributes in the following chapter.
Variant Requirements
These requirements are for importing variants on the Products v3 experience. If your store uses the v2 experience, see Importing Product Options (v2).
- Product variant rows must be created directly under the corresponding base product row in order to successfully create variants via import.
- In addition to the fields required for importing base products, you must include the following fields when creating product variants via CSV import:
- Item Type
- Product Name
- Product Code/SKU
- You must leave the Product ID fields blank when creating new variants.
- Product variants are arranged in SKU and Rule Item Types. Each Item Type supports the following variant attributes:
| Item Type | Supported Attributes |
|---|---|
| SKU |
|
| Rule |
|
- To prevent import errors, you must delete the Option Set and Option Set Align fields from your CSV file before importing, or create a custom export template that excludes them.
- If a single variant has multiple options, separate them in the Product Name column with a comma when formatting. For example, for a variant that is small size and blue color, the Product Name column would look like [RB]Size=Small,[CS]Color=Blue:#0000FF.
- Swatch options require a color hex code for colors and a URL for patterns.
- Image files for pattern type swatches should be uploaded using WebDAV to the product_images/import folder. The file name and URL in the CSV must match exactly.
- The maximum file size for swatch images is 8 MB.
- Each product can have a maximum of 600 variants.
Image Requirements
- The maximum file size for product and variant images is 8 MB.
- In addition to the fields required for importing base products, you must include the Product Image File field when adding product images via CSV import.
- You must leave the Product Image ID fields blank when creating new images.
- Image URLs must link to a file that is online and publicly accessible. Supported file types are JPEG/JPG, GIF, WebP, and PNG.
- Non-HTTP/HTTPS image URLs are not supported.
- Use a full image URL or the file name of an image previously uploaded into the product_images/import folder of WebDAV.
- If you've created a subfolder in product_images/import and added images to it, you must include that folder's subdirectory with the file name (like folder_name/image.png).
- Image file names are restricted to a-z, 0-9, - and _. They cannot contain any spaces or special characters.
- Image file names and URLs can have a maximum length of 1,024 characters.
- The optimal size for your product images is 1280 x 1280 pixels. Other product images (like thumbnails) will be created from the original image you upload.
- A base product can have a maximum of 1,000 images.
- Only one image can be added per variant.
Digital File Requirements
- In addition to the fields required for importing base products, you must include the Product File field when adding digital files via CSV import.
- If you’re importing digital files from WebDAV, you must add them to the product_downloads/import folder, and you must use the file name and extension in the Product File field, such as filename.pdf.
- If you’re importing digital files with a URL, the file you link to must be publicly accessible.
- Non-HTTP/HTTPS file URLs are not supported.
- The maximum size for digital products is 512 MB.
Category Requirements
- Use semicolons (;) to separate the different categories that a product is assigned to.
- Use forward slashes (/) to denote a category-subcategory relationship (like Parent Category/Subcategory).
- A product can be assigned to a maximum of 1,000 categories.
- Your store can have a maximum of 16,000 categories.
- A category name can have a maximum of 50 characters.
Creating a New Product via Import
Before you upload your catalog for the first time, we recommend importing a single, simple product without variants or images. This allows you to get acquainted with the import workflow and understand how import fields correspond to your product’s attributes, so that you’re less likely to run into issues when you upload multiple products in the future.
The import process consists of formatting your product information in the CSV file, and then uploading the file to your control panel. In the sections below, we’ll go over the steps involved and include helpful considerations for your first import.
Formatting Your Product Information
Obtain a basic CSV file by downloading our sample template, or by exporting the example products in your control panel. If you want to reduce the amount of data you are managing in your first import, you can remove any non-required fields that you don’t want to fill out for your product, or you can create an export template that only includes your desired product fields.
Open the CSV file in your preferred spreadsheet program. In a row underneath the sample product, add the information for your first product in the relevant fields, making sure that you’ve included the minimum required product attributes. You can find information on all importable attributes and how to format them in Supported Product Fields, but we’ve included considerations for several commonly-used fields in the list below.

- Item Type — This should be “Product”, rather than “SKU” or “Rule”.
- Product ID — Leave this field blank when creating new products.
- Product Name — This field is required for creating new products. Product names must be unique.
- Product Type — Enter P for physical products and D for digital products. If left blank, this will automatically assign the product as physical.
- Product Code/SKU — Like Product Name, each SKU must be unique.
- Brand Name — Enter an existing brand name from your store, or enter a new brand name to create it upon import. Note that additional brand information, such as brand images and metadata, must be added by editing the brand in the control panel.
- Product Description — If you’re not familiar with HTML formatting, you can enter your product description as plain text and then customize the description in your control panel after importing.
- Price — Don’t include any currency symbols in this field. Product prices are automatically imported in your store’s default currency. If left blank, the product will have a price of 0.
- Weight — Don’t include units, as these are automatically applied by your store’s physical dimension settings. This is also true for the Width, Height, and Depth fields. If left blank, the product will have a weight of 0.
- Category — This column must be included in your CSV file, but it can be left blank.
- You can assign products to existing categories or subcategories, or create new categories via import. See Importing Categories for more information.
- Product URL — Enter your URL in this format: /relative-url/. If left blank, the product URL will be automatically generated using the selected format in your URL structure settings.
If you used the sample template, we recommend deleting the example product before saving your changes in order to avoid creating an unwanted product during import.
Uploading Your CSV File
After adding your product data to the CSV file, navigate to Products › Import. Click Choose file to select your CSV file from your computer, or select Use a file already on the server to import a CSV file added to the import_files folder of WebDAV. While importing from WebDAV increases import stability for CSV files that contain large amounts of data, it is not necessary for importing your first product.

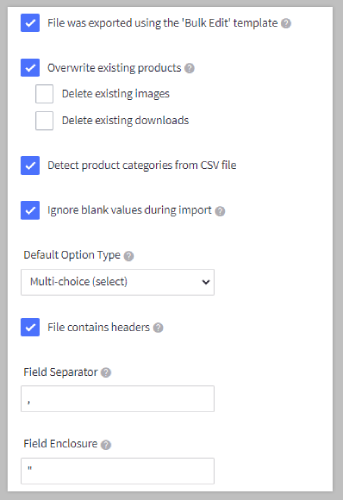
Under Import Options, select your preferred import settings.

- File was exported using the 'Bulk Edit' template — If you exported your file using the Bulk Edit template, or are using our sample CSV, check this box to preselect the rest of the Import Options settings and bypass the Link Import Fields step.
- If you used a custom export template with column names that differ from those listed in the table of supported fields, checking this box will preselect the correct Import Options settings, but you may need to manually match your CSV columns in the Link Import Fields step.
- Overwrite existing products — If checked, your products will be updated upon import. This is checked by default if you selected File was exported using the 'Bulk Edit' template, but it is not necessary if your CSV file only contains new products.
- Delete existing images and Delete existing downloads — These will delete all of your product images and digital product files. Once they are deleted, there is no way to recover them from BigCommerce. Enabling this setting is not recommended for most import cases.
- Detect product categories from CSV file — Enable this if you want the import to auto-detect category names. If you neglected to fill in the Category field in your CSV, uncheck this box to view a list of existing categories, and select the category you want your products to be assigned to.
- Ignore blank values during import — Unchecking this setting will delete the data associated with any blank field in your import file. This setting won’t affect your catalog if you are only importing new products, but we strongly recommend keeping this setting enabled if your CSV file contains existing products.
- For example, if you left an existing product’s description blank and unchecked this setting, the product’s description would be deleted from your store without any alert.
- Default Option Type — This is used if you’re trying to create options via import and you haven't specified the option type correctly in the file. It will allow you to select a single type of option to use, but we recommend specifying the option type in your CSV file.
You can typically leave the following settings alone. They are used if you are uploading a spreadsheet with a specific file structure or field formatting.
- File contains headers — The file contains column headings at the top of the file. This setting is enabled by default.
- Field Separator — The character used to separate fields. By default, the Import/Export tool uses commas (,) as a field separator.
- Field Enclosure — The character used to tie phrases together, such as "Socks and Shoes". By default, the Import/Export tool uses quotation marks (" ") as a field enclosure.
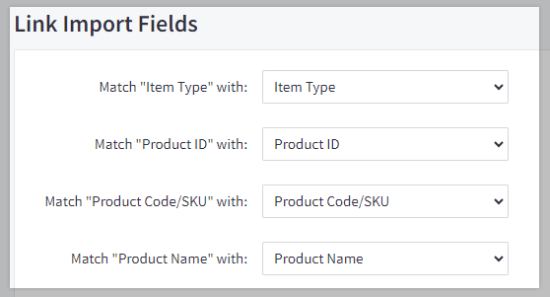
After configuring the Import Options settings, click Next to proceed to the Link Import Fields page. From here, you can confirm that each product field is matched with the correct column in your CSV file.

If you used the sample CSV and selected File was exported using the 'Bulk Edit' template, all columns in the file are matched by default. If you used a custom export template to create your CSV file, the Import/Export tool sets any field without a matching column name to Ignore. Select the appropriate column name from the drop-down menu of each field, or leave it as Ignore to omit data for that field.

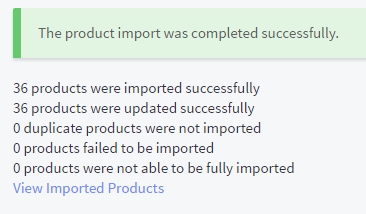
Click Next when done, and then click Start Import to import your CSV file. When the import is complete, you will see a summary of the products that were imported. To see the products that were added to your catalog and make additional edits in the control panel, click View Imported Products.

If your product failed to import, or if some of its attributes could not import successfully, a More Information link is included, which provides a report of all import errors.

If your product failed to import entirely, resolve any issues from the More Information error report in your CSV file and restart the import process.
If some of the product’s attributes failed to import, export the product from your control panel and make any necessary corrections, or delete the product in the control panel and re-import it from your original CSV file after resolving the errors. Re-importing the original file without deleting the product will cause import errors since the product already exists in your catalog.
Now that you’ve imported your first product, you can repeat these steps to import additional simple products to your store. In the next chapter, we’ll discuss how to import products with complex attributes, such as variants or images, and provide considerations for uploading your entire catalog to BigCommerce.


