Updating products via CSV import is a common way to adjust inventory, revise product details, and add products to new channels. Our Import/Export tool makes it easy to adjust your product attributes in bulk and upload the changes to your store.
After the requirements and steps below, we’ve also included various use cases for using Product Import/Export to manage your catalog.
- Updating product inventory
- Adding sale pricing
- Moving products to a new category
- Changing product images
- Transferring SEO data
Please note that the modern Import/Export tool cannot be used for the following scenarios:
- Adding, editing, or removing digital product files
- Importing images from a local file
- The following actions when updating variants via import:
- Adding new variants to a product with existing variants
- Removing existing variants from a product
- Changing the types, names, or values of existing variant options in the Options column
- Adding, updating, or removing modifiers
Below, we’ve listed the general requirements for import, as well as special considerations for various product attributes.
Requirements and Limitations
While importing existing products shares many of the requirements as creating new products via import, there are some differences. We’ve included a complete list of requirements below.
Importing new and existing products in the same CSV file? In order to ensure that your import is successful, you must meet both sets of requirements.
- This Import/Export experience is only available for stores using v3 Add/Edit Product experience.
- If your store is using the v2 experience, see Importing and Exporting Products (v2).
- To import existing products, you will need the following permissions enabled on your user account:
- Manage Products
- Import Catalog Entities
File Formatting Requirements
- You must use a CSV (comma separated value) file type for import. Other spreadsheet file formats, such as XML, are not supported.
- Your CSV file must contain the following columns:
- Item
- ID
- At least one other column
- A product’s ID must be included in the ID field in order for product updates to be imported successfully.
- Variant, Image, or Video rows must be located directly under the Product row they correspond to in order to import properly.
- The maximum CSV file size that can be imported is 20 MB. You can import up to 10,000 products without performance being affected.
In addition to the requirements above, there are also specific requirements for updating complex attributes like variants and images in your CSV file. As with base products, if you are creating new attributes and updating existing ones in the same CSV file, you must meet both the "creating" and "updating" requirements.
Variant Requirements
- The following variant fields can be updated via CSV import:
|
|
- Each variant SKU must be unique.
- A variant’s ID must be included in the ID field.
Image Requirements
- The maximum file size for product images is 8 MB.
- The optimal size for your product images is 1280 x 1280 pixels. Other product images (like thumbnails) will be created from the original image you upload.
- Image file types must be JPEG/JPG, GIF, WebP, or PNG. They cannot be TIFF, BMP, or PDF file formats.
- Images must be hosted (not stored locally) and have a referenceable URL.The image URL can have a maximum of 1,024 characters and must be "HTTP" or "HTTPS".
- If you are hosting your images in WebDAV, you must use the full URL path, not the WebDAV file name.
- An image’s ID must be included in the ID field in order for image updates to be imported successfully.
Video Requirements
- Product videos must be hosted on YouTube so that a YouTube ID can be referenced in the CSV file.
- A video’s ID must be included in the ID field in order for video updates to be imported successfully.
Custom Field Requirements
- Each product can have a maximum of 200 custom fields.
- Custom field names and values each have a maximum character limit of 250.
- The format for existing custom fields looks like this: {"id":#,"name":"custom field name","value":"custom field value"}.
- Example: [{"id:"123,"name":"Color","value":"Blue"}]
- The ID attribute for existing custom fields must not have quotes around it, unlike the name and value attributes.
- You must use straight quotes (" ") instead of curly quotes (“ ”) to wrap your custom field elements.
- If your spreadsheet program automatically converts straight quotes to smart quotes, you will need to update your program’s preferences to use straight quotes by default.
- When adding quotation marks (" ") to custom field values, you must use the HTML character code (") in order to prevent import errors. All other special characters can be entered normally.
- Example: [{"id:"123,"name":"Color","value":""Blue""}]
- Newline characters are not supported in custom fields.
- A custom field’s ID must be included.
Importing Product Updates
Similar to importing new products, updating existing products and their complex attributes via import involves editing your product information in the CSV file and uploading it to your control panel. See the sections below for instructions and helpful considerations.
Editing Your Product Information
To get started, export your desired products to a CSV file and open it in your preferred spreadsheet program. Make a backup copy of your file, in case you need to revert any product data.
The CSV template includes all exportable fields by default, but you can remove any information columns you don’t need as long as your file still meets the import requirements. For instance, you can create an inventory spreadsheet with the Item, ID, Name, Current Stock, and Low Stock fields to quickly update your product stock levels. See Common Use Cases for other examples of how you can manage your catalog via CSV import.
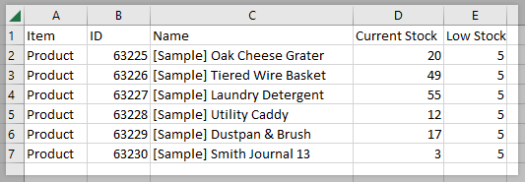
While editing your products in the CSV file, make sure that you are using the correct formatting for each field. Formatting issues, such as improper field separators or unsupported special characters, can lead to incorrect or missing product data. See Table of Supported Fields for a complete list of exportable fields and how to format them.
Uploading Your CSV File
After you’ve saved your changes in the CSV file, go to Products › Import in the control panel. Drag and drop your file into the upload field, or click Upload file to select the file on your computer.
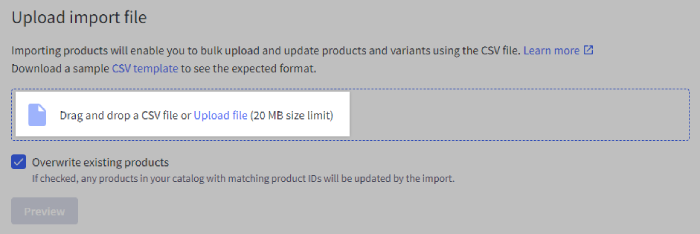
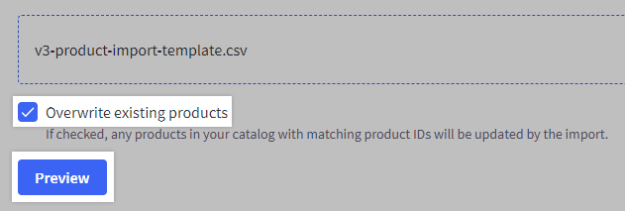
The box next to Overwrite existing products is checked by default. Leave this checked to ensure that the product data in your store’s catalog is updated. Click Preview to proceed to the next step.
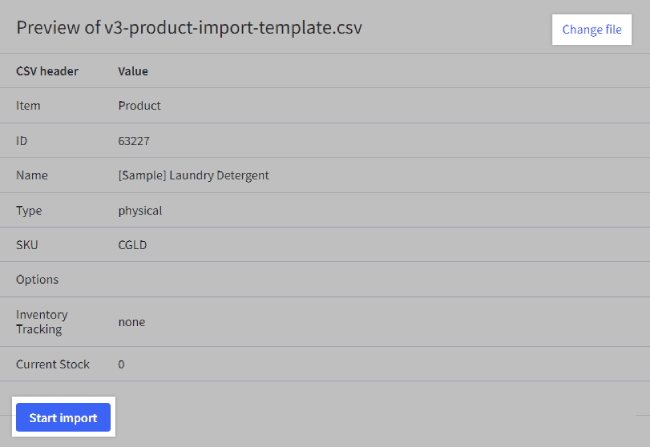
The Preview page displays all fields in the CSV file and the values entered in the first product line. Review your product’s details, and click Change file to return to the Upload page if you notice any issues. If everything looks correct, click Start import.
During import, you will see a progress bar that displays how many products have been imported so far. This will complete quickly when importing your first product, but you can navigate to other areas of the product during larger imports and it will continue in the background.

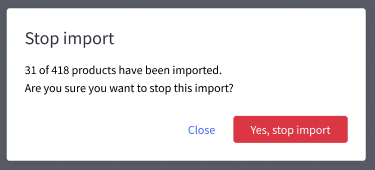
If you need to stop the import for any reason, click Stop Import. On the popup, click Yes, stop import to confirm, or Close to continue with the import.
Upon completion, you’ll see a summary of your import. This will indicate whether your products imported successfully or failed to import, and includes a list of import errors if any occurred. The import summary remains in Products › Import until you begin your next import so that you can revisit it, if necessary.
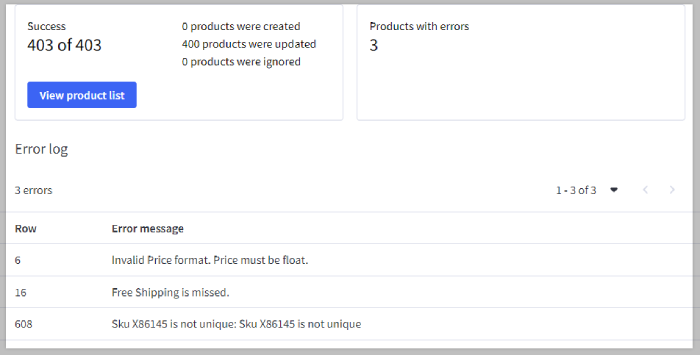
If your product import encountered any errors, adjust the information in your CSV file based on the error messages you received, then click Start new import to import the updated file. Otherwise, you can click View product list to access the newly-created products in the control panel and make additional edits, if desired.
Common Use Cases
Whether you’re making edits to a handful of products or updating your entire catalog, CSV import is the most efficient way to make changes in bulk. In the list below, we’ve included tips on how to configure your CSV file to easily handle several common catalog tasks.
- Updating product inventory
- Adding sale pricing
- Moving products to a new category
- Changing product images
- Transferring SEO data
Updating Product Inventory
Performing regular inventory updates can be difficult with larger catalogs. However, you can modify your CSV file to streamline the process and edit product stock in bulk.
Need to manage stock across multiple locations? You can use the inventory template that is specifically designed for this purpose. See Importing and Exporting Multi-Location Inventory for more information.
After exporting your desired products, open the CSV file in your preferred spreadsheet program and remove any columns you don’t need. We recommend keeping the following columns to ensure a successful import and for easy product identification:
- ID
- Item
- Name
- SKU (helpful for updating variant stock levels, or if you receive an inventory spreadsheet from a supplier or distributor)
- Inventory Tracking (helpful to note which inventory tracking method each product uses)
- Current Stock
- Low Stock

From here, you can rearrange the column order to easily cross reference the product’s name or SKU with its corresponding stock level while making your edits.
If you regularly receive product inventory data from an external spreadsheet, you can transfer the stock levels to your CSV export file by using your spreadsheet program’s lookup tool, such as Excel’s VLOOKUP function, to transfer stock levels from one spreadsheet to another. We recommend using SKUs or another product identifier that will have an exact match in both spreadsheets to ensure proper data transfer.
Adding Sale Pricing
While you can add discounts to groups of products in the control panel by using a promotion, you may instead prefer to override the product’s default price by specifying a sale price.
Depending on your theme, this can display a strikethrough on the original price and add a sale badge to your product listing pages, drawing awareness and encouraging conversions.

If you want to quickly add sale pricing to multiple products, export them to a CSV file and remove all columns except for the following:
- ID
- Item
- Name
- SKU (helpful for updating variant pricing)
- Price
- Sale Price

You can now see the SKU, default price, and sale price of each product at a glance. Note that any variants with the same default price as their base product have a blank value in the Price field, and you can leave a variant’s Sale Price field blank if you want it to have the same discounted price as the base product.
If you are adding a blanket discount to multiple products, such as 15% or $5 off, you can use your spreadsheet program’s formula tools to apply the same discount value to each product you select.
When your sale is over, you can update your products by editing the original export file if no other product data has changed.Delete the values in the Sale Price column of the desired products in the CSV, and then re-import it in your store to remove sale pricing from products.
Moving Products to a New Category
There may be times when you need to add or relocate products to a new category. For example you may want to assign products to newly-created categories after importing them from scratch, or restrict access to products by adding them to a hidden category.
To manage category assignment in bulk, export your desired products to a CSV file. In your spreadsheet program, remove any columns you aren’t using. We recommend keeping the following:
- Item
- ID
- Name
- Channels (helpful for confirming which storefront channels your products are available in)
- Categories

Categories are only displayed next to product item rows. Product attribute rows like variants and images inherit the category assignment of the base product, and cannot be assigned to their own categories.
To assign a product to one or more categories in your CSV file, enter the category ID in the Categories field. When adding multiple categories, separate each category ID with a semicolon (;). You can locate a category’s ID in your browser’s address bar when viewing it in the control panel, or you can get a list of all categories and their IDs via the API.

Keep in mind that each of your storefront channels has its own categories. If you assign a product to a category without assigning it to the corresponding storefront, it will not be visible in that storefront. Your default storefront will always have a channel ID of 1, while additional storefront have a system-generated ID located in the storefront's permanent address.
Changing Product Images
If you’ve recently optimized your product images for improved site speed, or addressed image display issues, you may need to replace multiple images in your catalog. Select your desired products for export, then open the CSV file and remove any unwanted columns. We recommend keeping the following:
- Item
- ID
- Name
- SKU (helpful if you’re updating variant images)
- Variant Image URL
- Internal Image URL (Export)
- Image URL (Import)
- Image Description (if you need to update the image’s alt text)
- Image is Thumbnail (if you need to change a product’s default image)
- Image Sort Order (if you need to change the order your images appear on product pages)

When replacing product images, add the full URL path of the new images to the Image URL (Import) fields of the relevant image rows. You do not need to alter the pre-existing images in the Internal Image URL (Export) field. If your product images are hosted in WebDAV, make sure that you copy the URL that does not contain /dav.

If you’ve added a URL to the Image URL (Import) field, leaving the image’s ID field blank will cause a new image to be added to the product instead of updating the existing image.
If you are replacing a variant image, paste the new image URL over the previous URL in the Variant Image URL field in the variant row. Keep in mind that each variant can have only one image.
Transferring SEO Data
If you are migrating from a different platform, it’s important to include product SEO data to minimize the impact of the migration. Additionally, you may want to update your SEO fields after receiving SEO coaching.
After exporting your products, open the CSV file in your preferred spreadsheet program and remove any fields you aren’t editing. The following fields are helpful for managing product SEO:
- Item
- ID
- Name
- SKU (helpful for identifying variants in the CSV file)
- Description
- Page Title
- Product URL
- Meta Description
- Search Keywords
- Meta Keywords
- Image Description
- Video Title
- Video Description

While editing SEO fields in your CSV file, refer to our Table of Supported Fields to ensure that they meet their respective character limits and formatting requirements. If you are updating your product description, you can replace the existing content with plain text or HTML. If you are editing HTML, it can be helpful to make your changes in a plain text editor such as Notepad or TextEdit.
To learn more about adding SEO data to product pages and other areas of your storefront, see SEO Fields. You can also refer to our Guide to SEO for help with crafting SEO-friendly content.


