You can group products together using a category to make them easier to find and browse for shoppers.
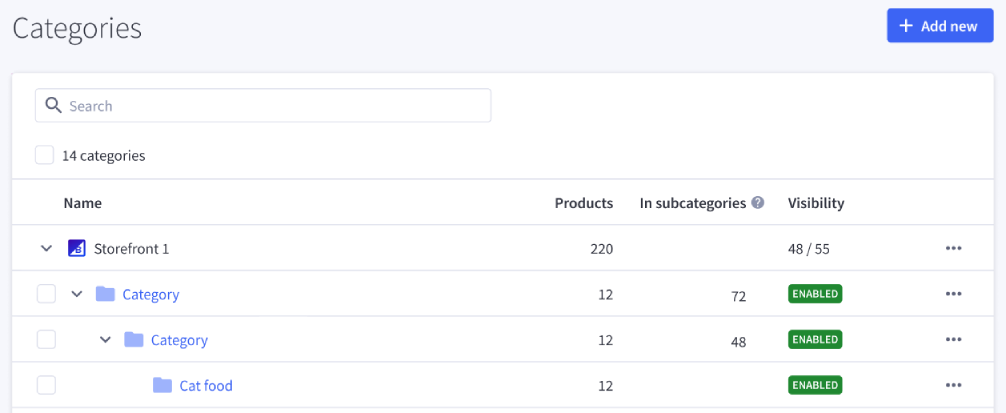
Go to Products › Product Categories to create, organize, and manage your store's categories.
How Categories Work
A product can be assigned to multiple categories, and categories can be based on the attributes that matter the most to your customers, such as:
- Mens, Womens, and Kids categories for clothing/apparel
- Road and Mountain categories for bicycles
- Size, Color, or other product traits
- a Sale category for discounted items
Categories can only be assigned to one storefront at a time, but multiple storefronts may have the same category name and URL path. For example, cats.com/toys and dogs.com/toys.
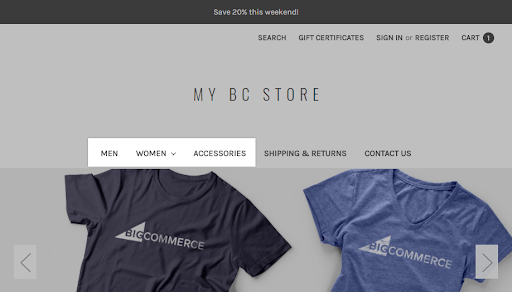
The way categories appear on your storefront depends on your store’s theme. For example, this is how categories look on a storefront using the default Cornerstone theme:
Requirements
- To view categories, the Manage Channels and Manage Categories permissions must be enabled on your user account.
- To manage categories, the Create Categories, Edit Categories, and Delete Categories permissions must be enabled on your user account.
- Additional user permissions, such as Manage Products, may need to be enabled for full functionality of the category manager.
Managing Categories
You can use the category list to rearrange categories, see which products are assigned to them, and update their visibility status.
If you have several categories, use the search bar to see their assigned storefront and quickly locate them in the list.

Click on a storefront name to expand it and see the categories assigned to it. If you have a single storefront, you will find the categories expanded by default.
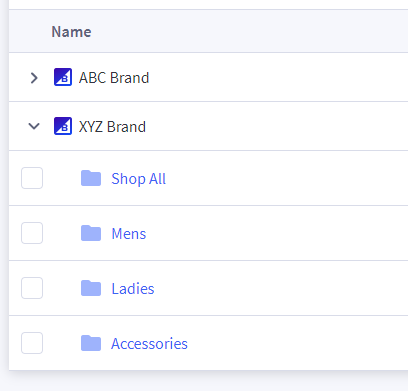
- To change the order of categories, hover your mouse over the category row, then click and drag the category up or down. Drag right to "nest" a category under another to make it a subcategory. Drag left to move a subcategory higher up its category tree or to “un-nest” and place it back as a top level category.
- To view the products assigned to a particular category, click ⋯ next to the category and select View products.
- To change the visibility of a category, click on the action menu (⋯), then select Enable visibility or Disable visibility, depending on the category’s current visibility status. When turned off, the category is removed from the storefront menu and cannot be accessed. Note that products in non-visible categories can still appear in other places like search results, featured products, and the New Products panel.
- You can see the number of products assigned to each category, as well as products in any subcategories. Note that the “In subcategories” total does not include products from the parent category.
- Clicking on ⋯ to the right of a category allows you to take the following actions:
- Edit settings
- Create subcategory
- Select all subcategories
- Disable visibility
- View products
- Duplicate
- View on storefront
- View in Page Builder
- Delete
Bulk Editing Categories
You can update or change the attributes of several categories at once. Check the box next to one or more categories, or enable the checkbox at the top of the page to select all categories. Note that only all visible categories will be selected when using bulk selection.
The following category actions can be taken in bulk within the control panel:
- Duplicate
- Move to
- Enable visibility
- Disable visibility
- Delete
Use Move to for moving existing categories into a new position in your store’s category organization. After clicking Move to, type in the category name or open the category tree to select an existing category, or create a new category.
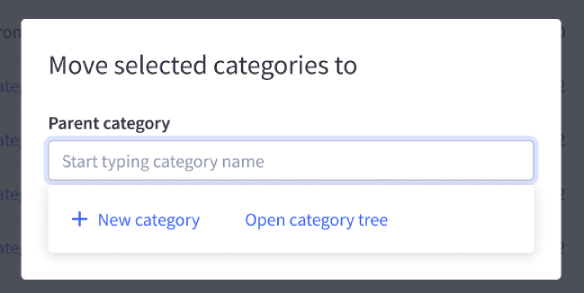
When creating a new category, enter the category name and select a parent category, or leave it blank to add the category to the top category of your storefront. The storefront/channel field will be grayed out. Click the checkbox to enable visibility on the storefront.
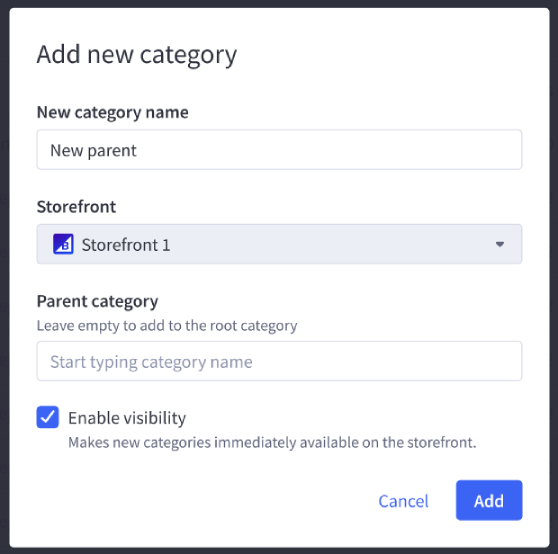
Once the category is created or selected, click Add or Move.
Creating Categories
The steps below show you how to create categories in the control panel. You can also create a category when adding or editing a product.
Go to Products › Product Categories and click + Add new.

Enter a New category name for your category. If you have more than one storefront, use the Storefront selector to assign this category to a storefront. Specify a Parent category or leave it blank to add the new category to the storefront's root category. If you want the category to be immediately available for shoppers on the storefront, click the checkbox to Enable visibility.
Click Save and edit when you’re done, or Save and add another to save and create additional categories.
Subcategories
A subcategory is a category that is "nested" in another category. Subcategories are sometimes called child categories, and the category they belong to is called the parent category.
There are a few ways to create a subcategory:
- Create a new category or edit an existing category and specify a Parent category.
- From the category list, click ⋯ next to the parent category, then Create sub-category.
Assigning Products to Categories
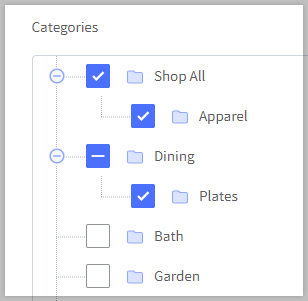
A product can be added to a category through the Add/Edit Product page. Under Categories, select the category or categories you want to assign the product to. Each desired category must be selected individually. Selecting a parent or child category will not affect related categories.
A check next to a category name will indicate that the product is assigned to that category. A dash (—) next to a category name indicates that the product is assigned to a subcategory within that category tree, but not the parent category.
In the example below, a product is assigned to the Shop All, Apparel, and Plates categories and not assigned to the Dining, Bath, or Garden categories.
Assigning Categories from the Product List
Products can also be assigned to categories from the Products page.
Note: You will need to opt in to the updated Product List in order to use this feature.
To assign products to categories, check the box next to one or more products, then click Add to categories. Depending on how wide your screen is, this may be under the ⋯ button. Select which categories you want the product to appear in, then click Save.

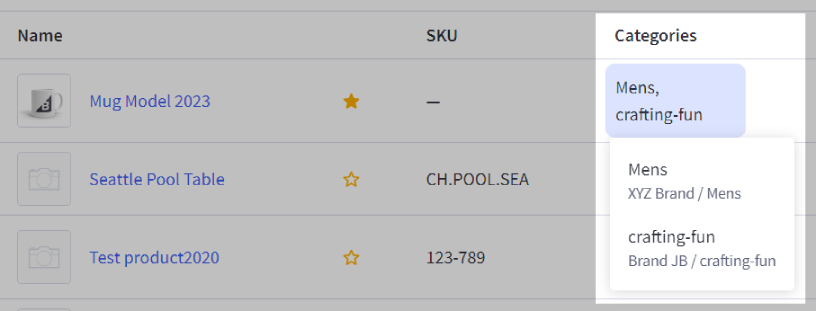
You can quickly view which categories and channels that a product is assigned to from the list. Clicking the categories field for a product will display a breakdown of each category, with its channel and category path on the storefront.
Category Settings
Below are the settings available when creating or editing a category:
- Display name — the category name as it appears in your store (limit of 50 characters)
- URL — the category URL path (defaults to the category name if left blank). The category URL supports alphanumeric characters, as well as the following special characters: . , _ /
- Description — a WYSIWYG content editor that will appear at the top of your category page
- Channel — If you have multiple storefronts, select which storefront this category belongs to. If you only have one storefront, this will be your default storefront and cannot be changed. Note that this field cannot be edited after category creation.
- Parent category — if this will be a subcategory, select the parent category
- Template layout file — the category template file
- Sort order — sets the priority in which the categories are listed; 0 is the default
- Default product sort — set how you want products to be sorted within this category. You can keep the global setting from Settings › General › Display (Category Settings) or set a specific one for this category.
- Category image — select an image to appear on the category page, if supported by your theme
- Supported file types are JPEG/JPG, GIF, PNG, and ICO.
- Maximum image file size is 8 MB.
- Search engine optimization — add your page title, search keywords, meta tag keywords, and meta tag descriptions to maximize your SEO impact
You can navigate to the previous and next category by clicking the arrow buttons. This allows you to quickly update category details without going back to the category manager.

Additional Category Display Settings
Additional category settings can be found in Settings › Display.
Display Settings
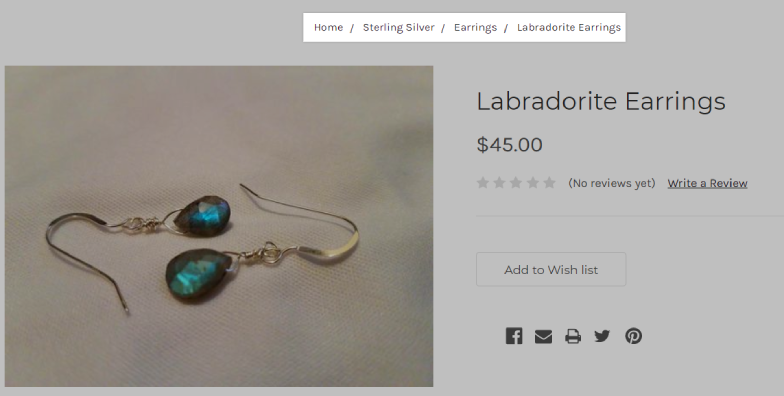
- Product Breadcrumbs — Show the category tree of a particular product as an alternative browsing method for shoppers and to add structure to your store's search results. Select Don't Show to hide breadcrumb links on product pages or Show One Only to display the most recent category tree the product has been added to.
Category Settings
- Category Product List — where products on a category page are fetched from
- Show products from the current category only
- Show products from child categories if the current category is empty
- Show products from the current category and its children
- Default Product Sort — store-wide setting for the order in which products are displayed; can adjust individual categories to a different sort if desired.
- Featured
- Newest Items
- Best Selling
- Alphabetical (A-Z)
- Alphabetical (Z-A)
- Average customer review
- Price (Low to High)
- Price (High to Low)
- Menu Display Depth — controls how many levels deep your categories display in the store. Note that your theme may have additional settings associated with category display depth.
Additional settings, such as products per page for category pages, category display mode, category menu style, and menu display depth are set using Page Builder. If your store is using a legacy Blueprint theme, see Blueprint Themes for more information about these settings.
Deleting Categories
Sometimes you may need to delete categories. Categories can only be deleted from Products › Product Categories.
Check the box to the left of the category or subcategory you wish to delete. Deleting a category will automatically delete its subcategories.
Click the ⋯ button at the top of the list, and select Delete.

Troubleshooting Categories
If one or more categories are not appearing on your storefront when you expect them to be, there can be several potential causes:
- the category is assigned to another storefront/channel
- some customer groups may not be configured correctly or need to be adjusted
- your display settings may not be configured correctly or need to be adjusted
- the category's visibility setting may be disabled
- your product/category database may need to be refreshed
- if you've made changes to an HTML template file, the category panel may have inadvertently been deleted
Check Customer Groups
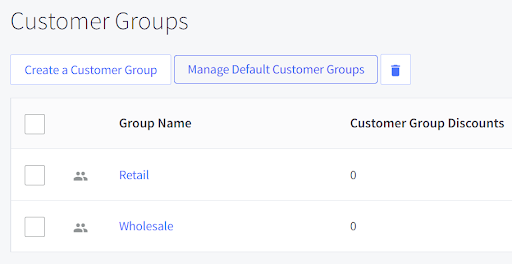
If you use customer groups, click Manage Default Customer Groups, check the group for Guest Customers, and make sure it is set to whichever group's permissions match what you want guests to see (such as Retail or Default).
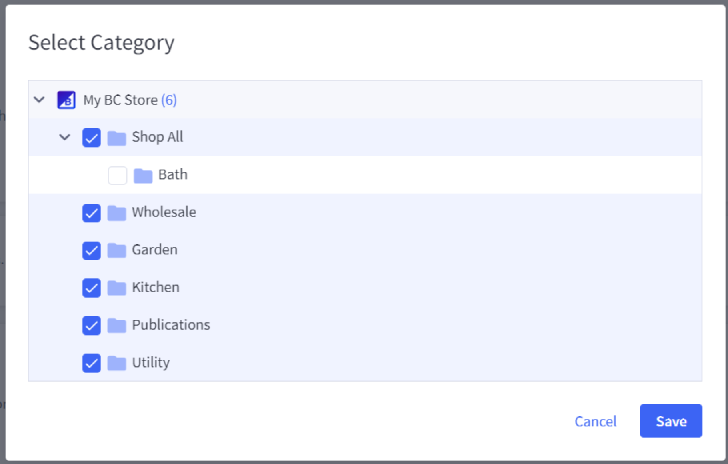
Check the Group access settings for each customer group. If the customer group does not have Group Access checked, make sure that the missing categories and subcategories are checked. Subcategories are not automatically selected when a parent category is selected, so make sure that the subcategories that aren't appearing have been selected.
New categories created after you've configured your Group access settings are not selected by default and will need to be selected manually.
Check Category Visibility
Go to Products › Product Categories.
Locate the categories that aren't appearing. In the case of subcategories, click the › sign to expand the parent categories until you see your category.
Make sure that the category has its Visibility enabled. Note that categories marked as not visible cannot be visited, even by navigating directly to the URL.
Refresh Category List
Sometimes the database caches categories a certain way, which can lead to them not appearing correctly. In this case, toggling the categories can refresh the database and fix the display.
- Click and drag a category up in the category list. You will notice the Category page reload.
- Drag the category back to its original position.
- Refresh your homepage to see if the categories appear. You may need to clear your browser's cache to see the changes reflected.
FAQ
Can I customize the design of each of my category pages?
Yes, you can use Page Builder to customize category pages. In the list of categories, click ⋯ next to the category and select View in Page Builder.
Can I hide categories from customer groups?
Yes. If you're on a Plus plan or higher, you can use Customer Groups to control which customers can see which categories.
Can I assign categories to products in bulk?
Yes, you can:
- edit products in bulk (including assigning categories) in the control panel using the Bulk Edit tool
- assign products to categories from the Product List
- use a CSV import to assign categories to products. If you have multiple storefronts, you’ll use Category ID to do this instead of Category name. See our Modern Product Import/Export guide for more information.
Can I create categories in bulk?
Yes, you can create and manage categories directly using the BigCommerce API.
How can I view the channel ID for a specific category in the control panel?
Navigate to the desired category, and select Edit in the action menu. The URL will show the channel ID for the storefront, as well as the category ID. All categories have a channel ID and a unique category ID assigned when they are created.

In this example, “1” is the channel ID, and “318” is the category ID.
Note that categories are unique to each storefront. As such, multi-storefront stores may have multiple categories with the same name. Categories in single-storefront stores will be assigned to the default storefront channel automatically.
How can I prevent store URL links in category descriptions from converting to variables on my headless store?
If store link URLs are converting to %%GLOBAL_CdnStorePath%% or %%GLOBAL_ShopPathSSL%% on your headless store, contact our Support team for assistance.


