For many businesses, the physical location where you stock inventory is the same as where you ship orders from. However, as your business grows with additional retail locations, warehouses, and temporary pop-ups and trade shows, you will need your storefront and backend to reflect the multi-location nature of your inventory, where product stock may be distributed across various places.
To enable you to manage inventory smoothly across multiple locations, BigCommerce has added location-specific inventory functionality for stores using the new Import/Export experience. By using CSV file importing, you can view and edit stock levels faster and easier than using manual updates in the control panel.
Beta: This feature is currently in beta and may not yet be available for all stores.
Requirements
To use update inventory per location via CSV import/export, your store must meet the following requirements:
- Your store must be using the v3 Add/Edit Product experience.
- Your store must be using the modern Import/Export experience.
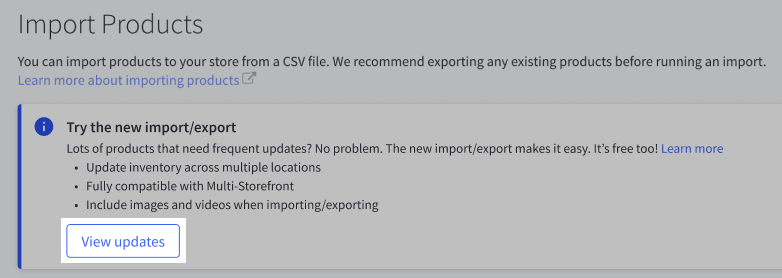
Stores using legacy Import/Export can manually opt in by upgrading to the new Import/Export experience. Click View updates on the banner at the top of the Products › Import page to switch to the new Import/Export experience.
Keep in mind that your store and its catalog must meet the listed requirements for the new Import/Export experience. This includes access to a spreadsheet program that supports CSV files, such as Excel or Google Sheets.
To import and export product stock levels, you will need the following permissions enabled on your user account:
- Manage Products
- Import Products
- Export Products
- View Inventory
- Edit Inventory
For information on the additional user permissions required for creating and managing locations, and managing stock levels and low stock levels per location in the control panel, see our Multi-Location documentation.
Functional Requirements
In case of inventory operations, we tend to use the technical term “line” rather than “product” or “SKU”. One line refers to a specific SKU (product or variant) in a specific location. For example, a CSV file containing 50 products with 5 variants each, with inventory in 12 locations translates into 3,000 lines being processed during importing and exporting (50 x 5 x 12).
A CSV file containing 3,000 lines can also consist of combinations such as:
- 3,000 simple products (i.e. products with no variations) assigned to a single location
- 300 products with 10 variants each, assigned to a single location
- 30 products with 10 variants each, assigned to 10 locations
Import
When importing, the inventory CSV file has a global limit of 20Mb, which is the same as product CSV imports. This is approximately equal to 300K lines, with all supported columns included in the file. You can increase the number of lines in your file by reducing the number of columns included.
Export
The current limit when exporting is 5 million (5,000,000) lines, with all supported columns included in the file. To reduce the number of lines in your export, you can:
- apply filters in the Product List to reduce the quantity of products included in the export
- select individual locations to include in the export file, rather than including all locations
- select which product attributes (columns) to include in the export file, rather than including all columns
Exporting Inventory
Need to export only certain products? You can specify a subset of products for export by selecting them from the catalog list, from advanced search results, or from a specific category. Ensure that the desired products are selected before clicking Bulk Actions and selecting Export to avoid exporting all products.
To export your products using the inventory CSV template, go to Products › Export, and select Inventory from the Data to export dropdown.
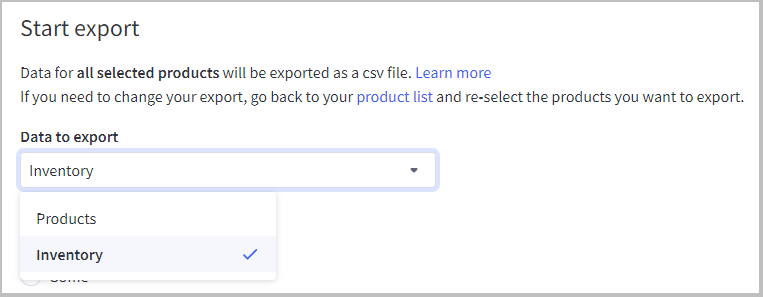
By default, all locations and all product fields included in the inventory template will be selected. To restrict your export to only certain locations, select Some, then click on the dropdown to select the locations you would like to include. If you have many locations and want to exclude a small subset, check the box next to Select all and then uncheck those locations.

The Location ID, Product ID, and Variant ID are always present in the inventory template, but you can select which of following product fields are also present:
- Item
- Name
- SKU
- Current Stock
- Low Stock
- Safety Stock
- Bin Picking Number
- Availability
Deselect any fields you would like to omit or may not actively use in your store, such as Bin Picking Number. Note that this choice will be saved for future exports until you change them. Click Start export when ready.
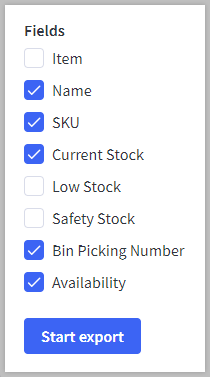
Why is the Start export button grayed out? In order to export your products with the inventory template, you must have at least one of the listed product fields selected for inclusion in the CSV file.
You will see a progress bar, showing the number of products. Click Cancel export if you need to stop the process at any time, then click Yes, cancel export to confirm.

When the export is finished, click on the CSV file name to download the file to your computer. It will have a file name like “inventory_sku_20240109_223012”.
If you would like to do another export, click Start new export.

Editing the CSV File
When you open the exported file, you will see the following fields:
- Location ID — The system-generated location identifier
- Item — The item type will be Product or Variant
- Product ID — The system-generated product identifier
- Variant ID — The system-generated variant identifier
- Name — The name of your product
- SKU — Stock-keeping unit number used for inventory. This field is alphanumeric.
- Current Stock — The quantity of a product or variant available for purchase. Use numbers only.
- Low Stock — When the stock level reaches this quantity, a notification email will be sent to alert you that you are running low in inventory and may wish to restock. Email notifications are only available for the default location. Use numbers only.
- Safety Stock — When the stock level reaches this quantity, the product or variant will become automatically unpurchasable. This helps you to avoid overselling. Use numbers only.
- Availability — Determines whether the product or variant is available at the location. Uses boolean logic (TRUE or FALSE). Using FALSE in this field will lead to the product or variant showing as N/A in the product list and storefront. This can be useful when you want to stock inventory at a location for staging, but not offer it for purchase and pickup.
- Bin Picking Number — The Bin Picking Number (BPN) of your product or variant. If your products are stored in a warehouse, use BPNs to specify where in the warehouse they are located for quicker and more accurate order fulfillment.

Although Name and SKU are included by default in the export template, they cannot be updated via inventory import. To update these product fields, use a product import instead.
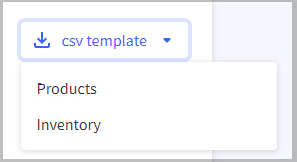
Need an example? Download a copy of our sample inventory template to become familiar with the formatting of location-aware inventory CSV files. Click on the csv template dropdown in the upper right corner of Products › Import and select the data type (Products or Inventory) to download the file directly from the control panel.
Importing Inventory
Once you have updated your exported inventory CSV file, go to Products › Import. If you have previously imported a CSV file into your store, click Start new import.

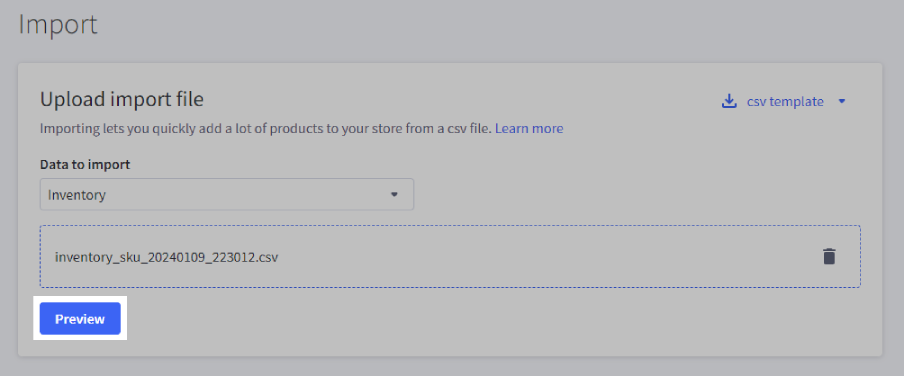
Select Inventory from the Data to Import dropdown.
Note: Unlike product imports, there is no setting to overwrite existing products, as inventory imports will always overwrite existing current stock, low stock, and safety stock values, as well as the bin picking number and availability status, if the necessary product identifiers are present in the CSV file.

Drag and drop your CSV file into the upload field, or click Upload file to select a file on your computer, then click Preview.
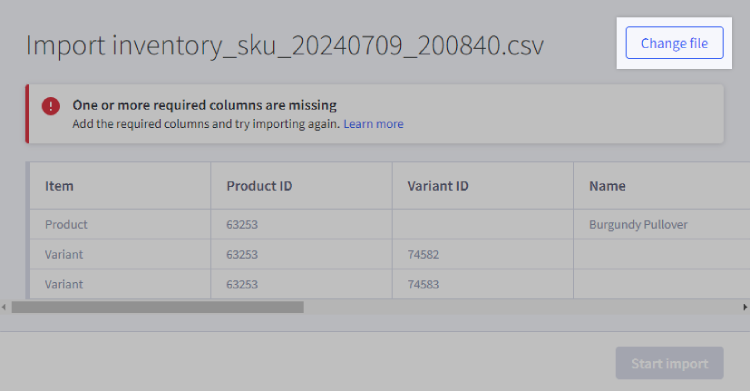
Scroll across as needed and review the CSV headers and values for the first product listed in your CSV file. If the information doesn’t look correct, click Change file to attach an updated file. If one or more of the required columns are missing in the CSV, you will get an error on the preview page which prompts you to add them to your file and try again.
Click Start import when ready.
You will see a progress bar, displaying how many items have been imported. You can leave this screen and the import process will continue in the background.
If you need to stop the import for any reason, click Stop Import. On the popup, click Yes, stop import to confirm, or Close to continue with the import. Note that any products updated before canceling an import will keep their changes - stopping an import does not revert stock levels. See the FAQ for more information.

Once the import is finished, you will see a summary that displays which products had their inventory successfully updated and which ones experienced an error.

If the import encountered any errors, these will be listed below the summary. The error log shows the row where the error was found in the CSV file, along with the error message. This makes it easier for you to identify and fix these issues, then re-import your file.
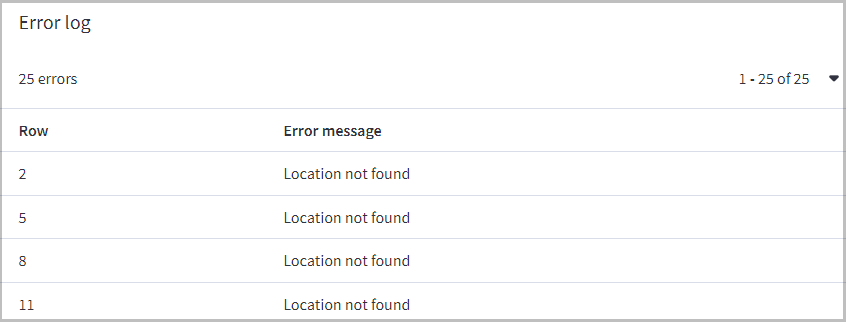
Common import errors include the following:
- Item not found
- Note that Variant ID can be empty for Product type items.
- This occurs when either the SKU or the Product ID and Variant ID are missing or incorrect.
- Item field is empty.
- Current Stock, Low Stock, or Safety Stock not updated due to an inconsistency in inventory tracking mode.
- An example would be product-level stock updates being ignored on a complex product, since inventory for these products is calculated and tracked on the variant level.
- Current Stock, Low Stock, or Safety Stock values are negative.
- Incorrect field format (string, numeral/alphabetic)
FAQ
Can I create custom templates?
No, custom template creation is not supported. However, the fields selected during your previous export will be saved for future exports.
Can I view a list of products with recently adjusted stock levels?
No, there isn’t a custom view or filter that will sort recently imported products by this status. However, comparing the exported inventory file with the imported file should give you this information.
How can I return to the legacy Import/Export experience after manually opting in to the new Import/Export experience to use the inventory template?
You can always return to the legacy experience by navigating to the Products › Export page, then clicking Rollback to previous version. Stores created with the new Import/Export experience already enabled will not see this option.

Is the Name column required for inventory import?
No, it is optional. While product names are very useful for identifying products and variants when manually updating CSV files, it is actually the Product ID and Variant ID fields, or the SKU field if available, that is used for precise identification of items in your catalog. By not including Name data, your file can be processed faster and more reliably.
How do I find Location ID?
You can find the IDs of your store’s locations by navigating to Settings › Locations in the control panel. Each location's ID is listed under the Id column.
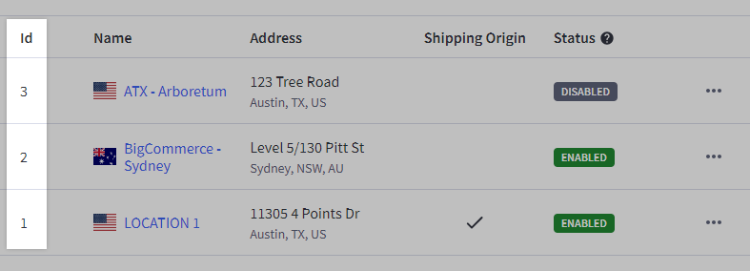
Note that you cannot create locations via CSV import — only assign product stock to existing locations.
Can I cancel an import after it has started?
Yes, an import can be terminated at any point in time, but any products updated before stopping won’t be reverted to their earlier status. Additionally, the cancellation process may take some time to complete, and you may experience more lines impacted than what is indicated in the control panel summary.


