B2B Edition offers a suite of settings to help you manage which features your staff and customers have access to, set up automation for different B2B processes, and customize your B2B storefront experience. All global settings are located in the Settings area of the B2B Edition control panel, while storefront-specific settings are located in the Storefronts area.
Requirements
In order to access and manage settings, your B2B Edition user account must have the following permissions enabled:
- View Settings
- Update Settings
To manage Account Form Fields, you must have the following permissions enabled:
- Account Form Fields
- Update Account Form Fields
To manage Extra Field settings, you must have the following permissions enabled:
- Add Extra Field
- Delete Extra Field
- Update Extra Field
- Get Extra Field List
To manage System users and roles, you must have the following permissions enabled:
- View Sales Staff
- Company/View Sales Staff
- Company/View Company
- Edit Sales Staff
- Edit Company
- View Roles
- View Role
- Edit Role
- Manage Default User Role
- Add New Role
- Delete Role
- View Users
- Add New User
- Update User
- Delete User
To manage Company users and roles, you must have the following permissions enabled:
- View Companies
- View Company Detail
- View Company Users
- Update User
- View Company Users and Roles
- View Users
- View Roles
- Add New Role
- Update Role
- Delete Role
To manage API Account settings, you must have the following permissions enabled:
- View API Accounts
- Add API Account
- Delete API Account
To manage Invoice settings, you must have the following permissions enabled:
- View Settings
- Update Settings
Users with the Store Owner role have all of the above permissions enabled by default. Users with the Administrator role have all except Delete API Account.
In order to customize Buyer Portal text with Translation settings, your CSV file must meet the following requirements:
- The CSV file size limit is 1 MB.
- Each custom value cannot exceed 1,000 characters in length.
- The file must have the same number of columns and the same column headers as the CSV template found in Translation settings.
- The values in the Variable column of the template CSV cannot be altered.
- Custom values cannot contain any code, such as HTML or scripts.
You must have the Buyer Portal experience enabled in your store in order to access the following settings:
Storefront Settings
Storefront settings can be accessed from Storefronts in the B2B Edition control panel, and allow you to enable B2B functionality with multiple native storefronts.

To activate a storefront that has been provisioned with B2B Edition, select Activate B2B from its Action menu. On B2B-enabled storefronts, you can select the following actions:
- Set as default — selects the storefront to be automatically assigned when creating quotes
- Deactivate B2B — disables B2B functionality on the storefront
- View storefront — links to your live storefront

To disable B2B functionality on a storefront, select Deactivate B2B from the Action menu.
Click on a storefront’s name to manage the following settings on the storefront level:
Email template customization options are not located in Storefront settings. To design a storefront-specific email template, use the storefront drop-down list in your Emails settings.
When editing storefront-specific settings, you can check the Use global box to apply “global settings” configured outside of the Storefronts area.

General Settings
General settings can be accessed in Settings › General in the B2B Edition control panel, and cover the following aspects of your store:
- Company management
- Address book management
- Store logo
- Feature management
- Account login / registration
- External SMTP server configuration
Company Management
Company Management settings allow you to set default configurations for a new Company account.
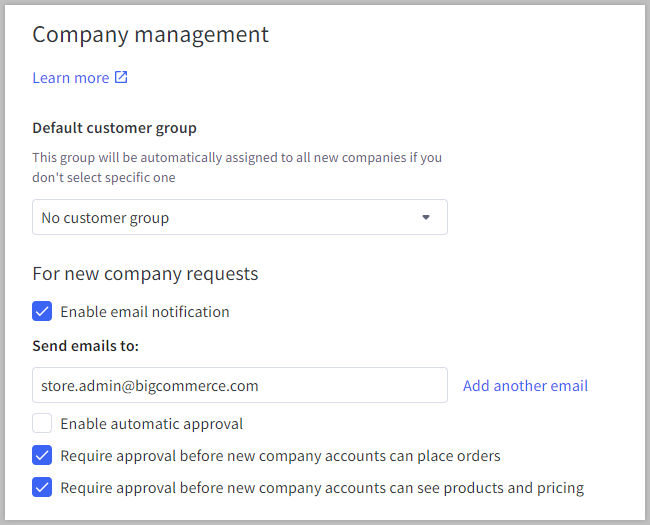
- Default customer group* — assigns the selected customer group to all new Company accounts.
- Enable email notification — notifies you when a customer submits a Company account application form. Once enabled, add one or more email addresses to receive notifications.
- Enable automatic approval — automatically approves Company accounts when an application form is submitted
- Require approval before new company accounts can place orders* — prevents a Company user from placing orders while logged into their storefront account until the Company account has been approved. Note that this setting will be hidden if automatic approval is enabled.
- Require approval before new company accounts can see products and pricing* — prevents a Company user from viewing products while logged into their storefront account until the Company account has been approved. Note that this setting will be hidden if automatic approval is enabled.

- Default payment methods — specifies which payment methods that customers in a newly-created Company account can use.
- Company credit — when checked, you can configure available credit for each Company account
* These settings are only available if you are using the Buyer Portal experience.
All payment methods are unchecked by default in General settings. If you have Enable automatic approval toggled on without enabling any payment methods, new Companies will be unable to complete checkout until you enable default or Company-specific payment methods.
Address Book Management
By default, only Administrator and Store Owner users can edit Company addresses in the B2B Edition control panel. Address Book Management settings define who else is permitted to edit their saved addresses from the storefront. Check the box next to Enable address book management to configure the following settings:

- Allow company users to edit addresses — enables customers with the appropriate permissions to add and edit addresses from the storefront
- Allow super admins to edit addresses — enables Super Admin users to edit the addresses of their assigned Companies from the storefront
Store Logo
By default, your storefront logo is not included on your B2B Edition emails, quotes, and invoices. Drag and drop your logo image or upload it from your computer to add it to your B2B communications. The logo image format must be JPG, GIF, or PNG.

In the Action menu (⋯), you can add a new logo by selecting Change image, or you can remove your existing logo by selecting Delete.
If you have multiple storefronts, you can add a specific logo for each in Storefront settings.
Feature Management
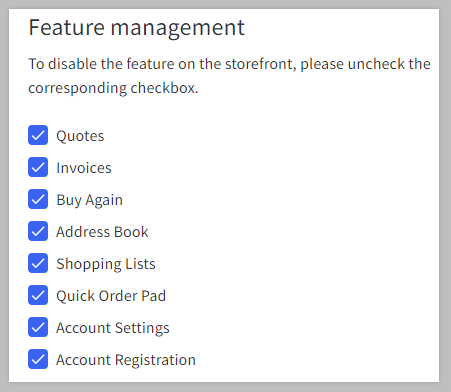
Feature Management settings control which functions are available for your customers in their Company storefront accounts. You can enable or disable the following features:
- Quotes
- Invoices
- Buy Again
- Address Book
- Shopping Lists
- Account Settings
- Account Registration
To learn more about these buyer features, see Buyer Functions.
Account Login / Registration
Account login and registration settings allow you to specify whether customers can register for personal accounts, business accounts, or both from your storefront. Note that changing this setting will not affect existing customer accounts.

External SMTP Server Configuration
By default, emails in B2B Edition are sent from noreply@bundleb2b.com. However, you can connect a third-party email service to assign a different sending email address.
If you want to use a third-party service to send your B2B emails, and they have provided you with SMTP login details, check the box next to Deliver Email Notifications Using External SMTP Server and enter your credentials.
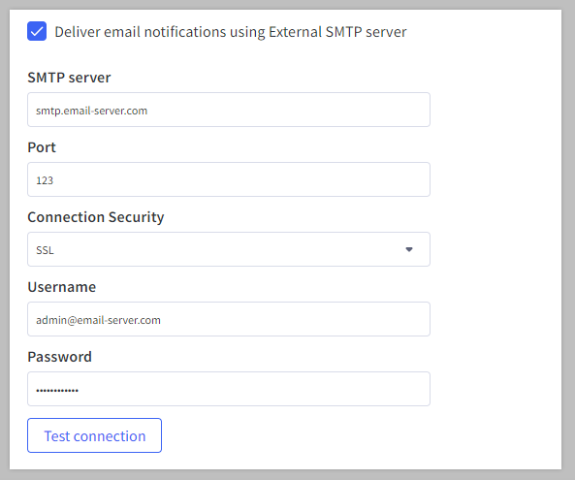
Use Test Connection to confirm that the SMTP server has been successfully connected, then Save your changes.
Buyer Portal Settings
If you’re using B2B Edition’s Buyer Portal experience on your storefront, you can customize its appearance from Settings › Buyer portal in the B2B Edition control panel.
Buyer Portal settings are organized into the following sections:
Using Multi-Storefront? You can manage your Buyer Portal settings for each storefront in your Storefront settings.
Type
By default, your storefront uses the Buyer Portal’s native structure and formatting. If you have developed custom design and functionality for your buyers, you can implement it on your storefront by changing your Buyer portal type to Custom. If you need to return to the native Buyer Portal, select Default.
Make sure that you are ready to deploy your custom Buyer Portal before changing your Buyer Portal type. Depending on your customizations, using the custom Buyer Portal type may override existing Buyer Portal settings in your B2B Edition control panel.

Style
Style settings allow you to customize the color profile of the Buyer Portal to complement the style of your other storefront pages.

- Primary color — defines the color of action buttons in the Buyer Portal, as well as the storefront login page. Use the color picker or enter a hex code to select the button color.
- The action button text color automatically updates based on the selected Primary color to improve readability. You can also use CSS Override settings to set a specific text color.
- Background color — defines the background color in the Buyer Portal. Use the color picker or enter a hex code to select the background color.
Masquerade Button
In addition to the customer-facing elements of the Buyer Portal, you can also change the design of the Masquerade button available to your Super Admin users.

- Color — defines the color of the Masquerade button. Use the color picker or enter a hex code to select the button color.
- Location — specifies where the button is placed in the Buyer Portal. You can select from Bottom right, Bottom left, Top right, and Top left.
- Vertical padding — moves the button away from the top or bottom of the page, depending on the specified location
- Horizontal padding — moves the button away from the left or right of the page, depending on the specified location
- Custom CSS — allows you to add custom styling to the Masquerade button
CSS Override
The CSS Override field allows you to customize the appearance of the Buyer Portal using CSS coding. This provides more control over styling elements like color, font, and sizing in all areas of the Buyer Portal. You can also use CSS to hide elements of the Buyer Portal that you don’t want visible, such as the View Invoice action when viewing B2B orders or the Add to quote area of the draft quote page.
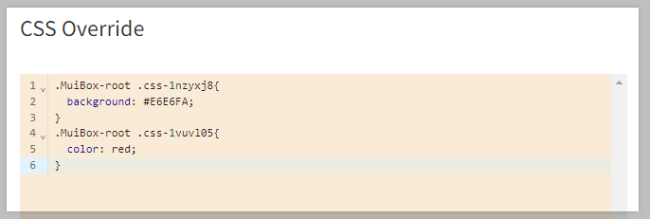
Note that CSS Override can only be used to customize the Buyer Portal. It cannot adjust the styling of B2B features on other areas of your storefront, such as the Add to Quote button on product detail pages or extra fields added to the checkout page.
Login Page Settings
Login Page settings can be accessed from Settings › Login Page in the B2B Edition control panel, and they provide several options for customizing the look and feel of the login page used by B2C and B2B customers.
Using Multi-Storefront? You can create unique login page designs for each of your storefronts by using B2B Edition's Storefront settings.
When designing your login page with these settings, you can see how the different areas of your login page are organized and preview changes to text and colors from the Elements Layout Reference area.
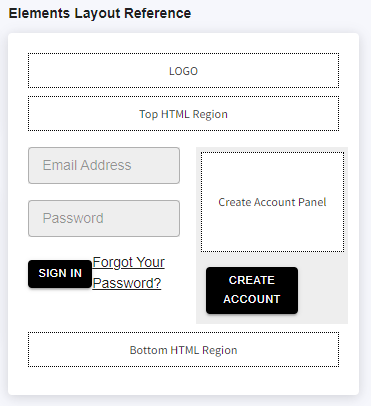
Login Page settings are organized in the following sections:
Display Settings
In Display Settings, you can enable Display Store Logo to add a logo to your sign-in and registration pages. This uses the logo image uploaded in your General or Storefront settings.

In the Login Landing Location drop-down menu, you can select where you want buyers to be taken after logging in to their storefront account. Select The Buyer Portal to direct them to the Buyer Portal, or select The Storefront to return them to the last storefront page they visited before logging in. Unlike other Login Page settings, this is store-wide, not storefront-specific.

This setting does not apply to Super Admin user login. Super Admins are always taken to the Dashboard area of the Buyer Portal after logging in, where they select a Company account to access via Masquerade.
Button Settings
Button settings allow you to style the buttons used by customers to register or log in to their account.
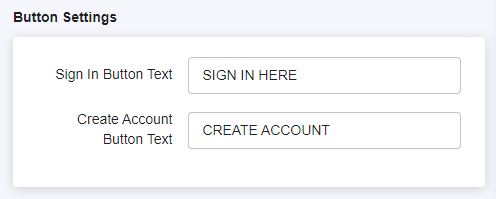
- Sign In Button Text — the text that appears on the button used to log in to an existing account
- Create Account Button Text — the text that appears on the button used to register for a new account
HTML Settings
Here you can edit the HTML of different areas in the login page, allowing you to customize text and layout, link to different areas of your storefront, add images, and more.
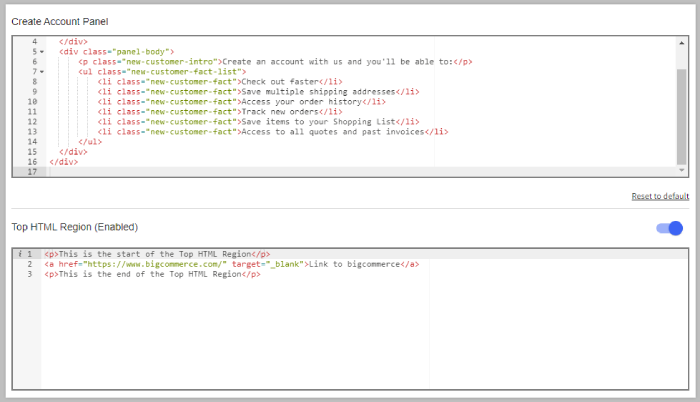
- Create Account Panel — details of the benefits of creating a storefront account. To restore the original content in the panel, click Reset to default.
- Top HTML Region — a custom region that displays content above the sign-in fields and Create Account Panel. Use the toggle switch to enable or disable the region in the login page.
- Bottom HTML Region — a custom region that adds content below the sign-in fields and Create Account Panel. Use the toggle switch to enable or disable the region in the login page.
Quote Settings
Using Multi-Storefront? You can manage quote behavior and design at the storefront level in your Storefront settings.
Quote settings can be accessed from Settings › Quotes in the B2B Edition control panel, and manage the features of B2B quotes in your store:
- Request for quote
- Quote details
- Quote submission response
- Auto-quoting
- Custom shipping
- Quote products unavailable to purchase
- Sync quote to order notes
- Finish quote floating action button
- Add to quote button on out of stock and non-purchasable products
- Add to quote button on product details page
- Quote button on shopping cart
Request for Quote
Request for Quote settings specify how B2B quotes can be requested from your storefront. Use the checkboxes to enable quoting for the following customer types:
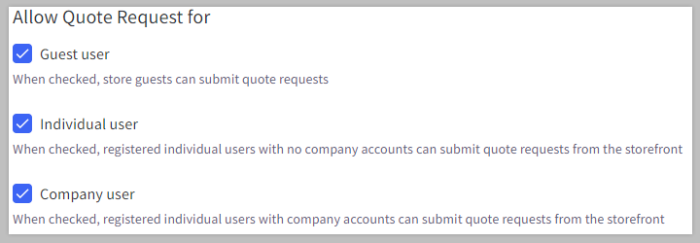
- Guest user — allows customers without a storefront account to request quotes
- Individual user — allows customers with storefront accounts that are not associated with a Company account to request quotes
- Company user — allows customers that are part of a Company account to request quotes
Quote Details
These settings manage back-end display of quotes and allow you to configure default attributes, such as the validity period and terms.

- Display the cost column in quote line items — when checked, this displays the Cost Price of line items when viewing quotes in the B2B Edition control panel.
- Display the margin column in quote line items — when checked, this compares the Cost Price and Quoted Price of each line item and calculates the profit margin. Display the cost column in quote line items must be checked in order to enable this setting.
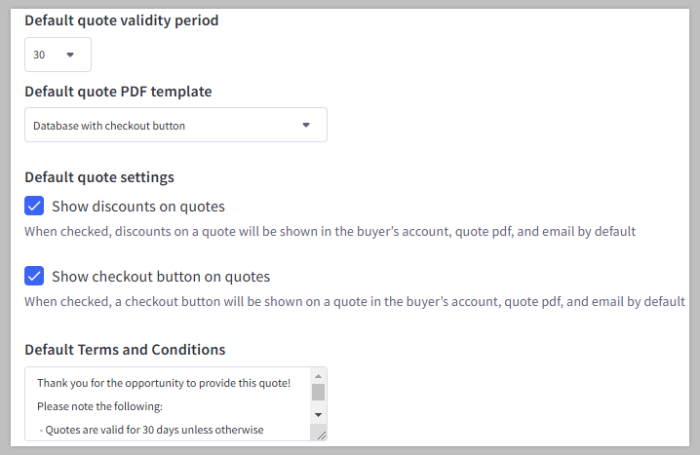
- Default quote validity period — establishes the default number of days before a quote expires. This can be changed after a quote has been created by editing the quote.
- Default quote PDF template — specifies the PDF template selected by default when submitting quotes to buyers. See the Sales Staff Quoting section of Order Management and Sales Representative Functions to learn more.
- Show discounts on quotes (Buyer Portal experience only) — When checked, discounts on a quote will be shown in the Buyer Portal, the quote PDF, and email by default. You can also enable and disable discount display manually on individual quotes.
- Show checkout button on quotes (Buyer Portal experience only) — When checked, the checkout button will be shown on a quote in the Buyer Portal, the quote PDF, and email by default, allowing the buyer to purchase the quote. You can also enable and disable the checkout button manually on individual quotes.
- Default Terms and Conditions — a text field where you can set terms and conditions to populate on each quote by default. This can be changed after a quote has been created by editing the quote.
Quote Submission Response
Enable Quote submission response to display a pop-up message after a buyer submits a quote request. This allows you to provide information, such as an estimated review time or contact details.
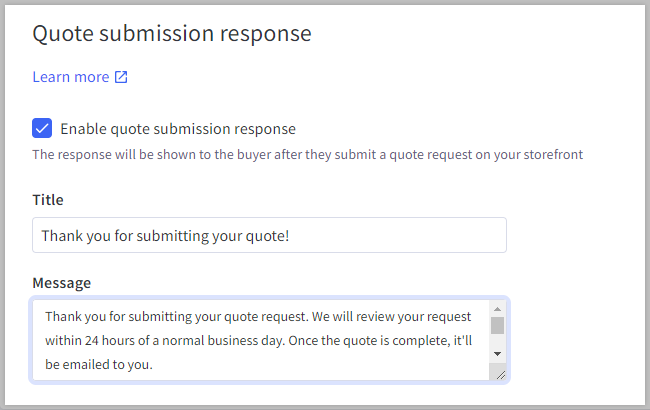
- Enable quote submission response — check to enable the pop-up message
- Title — specifies the title of the message in the pop-up window
- Message — text field to set the message content.
Auto-Quoting
The Auto-quoting setting allows you to control whether a buyer can immediately purchase a quote or if it must first be reviewed by their Sales Rep.
To bypass quote reviews and allow buyers to immediately purchase quotes, check the box next to Enable auto-quoting.

If you have enabled the setting to allow buyers to add non-purchasable products to quotes, quotes containing non-purchasable or out of stock products will be sent to a sales Rep for review, even with Auto-quoting enabled.
Custom Shipping
Custom Shipping settings allow you to create unique shipping methods which can be used in B2B quotes. This is helpful for quotes with shipping dimensions or destinations that may not be supported in your standard checkout.
Custom shipping methods are incompatible with ShipperHQ. If you are using the standard ShipperHQ integration, you must upgrade to ShipperHQ Plus before enabling custom shipping methods.
To activate this functionality, check the box next to Enable custom shipping methods.

This automatically adds the B2B Edition shipping carrier to your shipping zones, which allows custom shipping information to populate at checkout when a buyer converts a quote. Note that this shipping carrier is not visible to customers unless they are purchasing a quote with a custom shipping method applied.

Once enabled, enter the name of your custom shipping method in the text field. To create multiple shipping methods, click + Add custom shipping method.
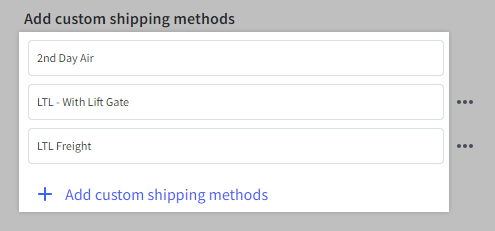
Custom shipping methods do not have rates assigned to them by default. When creating or editing a quote in the B2B Edition control panel, you’ll be prompted to enter your desired rate after selecting a custom shipping method. Customers cannot select a custom shipping method or enter their desired shipping rate when requesting a quote in the storefront.
To delete a custom shipping method, select Delete from the action menu.

Quote Products Unavailable to Purchase
These settings allow you to quote products that are otherwise not available to be ordered, such as products that are out of stock or marked as not purchasable, by generating custom items. Check the box next to Enable custom product creation for non-purchasable and out of stock products on quotes to allow custom items to be added when creating or editing quotes in the B2B Edition control panel.

Once enabled, you can also allow buyers to include non-purchasable products while drafting a quote request by checking Enable buyers to add non-purchasable and out of stock items to a quotes request.

Sync Quote to Order Notes
When a quote is converted to an order in the B2B Edition control panel or from the storefront, certain information, such as internal notes on line items or comments visible to the Buyer, is not relayed by default to the order in the BigCommerce control panel. Use the checkboxes to automatically include the following information on the customer-facing comments of orders created from B2B quotes:
- Send Customer Notes — transfers notes from the Additional Information section of the quote to the order comments
- Send Product Notes — transfers notes left on individual line items to the order comments

Finish Quote Floating Action Button
When a customer adds a product to a quote, the floating action button appears on all pages of the store, which takes them to the Buyer Portal to complete the quote. The following settings are available to style the button:
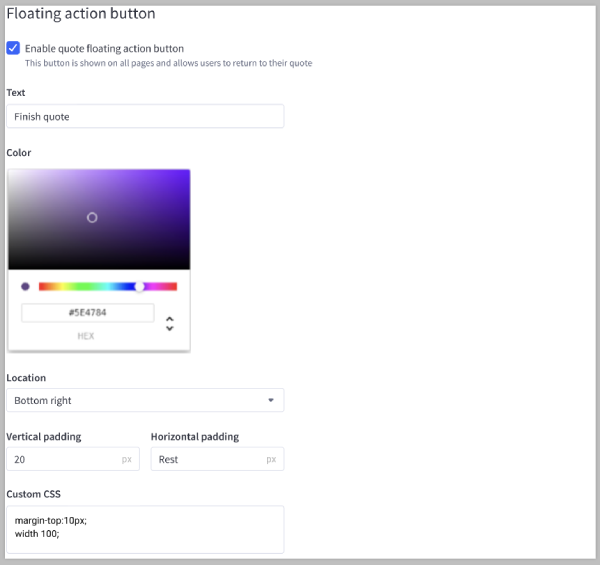
- Enable quote floating action button — when checked, this displays the button on all store pages
- Text — customizes the text of the floating action button
- Color — defines button color. Use the color picker or enter a hex code to select the color.
- Location — specifies where the button is placed in storefront pages. You can select from Bottom right, Bottom left, Top right, and Top left.
- Vertical padding — moves the button away from the top or bottom of the page, depending on the specified location
- Horizontal padding — moves the button away from the left or right of the page, depending on the specified location
- Custom CSS — allows you to add custom styling to the floating action button
Add to Quote Button on Out of Stock and Non-Purchasable Products
If you’ve enabled buyers to request quotes for non-purchasable products, you can also add a unique Add to Quote button to the storefront pages of non-purchasable products. Use the settings below to enable the button customize its appearance:
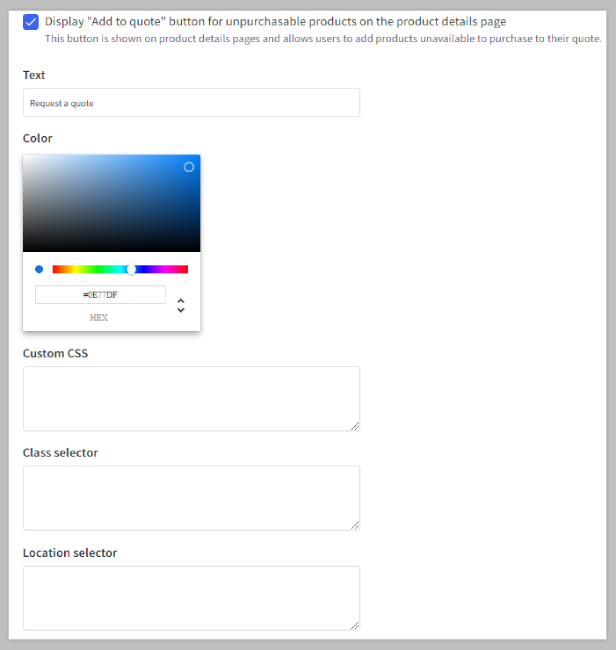
- Display “Add to quote” button for unpurchasable products on the product details page — allows buyers to add non-purchasable products to quotes while viewing them in your storefront.
- Text — customizes the text of the button. This is helpful to distinguish it from the default Add to Quote button on purchasable products.
- Color — defines button color. Use the color picker or enter a hex code to select the color.
- Custom CSS — allows you to add custom styling to the button
- Class selector — customize the button styling by specifying a button class from your theme files. By default, this button uses the b2b-add-to-quote class.
- Location selector — specifies where the button is placed in the product page. The default for Cornerstone and most themes is form div.form-action.
Add to Quote Button on Product Details Page
The following settings allow you to change the appearance of the Add to Quote button present in your product pages.

- Display “Add to quote” button on the product details page — when checked, this adds the button to product pages
- Text — adds custom text to the button
- Color — defines button color. Use the color picker or enter a hex code to select the color.
- Custom CSS — allows you to add custom styling to the Add to Quote button
- Class name — customize the button styling by specifying a button class from your theme files. By default, this button uses the b2b-add-to-quote class.
- Location selector — specifies where the button is placed in the product page. The default for Cornerstone and most themes is form div.form-action.
Quote Button on Shopping Cart
Use the following settings to customize the cart page button used to convert cart contents into a quote:

- Display “Cart to quote” button on the shopping cart page — when checked, this displays the button on the cart page
- Text — adds custom text to the button
- Color — defines button color. Use the color picker or enter a hex code to select the color.
- Custom CSS — allows you to add custom styling to the Cart to Quote button
- Class name — customize the button styling by specifying a button class from your theme files. By default, this button uses the b2b-cart-to-quote class.
- Location selector — specifies where the button is placed in the cart page. The default for Cornerstone and most themes is form div.form-action.
Shopping List Settings
Shopping List settings can be accessed from Settings › Shopping list in the B2B Edition control panel, and they provide styling options for the Add to Shopping List button on your product pages.
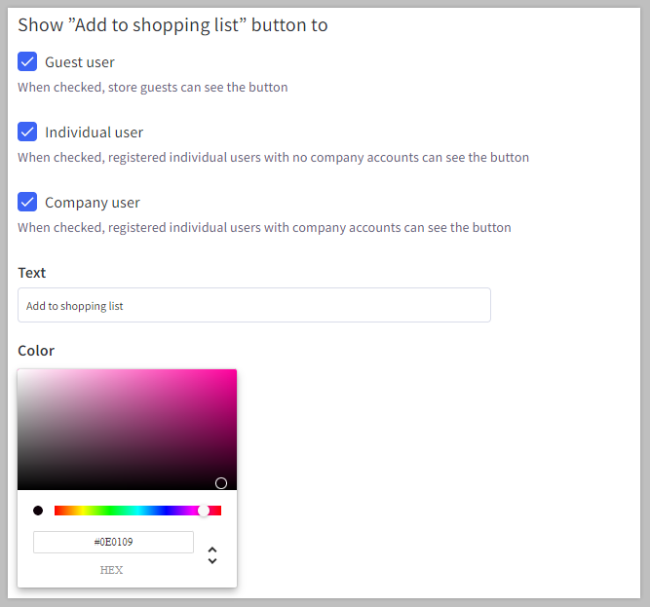
- Show “Add to shopping list” button on the product details page — specifies whether or not the Shopping List button is available to guests, B2C customers, and B2B customers
- Text — customizes the button text
- Color — defines button color. Use the color picker or enter a hex code to select the color.
- Custom CSS — allows you to add custom styling to the Add to Shopping List button
- Class name — select from the different button styling classes available by default in your store’s theme. By default, this button uses the b2b-add-to-list class.
- Location selector — specifies where the button is placed in the product page. The default for Cornerstone and most themes is form div.form-action.
Invoice Settings
Invoice settings can be accessed from Settings › Invoice in the B2B Edition control panel, and manage the default behavior for invoices in your store.
By default, invoices can only be generated via the Create Invoice action in Invoice Management › Orders in your B2B Edition control panel. However, you can enable automatic invoice generation for orders placed using offline or online payment methods with Issue invoices automatically for orders placed using.

The Default payment terms dropdown allows you to set the default payment date for invoices. The following options are available:
- Due immediately (Net 0)
- Net 5
- Net 15
- Net 30
- Net 45
- Net 60

Pro Tip! Enable specific invoice due dates for individual Companies by editing their account’s payment terms in the B2B Edition control panel.
In the Default terms and conditions text field, you can enter important invoice payment information, such as payment time frames, accepted invoice payment methods, and contact details for any questions.

After entering text in this field, your terms and conditions appear at the bottom of new invoices in the Buyer Portal, but they do not overwrite the content in previously-created invoices. You can customize the terms of individual invoices by editing them in the B2B Edition control panel.
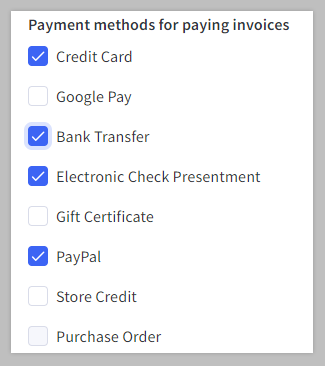
To specify which online payment methods your customers can use to pay their invoices, check the box next to the payment method’s name under Payment methods for paying invoices. While any available offline payment methods will display in this list, they cannot be selected. Note that customers will only be able to select from the subset of payment methods enabled for their Company account.
Email Settings
Email settings can be accessed from Settings › Emails in the B2B Edition control panel, and allow you to connect an external email service and customize your B2B email templates. See B2B Edition Email Templates to learn more.
Checkout Settings
Checkout settings can be accessed from Settings › Checkout in the B2B Edition control panel, and manage the B2B elements of your storefront checkout page. Note that this is different from the Optimized One-Page Checkout settings found in Settings › Checkout within the BigCommerce control panel. Additionally, these settings do not affect customers who are not logged into a storefront account associated with a Company.
- B2B Checkout
- Address Checkout Control Options
- Purchase Order Payment Method
- Additional Payment Text Input Field
B2B Checkout
B2B Checkout has a toggle for enabling or disabling B2B Edition’s checkout features in your existing checkout page. Note that enabling the B2B Edition checkout is necessary to manage payment methods, credit settings, and invoice payment terms for each Company account. This must also be enabled in order to configure other Checkout settings in B2B Edition.

Once enabled, select whether your store is using the standard Optimized One-Page Checkout or a custom checkout experience. This will automatically use the Script URL entered in your store’s Custom Checkout Settings in Settings › Checkout within the BigCommerce control panel.
Address Checkout Control Options
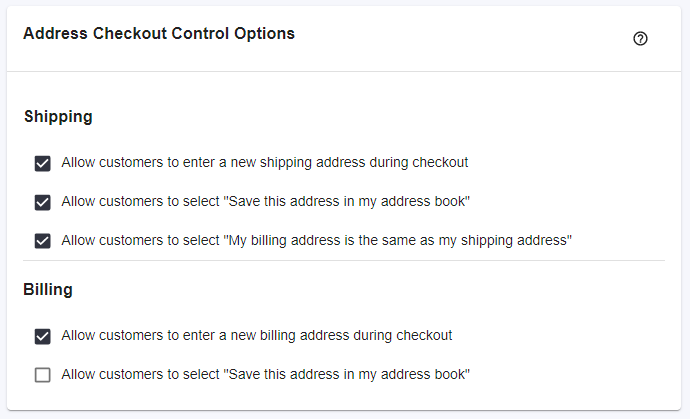
Here, you can specify which address settings are available for customers at checkout.
- Shipping
- Allow customers to enter a new shipping address during checkout — customers can enter a unique address rather than selecting a preconfigured address in the Shipping step of checkout
- Allow customers to select "Save this address in my address book" — if a customer enters a new address, they can choose to save it to the Company address book. This also saves it to their customer account in the control panel.
- Allow customers to select "My billing address is the same as my shipping address" — allows customers to duplicate the shipping address in the Billing step of checkout
- Billing
- Allow customers to enter a new billing address during checkout — customers can enter a unique address rather than selecting a preconfigured address in the Billing step of checkout
- Allow customers to select "Save this address in my address book" — if a customer enters a new address, they can choose to save it to the Company address book. This also saves it to their customer account in the control panel.
Purchase Order Payment Method
The Purchase Order (PO) payment method adapts the built-in Check payment method to support asynchronous payments and generate invoices with net payment terms. This payment method is only visible to B2B buyers with a Company account and cannot be used by B2C customers or guest shoppers.
You can enable PO payments on your storefront by toggling on Purchase Order Payment Method. You will be prompted to confirm that you have configured Check payments in Settings › Payments in the BigCommerce control panel before it is enabled.
We recommend changing the payment method name to “Purchase Order” or something similar in your payment settings in order to distinguish it from a standard Check payment.

Using multiple currencies? Make sure you’ve enabled the Check payment method for each currency you wish to offer PO payments.
The Display Name field adds a custom title to the field that appears when a customer selects Purchase Order as their payment method. Give it a name to indicate what information you need from them, such as a reference number. Check the box next to Make this field required to prevent customers from checking out with a Purchase Order before entering the desired information.

The information your buyers enter in this field appears in the order comments in your BigCommerce control panel and the Buyer Portal, as well as the order confirmation email, if enabled.
Additional Payment Text Input Field
Toggle this setting on to add a custom text field to the bottom of the Payment step of checkout, regardless of which payment method is selected. Like the Purchase Order field, text entered in these fields appears in the order confirmation email and in the order comments.
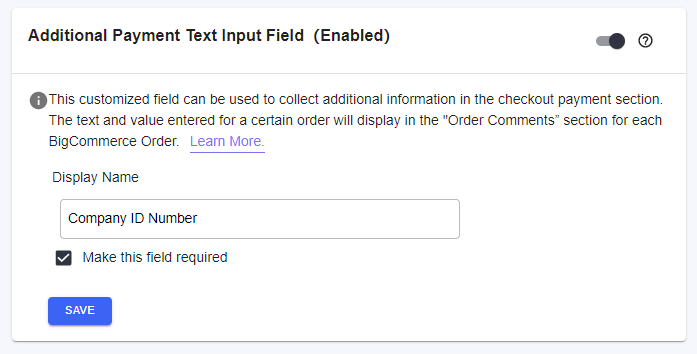
Enter a Display Name to indicate what information your customers should provide. Check the box next to Make this field required to prevent customers from checking out without filling out the field.
Account Form Fields
Account form fields can be accessed from Settings › Account Form Fields. Use these settings to customize the information fields in the following storefront forms:
The table of fields for each form displays which type of data each field uses, when it was last modified, and whether it was natively built into the form or custom-made.
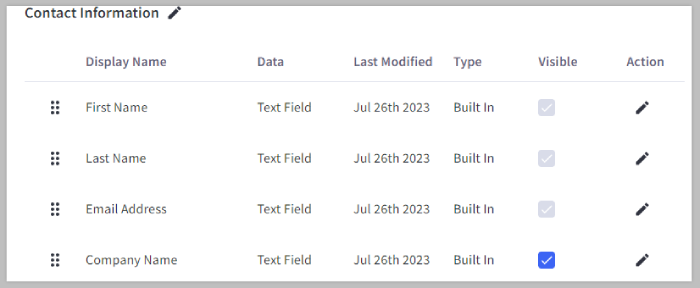
The following actions are available for form fields:
- Rename the form’s section titles by clicking the pencil icon at the top of each section.
- Reorder fields by dragging and dropping them in the list.
- Enable or disable the visibility of non-required fields with the Visible checkbox. The checkboxes for required fields are greyed out.
- Edit field display names by clicking the pencil icon in the Action column.
- Specify whether or not a field is required for account registration application.
- Some built-in fields, such as First Name, Last Name, and Email Address, are marked as required by default and cannot be made optional.
- Account signup fields and extra fields can be marked as required while creating or editing them in their respective areas, but not from Settings › Account Form Fields.
Pro Tip! Specify a default country in your account registration forms by editing the Country field in any form, and selecting the country from the Default Country dropdown. Your selection will automatically apply to all three forms.
Personal Account Registration Fields
The Personal Account Registration Fields tab has customization settings for the fields that appear when a customer registers a B2C storefront account. These are organized into the following sections:
- Contact Information — the default information requested when a customer signs up for a storefront account
- Additional Fields — custom account fields added in the BigCommerce control panel. Click Manage Account Signup Fields to add or delete them in your Account sign up form settings.
- Address — the address fields available when registering for a B2C customer account. Click Manage Address Extra Fields to add or delete user-defined fields in your Account sign up form settings.
- Password — fields for entering and confirming an account password
Business Account Registration Fields
The Business Account Registration Fields tab is where you can personalize the form that customers without a storefront account can use to request a Company account. It includes the following sections:
- Contact Information — the information needed to generate a Admin user account that can access the Buyer Portal
- Additional Information — custom account fields added in the BigCommerce control panel. Click Manage Account Signup Fields to add or delete them in your Account sign up form settings.
- Business Details — the information needed to create a Company account. Click Manage Company Extra Fields to add or delete the user-defined fields in your Extra Fields settings.
- Address — fields for the address present in the Basic Information tab when viewing a Company account in the B2B Edition control panel. This also includes any custom address fields you have added in your Extra Fields settings.
- Password — fields for entering and confirming an account password
Personal to Business Conversion Fields
The settings in the Personal to Business Conversion Fields tab allow you customize the fields in the Company account application, used by B2C customers to apply for a Company account. It is organized into the following sections:
- Contact Information — the information needed to generate an Admin user account that can access the Buyer Portal. Note that this is automatically filled in with the customer’s existing contact information if they are logged in to their storefront account.
- Business Details — the information needed to create a Company account. Click Manage Company Extra Fields to add or delete the user-defined fields in your Extra Fields settings.
- Address — fields for the address present in the Basic Information tab when viewing a Company account in the B2B Edition control panel. This also includes any custom address fields you have added in your Extra Fields settings.
- Password — fields for entering and confirming an account password
How do I make file uploads for Company account applications required? Edit the built-in Attachments field in the Business Account Registration and Personal to Business Conversion forms and check the box next to This field is required. You can also change the field name to indicate what prospective buyers need to include in their application.
Extra Fields
Extra Fields can be accessed from Settings › Extra Fields in the B2B Edition control panel, and allow you to request additional information from the following areas:
- Company — adds fields to the Basic Information section of Company details in the B2B Edition control panel, as well as the Company registration form in the storefront
- Company User — adds fields to buyer user accounts in the B2B Edition control panel, as well as the User management area of the Buyer Portal
- Address — adds fields to billing and shipping addresses in the B2B Edition control panel, as well as in the Address Book of storefront Company accounts and at checkout
- Note: these are added alongside any address fields configured in the Settings › Account sign up forms area of the BigCommerce control panel
- Order — adds fields below the Payment step of checkout, below any additional fields you added in your Checkout settings. Information entered in these fields appears in the order comments and the order confirmation email.
- Invoice — adds fields to be filled out when creating or editing an invoice in the B2B Edition control panel, or viewing an invoice from a storefront Company account or attached PDF

You can create up to 10 additional fields for each area. The following field types are supported:
- Text Field — creates a simple text field, such as First Name. Can specify a default value, as well as maximum allowed characters.
- Multiline Text Field — creates a text field for inputting multiple lines of data, such as Delivery Details. Can specify a default value, as well as maximum number of rows.
- Number Only — is similar to a regular text field, but validates for numbers only. You can specify the maximum value that can be entered.
- Drop Down — presents a drop-down list of options to select from
Each field type has the following settings:
- Is Required — when checked, the B2B Edition user or customer must fill in this field
- Is Unique — when checked, the information entered in the field cannot match existing data, such as customer email address
- Visible On Storefront — when checked, the field and its values can be viewed by customers and Super Admins from the storefront. If left unchecked, the information is still visible in its corresponding area of the B2B Edition control panel.

After creating an extra field, you can Edit or Delete it from the Action menu.

System Users and Roles
The Settings › System users and roles area of the B2B Edition control panel is organized into different tabs where you can you to add back-end users to your B2B Edition account, view preconfigured user roles, and create new roles with unique permissions. See B2B Edition User Roles and Permissions to learn more.
Company Users and Roles
In the Settings › Company users and roles area of the B2B Edition control panel, you can view and manage buyer users from any Company account, as well as create custom buyer roles with a unique set of Buyer Portal permissions. You can configure whether the permissions apply to just the user’s data or to all data in the Company’s Buyer Portal.
See B2B Edition Buyer Roles and Permissions for more information on creating and assigning user roles for your B2B customers.
API Account Settings
API Account settings can be accessed from Settings › API Accounts in the B2B Edition control panel. These settings allow you to generate API tokens for making API requests and integrating your data with third-party systems, as well as to view and manage previously-created API accounts.
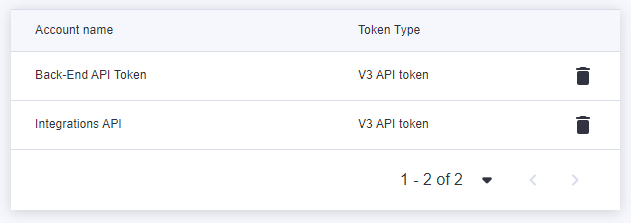
To generate a new API token, click + Create API Account.

In the Create account window, select one of the following token types:
- V3 API token — this should be the token type selected unless otherwise specified by your integration
- V2 API token — a legacy API token used with certain integrations, such as Acumatica
Give the API token a name to indicate what it will be used for. Note that, unlike BigCommerce API accounts, you do not need to specify OAuth scopes.

When you’re ready, Save your changes. You will be given the API Token that your app will need for OAuth access, and you will be prompted by your browser to download a .txt file containing the same credentials for safekeeping on your computer.
Keep your credentials! The API Token present in the pop-up window and the .txt file are the only copies you will have access to. If you lose this information or it has become compromised, delete the account and create a new one.
To delete an existing API account, click the trash can icon next to it in the API Accounts menu.

Translation Settings
Translation settings can be accessed from Settings › Translation in the B2B Edition control panel. This area includes a CSV upload field which allows you to customize all text strings in the storefront Buyer Portal.
Using Multi-Storefront? You can create individual localized storefront experiences by using B2B Edition’s Storefront settings.
To update your Buyer Portal text, download the CSV template in the Translation settings page. The template includes the following columns:
- Variable — indicates the area of the Buyer Portal corresponding to the default or custom text in the CSV row. Editing the variable names in this column will cause import failure.
- Default Value — the text that appears when no custom text is supplied. Editing default values will not cause import failure, but it will not update the default values in your Buyer Portal.
- Custom Value — customize or translate the default value by entering text here. If left blank, the default value will be used in your Buyer Portal.
After editing the CSV template, drag and drop the file into the upload field, or click the field to select the file from your computer. When done, click Preview.
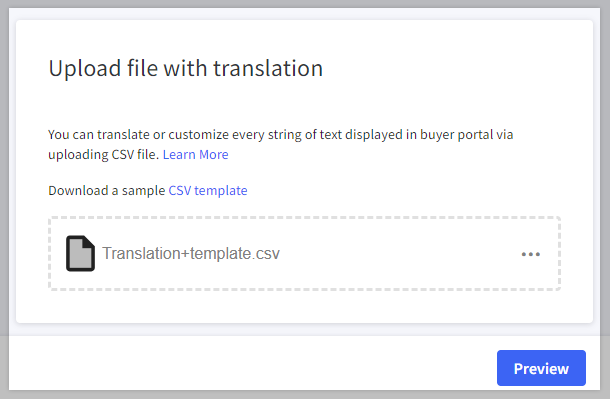
On the Preview page, scroll down and review the custom values listed in your CSV file. If the information doesn’t look correct, click Cancel to return to the Translation settings page. Otherwise, click Publish to begin the import. When the import is complete, your custom text will appear in the corresponding areas of the Buyer Portal.

Importing a CSV with blank custom values will return any previously customized text strings to their default values. Download a backup copy by clicking Export as CSV to edit Buyer Portal text while maintaining your existing customizations.
FAQ
Why am I not seeing certain settings in the B2B Edition control panel?
Certain settings manage the display and behavior of the storefront Buyer Portal. If the Buyer Portal experience has not been implemented in your store, then you will not see these settings in your B2B Edition control panel. See Migrating to the Buyer Portal Experience for public and internal information on enabling the Buyer Portal.
Can I change the default information supplied in a Company account?
Yes, you can change the details added to a Company account by default, such as payment methods or Price Lists, by editing the Company in your B2B Edition control panel.
Why are buyers with pending accounts able to view products and place orders after I’ve enabled product and order restriction in Company Management settings?
If a buyer isn’t logged into their storefront account, they can view and interact with the storefront as a guest. You can prevent guest customers from viewing and purchasing products using one of the following methods:
- Create a customer group via the API with category access set to none, and assign it as the default customer group for guests.
- You can configure your storefront to hide prices from guest customers in the Product Display settings area of the BigCommerce control panel.
- While this will not hide the products themselves, it will remove pricing information from guests, as well as the ability to add products to the cart.
Can I limit which users are allowed to place orders on the storefront in the legacy storefront experience?
If you are not using the Buyer Portal experience, the setting to restrict order placement to Company users with approved accounts is not available. However, you can customize your storefront to hide checkout buttons from users that are not associated with an approved Company account.
See this document for guidance on how you can implement this functionality in your storefront. Note that per our Design Policy, our Technical Support team cannot assist with customizations.
How do I develop a custom Buyer Portal experience for my storefront?
You can use the B2B Buyer Portal repository on GitHub to view different elements of Buyer Portal code and build your customizations from a reference. Note that this requires web development knowledge, and you may wish to work with your developer or a BigCommerce Partner to create your desired customizations.
For more information on using the reference code and getting support, see the README file in the repository.
Are there other methods for creating B2B Edition API tokens?
In addition to creating a token in the B2B Edition control panel, you can also generate one via the API.
How do I locate the class names and location selectors in my theme for customizing quote and Shopping List buttons?
If you want to adjust the location or styling of the quote and Shopping List buttons that appear on your storefront, you can find the class names and location selectors that are used by other storefront buttons in your theme’s code.
See this document for detailed instructions on using your browser’s Inspect Element tool to locate the CSS code applied to other buttons in your storefront. Keep in mind that our Technical Support team cannot assist with locating or adjusting code in your store.
Why am I not seeing any recent changes made to storefront and Buyer Portal design settings?
After saving design changes, such as those made in Login Page or Quote settings, they will be applied to the storefront in about 30 seconds. If you are still not seeing the changes after waiting a few minutes, you may need to clear your browser’s cache.
Why am I unable to preview and apply my Buyer Portal text customizations?
If you are getting an error after uploading your CSV file and clicking Preview, your file does not meet one or more of the requirements for a successful import.

See the list below for the potential error messages and how to resolve them.
- File exceeds maximum limit of 1 MB — Your CSV file size is greater than 1 MB.
- Incorrect data format — Your file is not using the .csv format. Convert the file to a CSV and upload it again.
- Incorrect variable in rows — The values in the Variable column have been renamed. Return the variables in the rows indicated by the error message to their default values.
- Incorrect custom value in rows — One or more custom values has invalid content, such as HTML. Remove the invalid content from the rows indicated by the error message.
- Exceeded maximum amount of symbols in a cell — One or more custom values has more than 1,000 characters of text. Reduce the custom value text to 1,000 characters or less.
Can I translate B2B text in the legacy storefront experience?
If you’re on the legacy storefront experience, the storefront translation settings are not available. However, you can implement custom code that translates the different B2B elements of your storefront.
This document provides guidance on customizing the text of B2B elements in your storefront. Note that our Technical Support team is unable to assist with modifying or installing code in your store.
Can I add formatting or styling to the Quote submission response?
The quote submission response message body uses the default text styling in your Buyer Portal. While it does respect line breaks, it does not support formatting options like bolding or hyperlinks.


