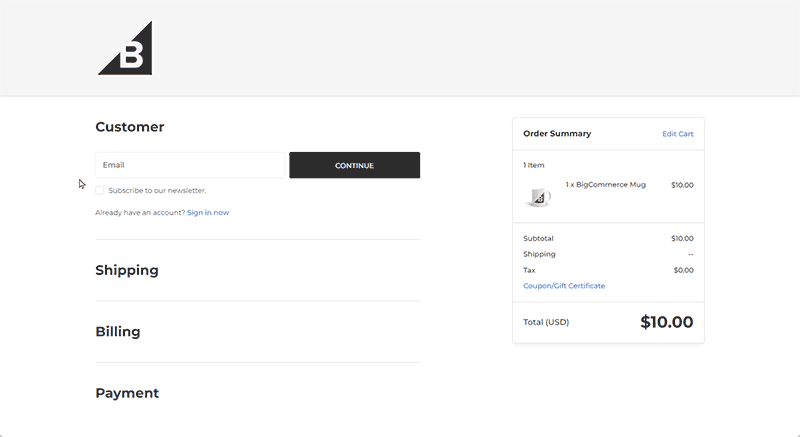
Optimized One-Page Checkout is BigCommerce’s default checkout and order confirmation page. It includes features that minimize friction and offer a smooth checkout process, which can lead to increase conversions.
Responsive, minimal design
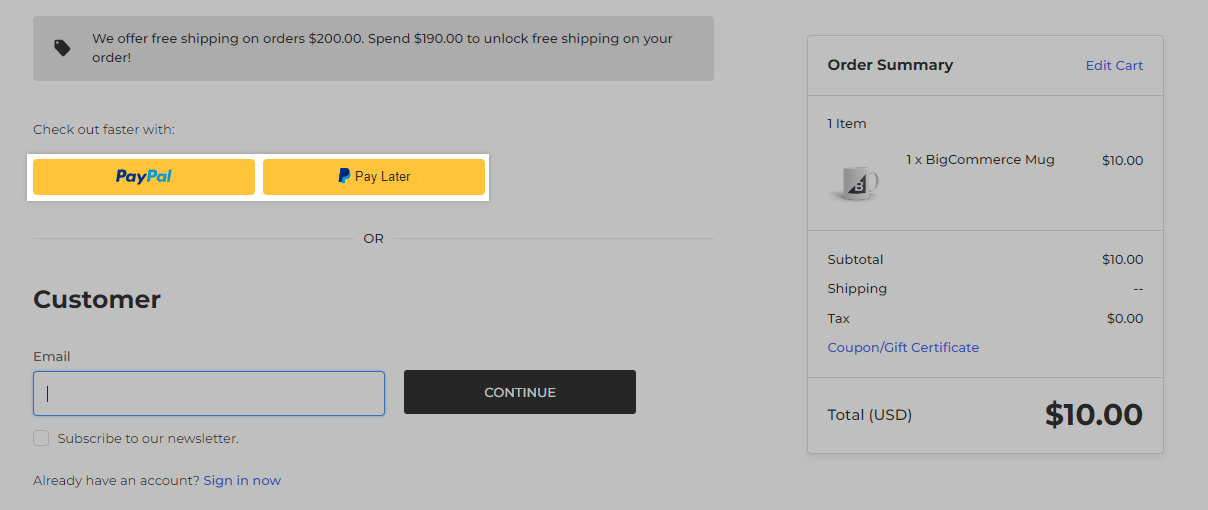
- Customers can quickly access and edit items in their cart throughout the checkout process.
- The responsive, minimal design lets customers comfortably check out on any device without distractions.
- Checkout will display the shopper's selected currency.
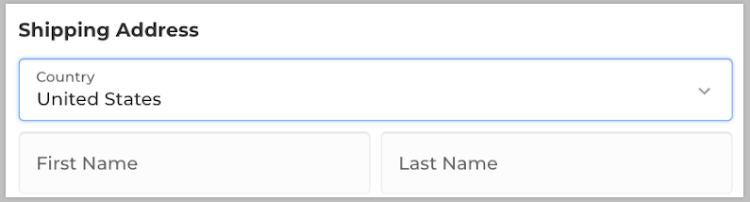
Simple Shipping Address Entry
- The default country in the drop-down menu is based on the customer’s IP address. Additionally, the menu only includes countries which have been set up in the Shipping page.
- A shipping method can be pre-selected to streamline the checkout process.
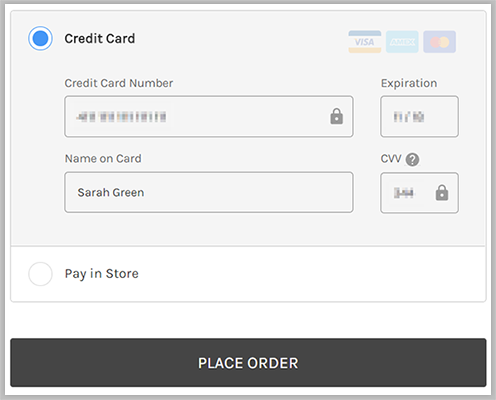
Credit Card Box
- Text fields are optimally laid out, clearly labeled, and include security icons to instill trust.
- Card type is auto-detected when the credit card number is entered, removing that extra step.
Smooth Checkout Flow
- Customers logged into their storefront account will have their email address and last used billing and shipping addresses pre-filled at checkout.
- New addresses can be saved to their account directly from the checkout page.
- Guests can create a customer account from within the checkout, without leaving the page.
- Customer accounts created via Embedded Checkout are created only on the BigCommerce platform, not the headless platform. It is up to the developer to make sure that customer accounts on BigCommerce and headless platforms are in sync with each other.
- On the order confirmation page, guests are given a second opportunity to create an account before leaving the checkout flow.
Using Multi-Storefront? Several of the checkout settings listed in this article can be customized to create a unique shopper experience on each of your storefronts. See Multi-Storefront for more information on supported settings.
Requirements
- To access checkout settings, you must have the Manage Settings permission enabled on your user account.
Switching to Optimized One-Page Checkout
To switch your store to Optimized One-Page Checkout, go to Settings › Checkout and select Optimized One-Page Checkout. Click Save, then click I’m ready to switch. If you are using a supported gateway, the new checkout will apply successfully.
For stores switching from Legacy Checkout, you will see a new checkout settings page after you’ve enabled Optimized One-Page Checkout.
Under Checkout type, you’ll see:
- Optimized One-Page Checkout
- Custom Checkout
- Revert to Legacy Checkout
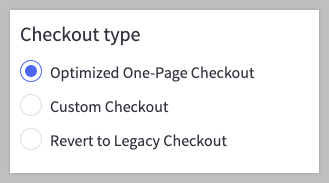
If you need to revert back to your old Legacy Checkout for whatever reason, select Revert to Legacy Checkout, and click Save. Once your checkout has been reverted, please reach out to your CSM or the BigCommerce support team if you need help planning your next migration attempt.
Order Confirmation URL
Some third-party funnel tracking systems, such as Microsoft Advertising conversion tracking, need to point to the order completion URL in your store. For Optimized One-Page Checkout, this URL is www.your-domain.com/checkout/order-confirmation. If you have any third-party tracking scripts that require a URL for the order completed page, they will also need to be updated to continue tracking correctly.
General Checkout Settings
Use these settings to select your store's checkout type, specify how shoppers check out on your store, and enable cart and security features.
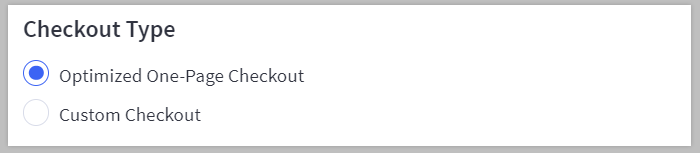
Checkout Type
Select whether you would like to use Optimized One-Page Checkout or a custom checkout.
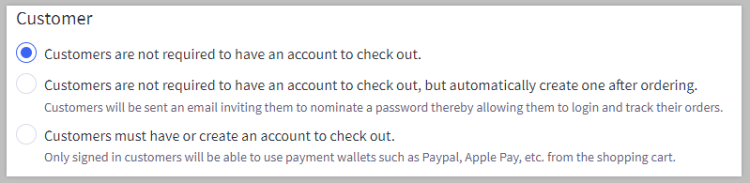
Customer
Select how you would like shoppers to check out:
- Allow shoppers to check out without an account as a guest.
- Allow shoppers to check out without an account, but automatically create one after ordering.
- Require shoppers to sign in or create an account before checking out.
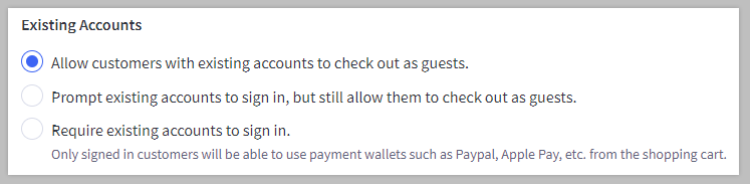
Existing Accounts
Select how you would like shoppers with existing accounts to check out:
- Allow existing customers to check out as a guest or sign in.
- Prompt existing customers to sign in, but still allow them to check out as a guest.
- Require existing customers to sign in. (Customers with existing accounts would not be able to check out as a guest.)
Cart
Select this to enable a "persistent cart," which lets your customers view items in their cart across multiple devices when logged in. Learn more in Persistent Cart.

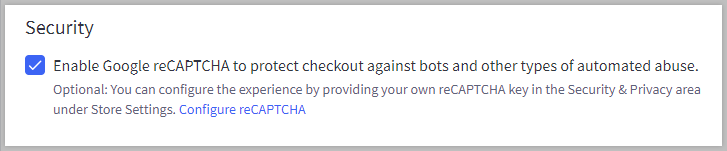
Security
Select this setting to enable Google reCAPTCHA, which protects your store against bots and other abuse. To reduce friction, reCAPTCHA on the checkout page is invisible.
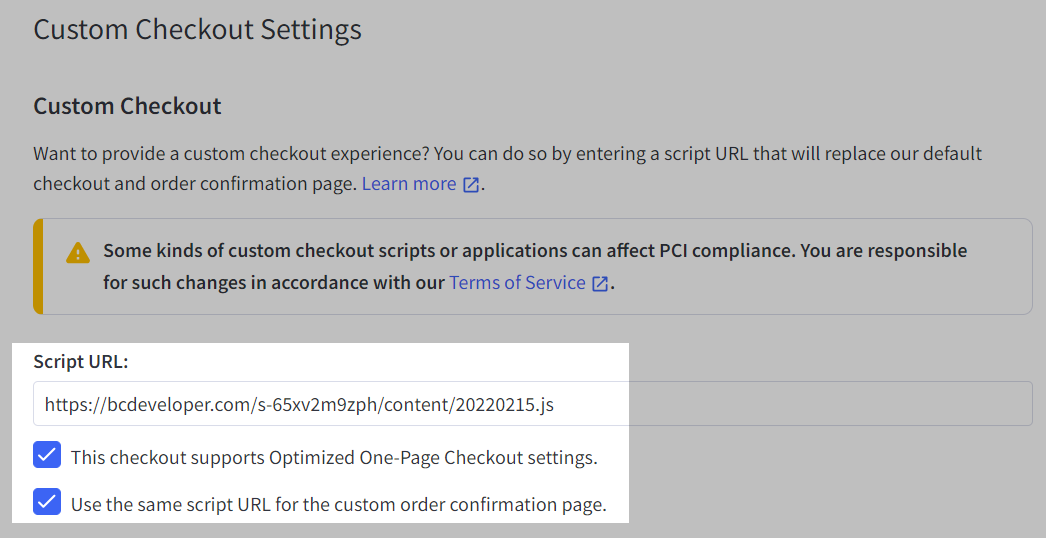
Custom Checkout Settings
If you selected to use a custom checkout as your checkout type, you will see the settings below.
Custom checkouts use our Checkout SDK. For more information on installing a custom checkout and related topics, visit the Dev Center.
Using a custom checkout may affect PCI-DSS compliance. Some checkout scripts may require you to take on full responsibility for PCI-DSS compliance for the checkout application. In addition, custom checkouts no longer receive automatic updates such as new features, bug fixes, and security updates. We recommend using Optimized One-Page Checkout if you are not comfortable in assuming this risk.
To install a custom checkout, fill in the Script URL with the location of your hosted checkout script, then click Save.
If your custom checkout supports Optimized One-Page Checkout settings, enable the checkbox to access and set up features that are included in our default checkout, listed under Optimized One-Page Checkout Settings.
You can also install a custom order confirmation page to replace the default page by using the same script URL. Enable the checkbox for "Use the same script URL for the custom order confirmation page" if you have included this feature in your script. See Installing a Custom Order Confirmation Page for more information.
Optimized One-Page Checkout Settings
If you selected Optimized One-Page Checkout as your checkout type or opted to include support for these settings on a custom checkout, you will see the settings listed below.
Customer
To allow passwordless login for existing customers on the checkout page, enable this checkbox. A one-time password will be provided as a link sent to the customer’s email. Customers can log in by clicking the link, simplifying the checkout flow.

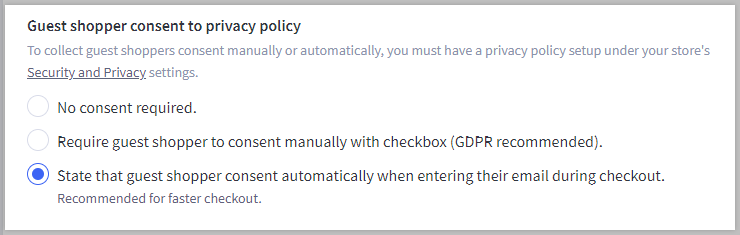
Guest shopper consent to privacy policy
Select how customers who check out as a guest will interact with your privacy policy:
- No consent is required — The privacy policy link will not display at checkout.
- Require guest shopper to consent manually with checkbox — Guest customers must manually agree to the privacy policy before they can check out. This setting is recommended for GDPR compliance.
- State that guest shopper consent automatically when entering their email during checkout. — Allow customers to automatically agree to the privacy policy by clicking Continue. This setting is recommended for faster checkout.
Shipping
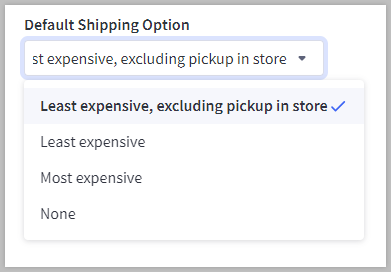
Default Shipping Option
A default shipping option decreases friction during checkout. You can set your checkout to default to one of the following:
- Least expensive, excluding pickup in store — This defaults to the least expensive option, excluding the Pickup in Store static shipping quote.
- Least expensive — This defaults to the overall cheapest option, including Pickup in Store.
- Most expensive — This defaults to the overall most expensive option, including Pickup in Store.
- None — No shipping option is pre-selected.
To allow customers to ship products in an order to different addresses, select this option. See Offering Shipping to Multiple Addresses to learn more.

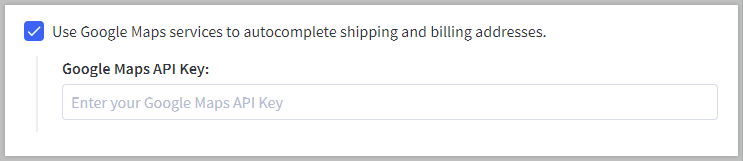
Enabling Google Address Autocomplete allows customers in select countries to check out faster by providing a list of potential matching addresses when the customer begins to enter in their billing or shipping address.
Billing
Enable this setting to check the "My billing address is the same as my shipping address" box at checkout by default.

Promotions
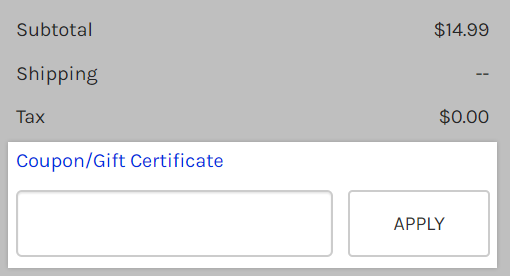
Coupon and Gift Certificate field
Select whether to display the Coupon/Gift Certificate field or to hide it behind a link.
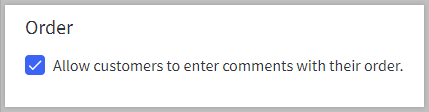
Order
Customers are able to add comments to their order when this setting is enabled. Comments can be viewed on the Orders › View page by selecting View notes from the action menu beside an order.
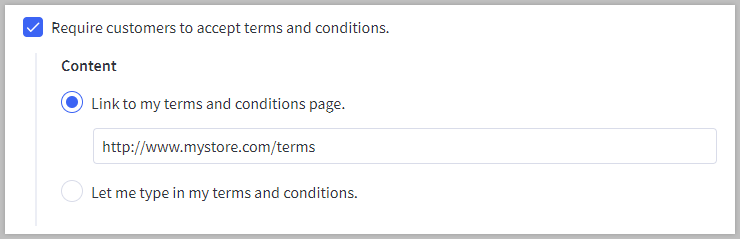
Enable this setting to require customers to check a box that says "Yes, I agree with the terms and conditions." This text can either link to a pop-up with the terms and conditions or link to a Terms of Service webpage.
Checkout Styling
All themes available in the Theme Marketplace allow you to make minor customizations to the styling on your checkout. See Customizing Checkout to learn more.
Order Confirmation Settings
The Contact Email field allows you to specify an email address to appear on the order confirmation ("Thanks for your order") page. By default, the order confirmation page displays the store administrator email address in your store's Miscellaneous settings.

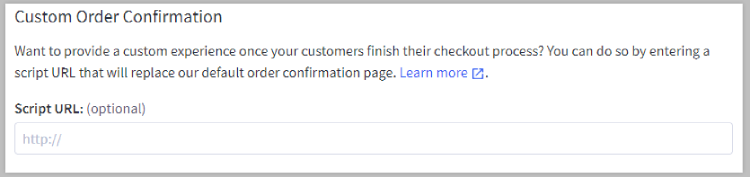
Custom Order Confirmation
This field allows for entering a script URL that replaces the default order confirmation page. For more information on installing a custom order confirmation page, visit our Dev Center.
Want to change the phone number on the order confirmation page? This page uses the phone number listed in the store profile.
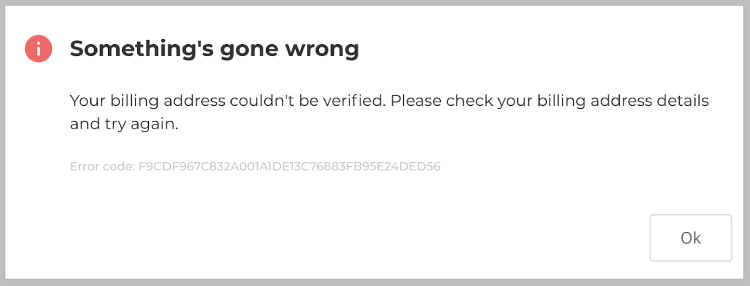
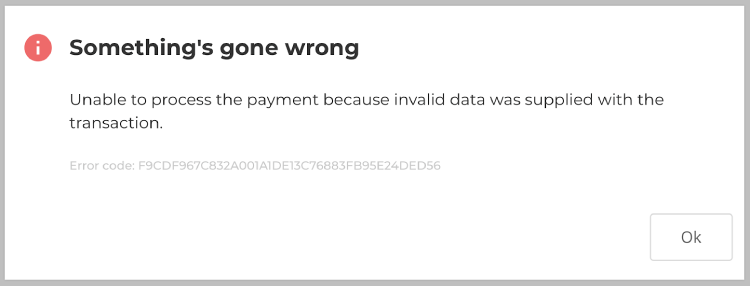
Verbose Error Messages at Checkout
If a transaction attempt fails, that shopper is shown error messaging with details about why the transaction failed, and suggested actions on how to resolve it. For example, “Your billing address couldn’t be verified. Please check your billing address details and try again.” This “verbose” error messaging is turned on by default for all stores.
If you prefer checkout errors to use generic messaging, you can opt-out of this feature by contacting our support team and requesting “vague” checkout error messages.
“Verbose” error message (default)
“Vague” error message
Localized Store Experiences: We support seamless translation for the native languages of countries listed in Store Profile Settings. All other languages require theme lang file customization.
"Verbose" Error Message List
Below is a list of all checkout payment error messages.
| There was a problem processing your card. Please contact your card issuer. |
| Payment for this order has already been made. |
| Your payment was declined. Please try a different card. |
| Your card details could not be verified. Please double check them and try again. |
| We're experiencing difficulty processing your transaction. Please try again later. |
| This is a duplicate transaction. Please contact us to confirm your order. Do not try to pay again. |
| Your card has expired. Please try again with a valid card. |
| Your billing address couldn't be verified. Please check your billing address details and try again. |
| Payment was declined. Please contact your bank. |
| There was an error while processing your payment. Please try again or contact us. |
| We're experiencing difficulty processing your transaction. Please contact us or try again later. |
| There was an error while processing your payment. Please contact us. |
| We're experiencing difficulty processing your transaction. Please try again later. |
| Your transaction was authorized, but is being held for review by the merchant. |
| Your card cannot be used to make this payment. Please contact your card issuer, or try using a different card. |
| Unable to process your payment due to timeout. Please try again. |
| Your payment couldn’t be verified. Please check your card details and try again. |
| There was an error processing your payment and your order couldn't be completed. Please try again. |
| Further authentication is required to process your payment. Please contact us. |
| Something went wrong on the server. Please try again at a later time. |
| Your card details could not be verified. Please double check them and try again. |
| Unable to process your payment because the transaction has already been voided. Please try again or contact us. |
Customizing Checkout
Checkout Styling
Stencil themes allow for minor style customizations to be made to the Optimized One-Page Checkout.

When this setting is checked, wallet buttons you have enabled on your store will appear above the Customer step for guest shoppers.
When disabled, the buttons will appear in the Customer step.

Labels can be moved inside input fields to shorten your checkout page length. This can help to reduce checkout friction.

When the setting is checked, field labels move inside the field itself. When a shopper enters data, the label “floats” to the top of the field.
When disabled, labels are static and display outside of the field.
Be careful! If you’ve customized your checkout styling, you should check your storefront’s checkout page immediately after enabling this setting to ensure it does not interfere with any custom styling changes within your store’s theme.
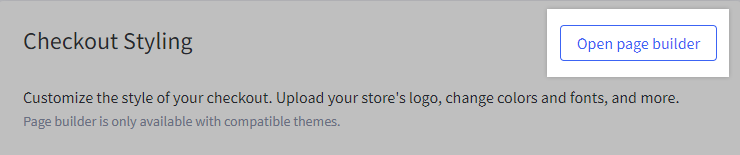
Page Builder has options for further checkout customization, such as adding a header image, changing fonts and colors, or adding a custom logo. This feature is available on all themes in the Theme Marketplace.
To launch Page Builder, go to Settings › Checkout and click on the Open page builder button under the Checkout Styling heading.
Go to the Theme Styles tab, then click the Checkout Page heading to access checkout customization options.
- If you have uploaded a store logo, it will auto-populate. You can also upload another logo only for the checkout page.
- See the Cornerstone Theme Manual for more details on checkout customization options for that theme.
- For advanced customization, updates can be made through the Stencil CLI. See our Dev Center for more information.

Using a legacy Blueprint Theme? See Blueprint Themes for more information on customizing the checkout page in your template files.
FAQ
Which Legacy Checkout payment gateways are not supported in Optimized One-Page Checkout?
If your store is using one of the following payment providers, it is important to note that it is not compatible with Optimized One-Page Checkout.
Before you attempt to switch checkouts, please first research the most appropriate alternative provider that is compatible with Optimized One-Page Checkout before upgrading:
|
|
Can I change which currency is listed at checkout?
No. Optimized One-Page Checkout will display the checkout with the currency the shopper chose on the storefront to keep the experience consistent. Invoice emails will display in the currency the order transacted in.
Are features such as Persistent Cart and passwordless customer account sign-in supported on stores with multiple storefronts?
All Optimized One-Page Checkout features are available as storewide, global settings. Currently only certain checkout settings can be customized on the storefront level. See Multi-Storefront for a list of these settings.
Does Optimized One-Page Checkout support multiple languages?
Yes. If the store uses multiple languages, the experience can now extend to the checkout with custom development and up to building a custom checkout. To learn more, see our Dev Center for detailed instructions.
Can Optimized One Page Checkout show banner notifications for discounts and promotions?
Yes. If you have set up an Automatic Promotion, such as spend $X to get free shipping, a banner notification can be placed in checkout to notify shoppers how much more they need to spend to qualify for free shipping. See Automatic Promotions for details on how to customize the location and messages of the discount banner.
Can I set the "Subscribe to our newsletter" box to automatically check yes during checkout?
Yes. You can set the newsletter checkbox to automatically tick during the checkout flow. See Newsletter and Email Marketing Settings for details on newsletter subscriptions.