This chapter covers product options in the v2 product experience. See Product Options (v3) for information on variant and modifier options in the v3 experience.
A product option is used for products that come in different variations. Size and color are common examples of product options, but they can also be modifications like checkboxes to include insurance or fields for adding custom text.

Product options are made up of values. A size option would have values like small, medium, and large. For some option types, values are supplied by the shopper, like custom text fields or file upload fields.
A variant is a particular variation of a product that has specific option values defined — like a small, blue shirt.
You can create a required option for products that need it, like size for clothing. This means the shopper must select a value (like small) before they can add the item to their cart. You can also create non-required options where the shopper can select or enter a value if they wish, but they don’t have to before adding the product to their cart. Non-required options are useful for add-ons or customizations, like engraving.
Stock keeping units, or SKUs, are a code you can assign to products and variants in order to track inventory. With BigCommerce, you can assign SKUs to both the base product and its individual variants.
Rules are a way to change product data (like price, weight, or the image shown) depending on which value-combination or SKU the customer selects for their options.
Creating Options
To add a product option and option set to your product:
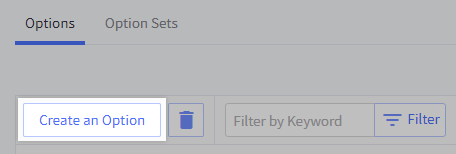
1. Go to Products › Product Options and click Create an Option.
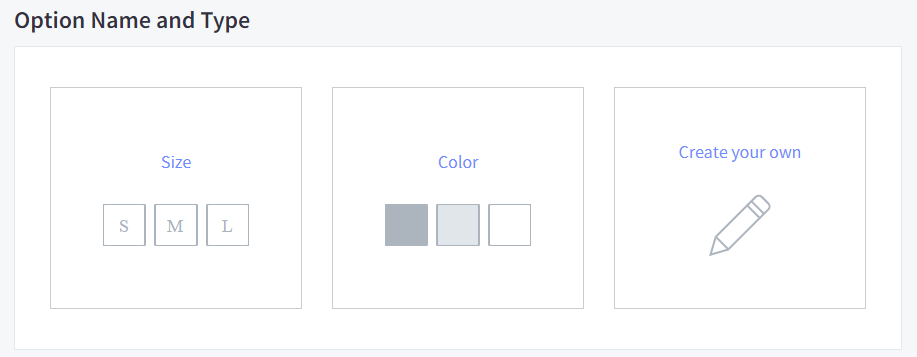
2. Select the type of option you want to create. You can use our templates for Size or Color options, or you can choose Create your own to build an option from scratch.
3. Give your option an internal-only Option Name for identification, and a Display Name that your customers will see on the storefront.

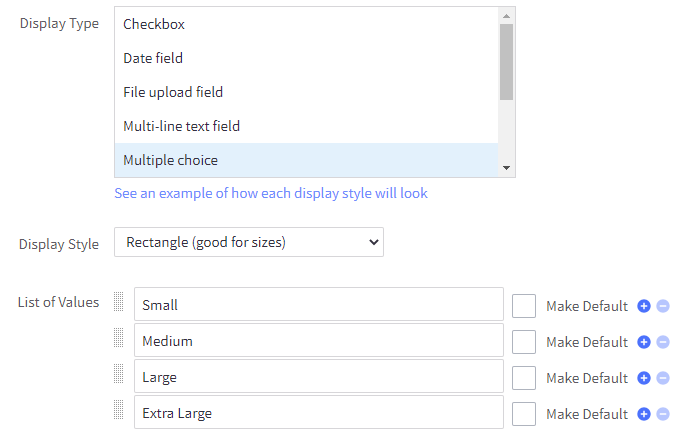
4. Select the display type and specify values for the option, if necessary, like Small, Medium, and Large. Click + next to a value to add another, or click - to remove an existing value. You can also click and drag the handle ⋮⋮ to the left of a value to change its sort order on the storefront.
5. Add the option to an existing option set or create a new one.
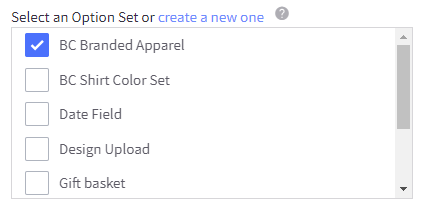
6. Apply the option set to your product.
Option Types
Option types specify the format of options and the different variations available with your product. They also determine how your options appear to shoppers, such as a multiple choice list or a checkbox. See the list below for more information on each type.
- Swatch — display color swatches by entering a hex code, selecting from the color picker, or uploading your own pattern. You can specify up to three colors per option value. Useful for products that come in different colors.
- Multiple Choice — present your product’s options as rectangle buttons, in a radio button list, or in a dropdown menu. Great for offering products in different sizes or flavors.
- Checkbox — create a checkbox option with configurable text and specify if it is checked or unchecked by default. Checkboxes are commonly used to upsell a related accessory or include services like insurance or donations.
- Text/Number Field — allow your shoppers to enter text or numbers with the product, such as for a custom engraving or dimension specifications. You can add sample text that shoppers can rewrite, specify whether text or numeric characters can be used, and assign a minimum and maximum character limit.
- Date — present drop-down menus for month, day, and year for your shopper to specify a date. This can be helpful for scheduling appointments for services or for products that are time-sensitive.
- File Upload — allow your shoppers to upload a file to send to you with the order. You can restrict the file types that can be uploaded. Useful for custom-printed products like photo albums or branded clothing. Note that a maximum of 20 files can be uploaded to a single product.
- Pick List — offer a selection of related products that can be added to the cart with your main product, such as product accessories or gift basket bundles. You can specify how the inventory, pricing, and shipping quotes for the bundled products are treated.
Variants
Each possible combination of option values for a particular product is known as a variant or variation. For example, you might sell a single shirt that comes in two sizes (small and large) and two colors (blue and red). Since the shirt has two sizes and two colors, that means this product has four variants (2 sizes x 2 colors = 4 variants).
For inventory tracking purposes, variants are typically identified using SKUs. For the small, red shirt, the SKU might be something like SHIRT-SM-RD. The terms variant and SKU are sometimes used interchangeably but are not to be confused with options (like size and color) or values (like small and red).
Note that a single product can have a maximum of 600 SKUs.
Option Sets
An option set is used to apply an option or a group of options to a product. For example, if your product was a t-shirt, you might have an option set named T-Shirts that consists of Size and Color options.
An option must be first assigned to an option set before it can be applied to a product — options are never applied directly to a product.
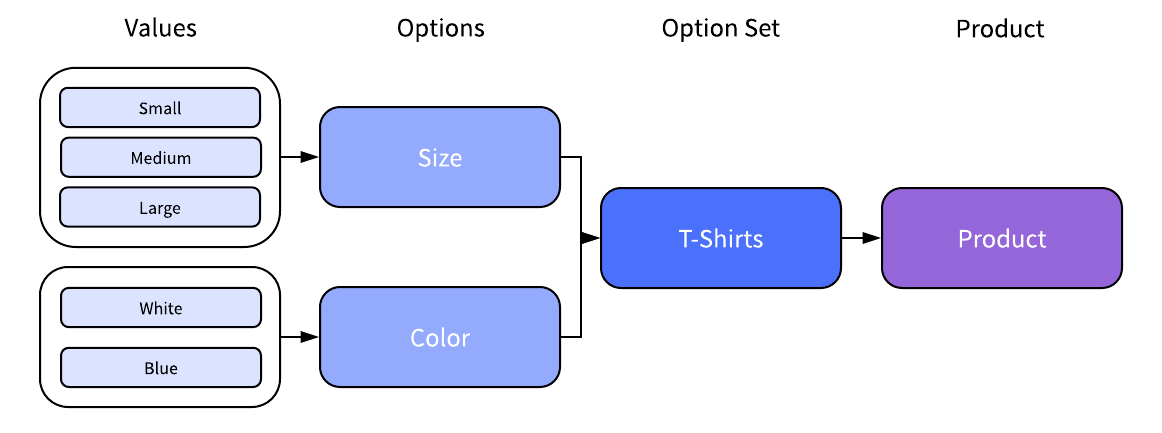
Sets can be specific to one particular product, or they can be reused across several products, so you don’t have to create a new set for similar products.
Rules, like changing the price based on selected options, can also be associated with option sets. Unlike product-level rules, option set-level rules are reusable since the same set can be assigned to several products. We’ll discuss how to create and manage rules in a later section.
Creating or Editing an Option Set
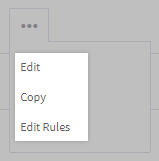
To create a new option set or edit an existing one, go to Products › Product Options and click on the Option Sets tab. Click an existing option set’s name to edit it, or use the Action menu to edit the option set, copy it, or edit its rules.
To make a new option set, click Create an Option Set.

The Option Set Name field is not shown on the storefront but is used for identification in the control panel. We recommend naming it something relevant to the product or brand. In the list of available options, click Add next to the options you want to be in your product. When you select them, they will appear to the right, under Options In This Set. Click the minus button (-) to remove an option from the set.

To remove a particular value (like Extra Small from a Size option) or change whether a particular option is required, click Edit next to the option under Options In This Set.
- Uncheck boxes of values you don't want to include.
- Select whether shoppers will be required to choose a value before adding the product to their carts. On the storefront, an asterisk appears next to options that are set as Required.

Applying an Option Set to Your Products
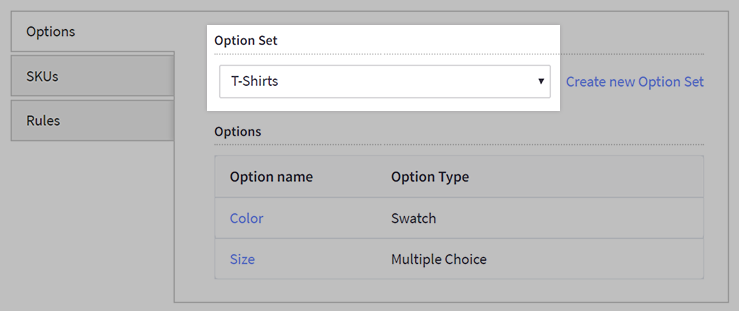
To add an option set to a single product, go to the Options & SKUs tab in the Product Edit page and use the Option Set dropdown to apply an option set. This will enable the SKUs and Rules tabs on the left side. To remove an option set from your product, select (None) from the dropdown.
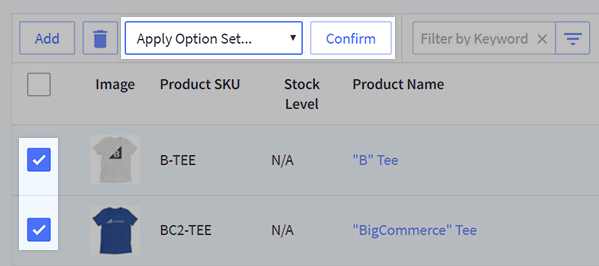
To apply an option set to products in bulk, go to Products › View and check the box next to each product you want to apply the option set to. In the Choose an Action dropdown at the top of the list, select Apply Option Set and click Confirm. In the popup that appears, select the option set you want to apply to the checked products.
Note: Applying an option set in bulk is not supported by the Multi-Channel Product List (enabled when you connect certain sales channels). You can still apply option sets in bulk via import.
Can option display names be changed within an Option Set? Yes, changing an option's display name within the Option Set will update the display name for all products using that option set. To learn more, see our FAQ.
Creating SKUs
SKUs can be created manually, or automatically using the Auto-SKU Generator. You can create up to 600 SKUs for a single product.
In addition to being creatable in the control panel, SKUs and SKU-specific product data can also be imported via CSV file. See our Guide to Legacy Product Import/Export for more information.
SKUs can be created for the following option types:
- Swatch
- Multiple choice
- Product pick list
- Checkbox (cannot be created with the Auto-SKU Generator)
To create a SKU while editing a product, click the Options & SKUs tab at the top, then click SKUs. Click Create a SKU.

In the popup that appears, fill out the attributes for your SKU, such as price, image, weight, and any product identifiers. Note that the SKU and Options for this SKU fields are required.
Make sure your SKUs have a value attributed from each option in the product's option set. If a product's SKU does not possess a value from each option, the Add to Cart button can fail to appear when certain option combinations are selected from the storefront. See Troubleshooting | "Add to Cart" Button Missing for more information.
Using the Auto-SKU Generator
The Auto-SKU Generator is a tool to help you quickly create and assign SKUs for all of your product option variants. Once you've generated your SKUs, you can update the inventory manually, or use the Import/Export tool to maximize efficiency.
Important: In order to use the Auto-SKU Generator, all options on your product must be marked as required. You can mark options as required by editing the option set they are in.
To use the Auto-SKU Generator, go to the Options & SKUs tab while editing a product and click the SKUs tab to the left. At the top, click Generate SKUs.
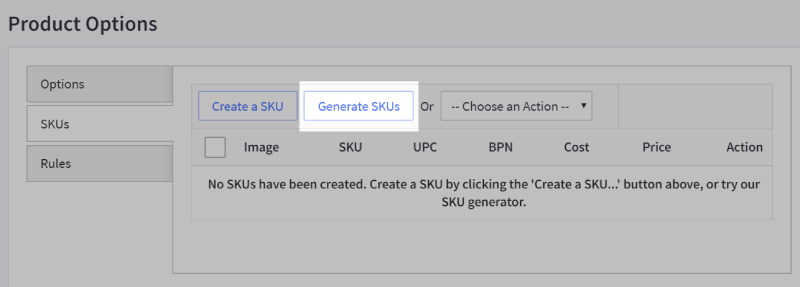
In the pop-up window, you can specify the pattern used to generate your SKUs. The following universal elements can be used regardless of option type:
- Unique ID — a random alphanumeric ID string
- Fixed text — a set text that you define (like "TEST")
- Product name — the product's name (configurable)
- Brand — the product's brand name (configurable)
There are also option value elements that can be enabled if your product is using that specific option type.
- Size — the variant's size
- Color — the variant's color
- Swatch — the variant's swatch color/pattern/texture, if you have a swatch option applied
- Product pick list — the items in the product pick list, if you have a product picklist option applied

Click + to add new elements to the SKU pattern or X to remove them. You can specify whether uppercase or lowercase letters are used, restrict the number of letters to be used for each element, or set it to use an acronym. For option value elements, you can also create an option value map to specify your abbreviation for each value within the option (such as “XL” for “Extra Large”).
Click Generate to generate the variant SKUs based on the pattern you set. Note that SKUs will not generate if there are more than 600 option combinations for the product.
Creating Rules
Rules allow you to alter attributes of the product based on the selection of one or more options. You can create the following rules:
- Changing the price
- Adjusting the weight
- Make it unavailable for purchase
- Show a different image
- Stop processing rules
Rules can be set for the following option types:
- Color
- Size
- Multiple choice
- Swatch
- Checkbox
- Product pick lists
When creating a rule, you may want it to only apply to an individual product, in which case you would create a product-based rule. If you want to be able to apply the rule to multiple, similar products at the same time, you can create an option set-based rule, which will apply to all products using the same option set. You can create product-based rules in bulk via CSV import.
To create a product rule while editing a product, click the Options & SKUs tab at the top, then navigate to the Rules side tab and click Create a Rule.
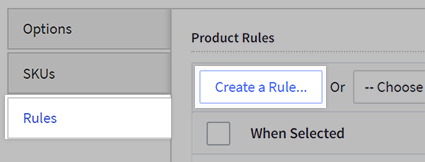
If you want to create an option set rule, go to Products › Product Options, and select the Options Sets tab. Navigate to the option set, and select Edit Rules from the Action menu. Click Create a rule... in the Manage Option Set Rules page to launch the pop-up for configuring rules.

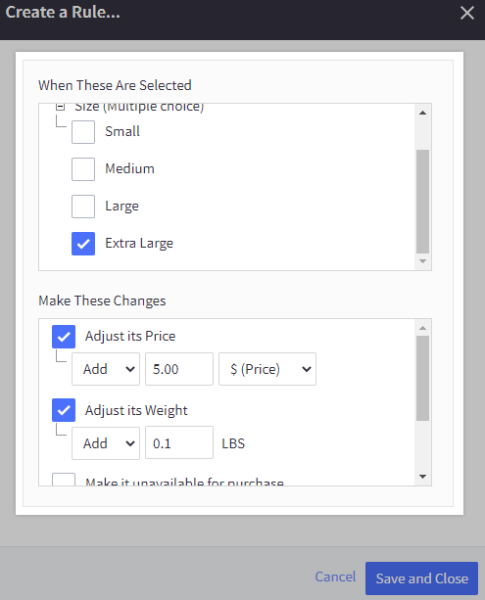
In When These Are Selected, select the option/combination of options you want the rule to apply to. Click the plus sign (+) next to the name of the option to view its values, then select the applicable combination of values for your rule.
Under Make These Changes, put a checkbox next to each change you want to implement when the customer selects the option value or combination you've selected above. You may need to add additional details for some rule types. See the list below for more information on each rule type.
- Adjust its Price — This rule lets you adjust the price when a particular value or combination of values is selected. You can add to or remove a certain amount (based on your currency) or percentage. You can also set a fixed price. Fixed prices cannot be zero.
- Adjust its Weight — This rule lets you adjust the weight when a particular option or combination of options is selected. You can add or remove weight (based on your Physical Dimension Settings). You can also set a fixed weight. Fixed weight cannot be zero.
- Make it unavailable for purchase — This rule can be used to make a certain option or combination of options hidden or unavailable. You have two choices:
- Hide the option — Use for a particular value or values you don't want the client to see as being available. For example, if you offer a shirt in multiple colors and sizes, but don't want to let customers see the red shirt, you can opt to hide red. This will hide all instances of the values you select, instead of targeting specific combinations. For example:
- Selecting both small and red will hide the small and red options.
- Selecting to hide a SKU will result in the same effect as Show Unavailable.
- It cannot be used to create conditional options (e.g. if the customer chooses small, hide red as an option).
- Show Unavailable message — used to make a certain option or combination of options show an 'unavailable' message when selected by the customer.
- Hide the option — Use for a particular value or values you don't want the client to see as being available. For example, if you offer a shirt in multiple colors and sizes, but don't want to let customers see the red shirt, you can opt to hide red. This will hide all instances of the values you select, instead of targeting specific combinations. For example:
- Show a different image — This rule changes the primary product image when a particular option or combination of options is selected. The image must be saved on your computer to be selected. This function does not work with the Image Manager. Select Browse to select the new image from your computer.
- Stop processing rules — This rule makes it so that once a rule has been triggered, no other rules will be triggered afterward.
- For example, you would use this if you have a rule that adds $50 to the price, and another that will add $5 to the price for something else, but you don't want to tack on the $5 if your customer is already choosing the $50 option.
FAQ
How do I edit sale prices for variants?
Sale prices can be edited per variant by using the Bulk Edit tool from the Product List.
What happens when I rename an option that is assigned to an option set?
Changing an option's display name will not automatically update the name within an Option Set. This is intended behavior. Option display names can be modified within the Option Set to keep the original display name intact for use in other option sets.
Why do option display names not update for all associated option sets?
If a change to the option's display name updated all option sets using that option, then that would prevent merchants from modifying display names on option sets for specific purposes.
Can I use special characters (e.g. @, #, $, %) in SKUs?
Yes. However, storefront search does not recognize special characters in search strings. If your customers search by partial SKU match, we recommend avoiding using special characters in SKUs.
Why isn't my product available in the product pick list?
Product pick lists do not work with products with any the following attributes:
- Product Options
- Event dates (deprecated)
- Configurable fields (deprecated)
Products with options or configurable fields cannot be added to a product pick list option or a discount rule because there is no way to determine which particular option or configurable field the customer would choose.
Can I configure pick list add-on products to show as a separate line item on the cart/checkout/invoice?
No, pick list add-on items do not show as separate products, but as an option on the base product.
What happens if I change the option set on a product?
Changing the option set on a product will remove any existing SKUs or product-level rules from the product. Use caution when changing the option set of an existing or live product - deleted SKUs or rules can only be restored manually or with a backup.
What does it mean when an option is “required”?
It means the user must select a value for that particular option before the product can be added to the cart or purchased. For example, most apparel has a required size option.
Options that are required and do not have a default value set will display “Choose Options” or “Please Choose an Option” until a value is selected.
Can I create conditional options in the Products v2 experience?
Yes. To do this, create a new option set or assign an existing set to your product in the Options & SKUs tab, assign SKUs to the options, set Inventory Tracking to Track inventory by options in the Inventory tab, and leave the stock levels for the unavailable combinations at 0.
Why does an option have None as a choice?
This means that the option is not required in its option set.
Can I apply an option set via import?
Yes, the importable field Option Sets can be used to apply sets to products using a CSV file import.
Why don't I have a "Choose an Action" drop-down on my View Products page?
Assigning an option set in bulk is not currently supported by the Multi-Channel Product List, which is turned on when you enable certain sales channels in the Channel Manager.
How do I delete customers' uploaded files?
If you have a product that allows customers to upload a file of their own (with a File Upload Field product option), that file will be stored on the server. To delete the file, you will need to access your store through WebDAV and delete the file from the server. Uploaded files are stored in product_images/configured_products.
Will storefront product price ranges include out-of-stock variants?
Yes, customers will see price ranges that include all of your variants, even ones that have no inventory. To ensure that price ranges are accurate for your products, we recommend either adding in prices for out-of-stock variants or simply removing their prices and allowing them to inherit the base product's price.
In the next chapter, we’ll discuss how to create and edit product options and rules in bulk via CSV import.


