Part of running a business is calculating and collecting sales tax. Tax collection requirements will differ depending on your local, state, and federal laws, and we recommend using an automatic tax setup if you are in a supported area.
However, you may want to use the basic tax setup for a variety of reasons, including:
- your location is outside of our automatic tax providers’ supported areas
- in combination with an automatic tax provider, using provider targeting
- as fallback tax
- if you have simple tax liability
The basic tax setup allows for you to define the tax rates for the different regional zones that you are required to collect in. The sales tax will be applied at checkout after the customer has entered their address.
Below, we’ve provided detailed instructions on setting up tax zones (where you charge) and tax rates (how much you charge). Be sure to use this in conjunction with your store’s tax settings.
Need help with taxes? The instructions in this article assume you already know the tax requirements necessary for running your business online. We highly recommend contacting your accountant or local tax authority to ensure you are charging tax properly for your store. Note that our support team is not qualified to give tax advice.
Terminology
Before you start setting up basic taxes, you will need to determine the following:
- What do you need to charge tax on? It can be different product types, shipping, or services like gift wrapping. This will determine your tax classes.
- Where do you need to charge taxes? It can be countries, states, cities, and even counties. This will determine your tax zones.
- Who do you need to charge for taxes? Do you anticipate any tax-exempt customers? This will determine if you need to create a tax-exempt customer group.
- What rates do you need to charge? This determines the tax rates, which are assigned by zone and tax class.
- How do you want prices to be displayed with taxes? This is usually based on your customer’s location and their local preferences, such as displaying prices exclusive of tax for US customers and inclusive of tax for Australian customers.
Example Case
Here is an example of a hypothetical store’s tax settings. They need to:
- Charge only on orders placed with a Tennessee billing address
- Use tax-exclusive pricing (pricing is shown without tax added in)
- Set up tax rates on two different product types:
- 4% on perishable goods
- 7% on non-perishable goods
- Set up a 0% tax rate for tax-exempt customers
They would need to use the following setup to address each of these aspects:
- Charge only on orders placed with a Tennessee billing address — set up a Tennessee tax zone
- Use tax-exclusive pricing — select “Display prices exclusive of tax” on the Tennessee zone's tax display settings
- Different tax rates between perishable and non-perishable goods — set up a “perishable goods” tax class and a “non-perishable goods” tax class, then set the tax rate for both classes in the Tennessee zone.
- Set up 0% rate for tax-exempt customers — set up a tax-exempt customer group with all rates set to 0%
Requirements
- To view and manage tax settings, you must have the Manage Tax Settings permission enabled on your user account.
- To view and edit products, you must have the Manage Products, Edit Products, Product Options, and Manage Brands permissions enabled on your user account.
- To view and manage customer accounts and customer groups, you must have the Manage Channels, Manage Customers, Edit Customers, Manage Categories, and Customer Groups permissions enabled on your user account.
- Customer groups are only available for stores on a Plus plan or higher.
Getting Started
Once you have an idea of the tax requirements you need, you can begin setting up tax. Go to Settings › Tax, and click Edit next to Basic Tax.
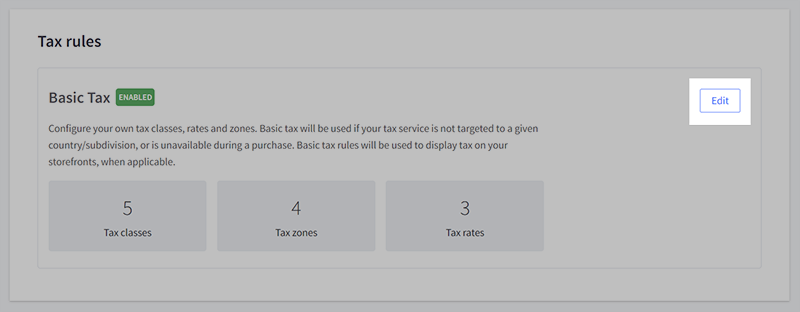
We recommend beginning your tax setup in the following order. Keep in mind that you can always test your orders and tweak your settings if needed.
1. Create all tax classes you need for your different product types. Once created, they will show up in other parts of the tax configurations.
2. Create and configure your tax zones, then specify the tax rates for each zone.
3. We recommend doing a test order for each tax scenario you need to address to make sure everything is working as intended.
Tax Classes
Tax classes are classifications for products and other line items that may need different tax rates charged. For example, your state may require you to tax perishable goods and non-perishable goods at different rates, or you may be required to tax shipping or gift wrapping.
This is achieved by creating different tax classes for each group. Any tax classes you create are added to all of your zones, where you can assign them the appropriate rate. Any unused classes in a zone can be set to a rate of 0%.
To view, add, or edit tax classes, click Edit next to Basic Tax, then click on the Tax classes tab.

We've included some tax classes automatically. If you are selling products that require different tax rates, such as perishable and non-perishable goods, you can create those tax classes here.
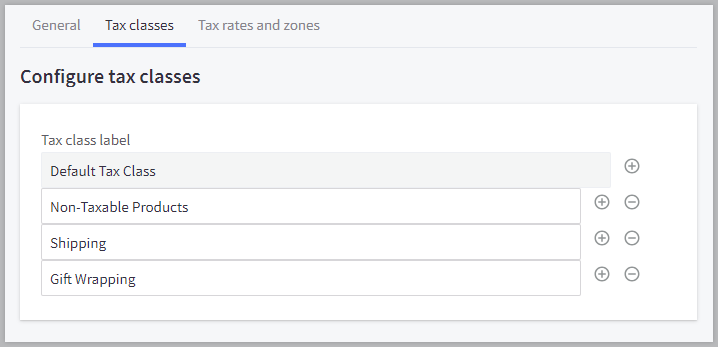
To create a new tax class, click the + button. You can also delete tax classes by clicking the - button. However, we recommend keeping all tax classes and just assigning them a rate of 0% if you won't be using them.
Assigning Tax Classes to Products
Once the tax classes are configured, you will need to update your products to indicate which tax class they belong to. For example, you would update your perishable products to your newly created “Perishable Goods” tax class.
BigCommerce automatically assigns all products to the Default Tax Class. To assign a different tax class, edit the product. Click Pricing on the left side navigation, then select a class from the Tax Class drop-down menu.
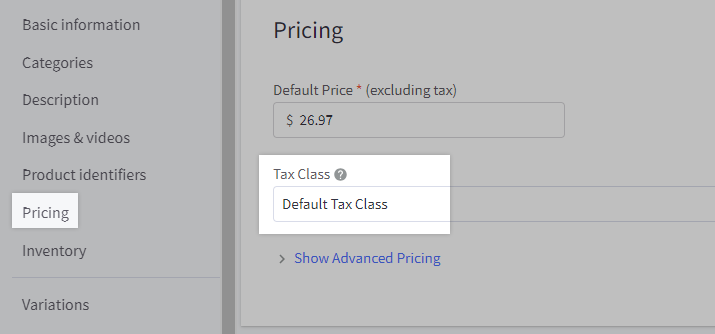
If you have several products, we recommend updating them in bulk by editing the Tax Class column in the CSV import file.
Shipping and Gift Wrapping Tax Classes
By default, your store will have Shipping and Gift Wrapping tax classes. These are for merchants who are required to collect taxes on shipping or gift wrapping. Even if you are not collecting tax for these, do not delete them.
If you are not required to collect taxes on these, set the tax rate to 0% in all of your zones.
In your store's tax settings, there are fields for specifying the Shipping tax class, Handling tax class, and Gift Wrapping tax class. Ensure that these field values are set to their corresponding tax classes. If they are set to something else, your shipping, handling, and gift wrapping taxes will be charged at the rate specified for that other class.
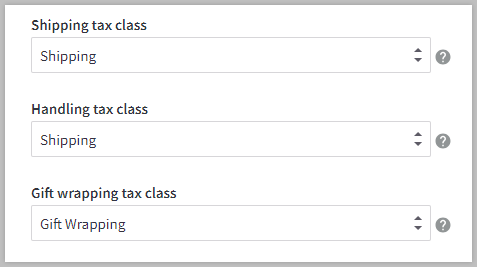
Once you have set up your tax classes, they will appear in the tax zones you create in the next step.
Tax Zones
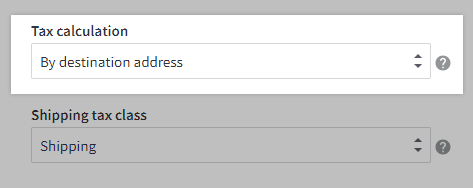
To charge different rates for different geographic locations, you will create one or more tax zones. A tax zone specifies the geographical area where a group of tax rates apply. Set whether the tax zone geographical area applies to a customer’s billing address, shipping or pickup address, or your store’s shipping origin address in your tax settings.
To view your tax zones, go to Settings › Tax, click Edit next to Basic Tax, then click on the Tax Rates and zones tab.

You will see any current tax zones and an overview of their settings:
- Zone type — how the zone is defined. Zones can be based on country, state, or postal code.
- Price display — whether the zone’s price display setting is tax inclusive or tax exclusive
- Status — whether the zone is currently active on the store or not
Default Zone
All stores contain a Default Zone, which applies a 0% tax rate to any regions not set up in another zone. Do not set up tax rates in this zone. Unless you have nexus everywhere in the world, you will want to keep this as an “everywhere I don’t need to charge taxes in” zone.
Adding Zones
To add a new tax zone, click Add a Tax Zone.

On the next page, complete the fields to set up the geographical area, which customers the zone applies to, and display settings for your new zone.
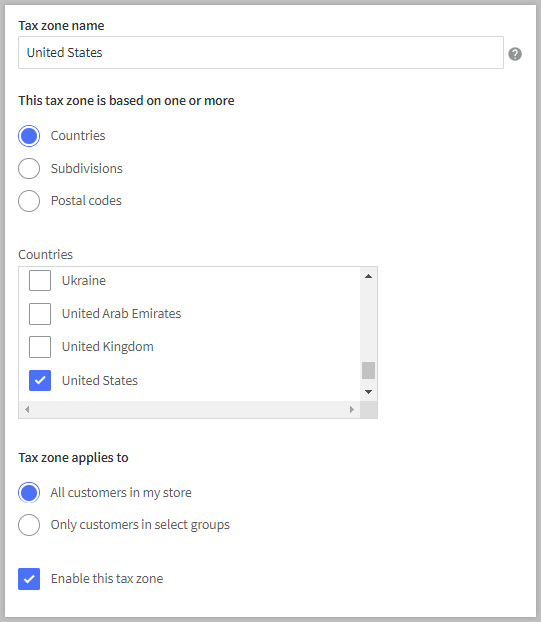
- Tax zone name — set the name internal of this tax zone. We recommend naming it after the geographic region it represents.
- This tax zone is based on one or more — select whether the zone represents one or more countries, subdivisions (such as state or province), or postal codes. Postal codes can be used together in a zone for city or county taxes.
- Tax zone applies to — apply to all customers or limit to one or more customer groups. To include guest customers, assign a default customer group. Only available for stores on a Plus plan or higher.
- Enable this tax zone — toggle this checkbox to enable or disable the tax zone
Tax Zone Display Settings
Using an automatic tax provider? Tax zone display settings configured here will still apply in your store if an automatic tax provider is enabled.
While adding or editing a tax zone, you can configure how the pricing will display on your storefront.
If you have geolocation enabled or a shopper enters their address, the prices displayed in product listing, product detail, cart, and checkout pages will use the tax display settings of the relevant tax zone.
Note that you must set up all of the required tax zones for geolocation to correctly display prices to shoppers on your storefront. See Tax Overview for more information and recommendations.
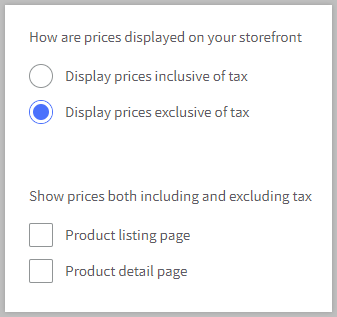
- How are prices displayed on your storefront — select to display prices as either inclusive or exclusive of tax
- Show prices both including and excluding tax — select to display both inclusive and exclusive pricing on product listing pages (such as category and brand pages) and product detail pages (product pages). While this setting is optional, it can be valuable for pricing transparency to shoppers.
Once you’ve finished with modifying the settings, click Save to add or update the tax zone.
Responsive Tax Display Settings — If you’ve selected to use tax zone display settings for “Prices on Invoices” in Tax Settings, order invoices will reflect the display settings for the tax zone that the customer falls under. This means that customers will see their invoices formatted to match the tax display on the cart and checkout. For example, a US customer will see prices exclusive of tax on invoices, whereas a UK customer will see prices inclusive of tax, provided that the store has these settings enabled in their respective tax zones.
Editing and Copying Zones
To edit a tax zone, click on the Action menu next to the zone, then select Edit settings. You can make a copy of a tax zone and its rates by selecting Duplicate zone. This can be useful when you are setting up multiple tax zones that will be similar to each other.

Deleting Zones
To delete tax zones, check the box next to its name, then click the Trash icon in the top navigation. Click OK to confirm, and the zones will be removed.
Note that the Default zone, used for any location outside of your other tax zones, cannot be deleted.

You can also select Delete from the Action menu.

Tax Rates
Once a tax zone is created, you can add rates to it. Tax rates are the percentages at which products or services are taxed. You may charge multiple tax rates within a zone. For example, if you have a city zone, you may need to set up a set of city-based tax rates in addition to a set of state-based tax rates.

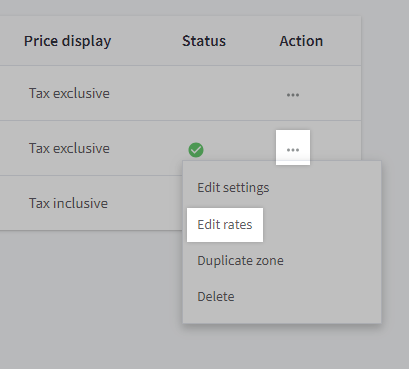
After you have created a tax zone, click the Tax rates tab to add, delete, or edit tax rates. You can also select Edit rates from the Action menu next to a particular zone when viewing the list of tax zones.
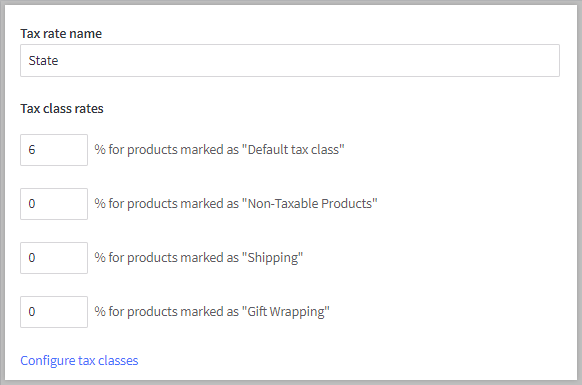
When adding or editing a rate, you will need to specify a Tax rate name and enter a rate for each tax class. Name the tax rate something that represents which tax you are charging, like City Tax or Federal Tax. If you do not need to charge tax for a particular tax class, enter 0 for the rate.
Tax Calculation Priority
In some circumstances, you will need to apply multiple rates to a single tax zone. For example, you may need to charge both city and state, or both provincial and federal sales taxes. If you have a tax zone that has more than one rate, you need to set the Calculation Priority.
Tax rates in a zone that share the same priority will be added together. Tax rates in a zone that have different priorities will be compounded in order of priority, where the lowest number has the highest priority. So for example, if you had to charge a GST rate on top of a PST rate, you would give PST a priority of 0 and GST a priority of 1.

Tax rates can be deleted using the same methods for deleting tax zones — by selecting the rate, then clicking the Trash icon in the top navigation, or by selecting Delete from the Action menu.
Common Tax Situations
- State/Province with a single tax rate
- Country with a single inclusive tax rate
- State/Province with multiple tax rates
- Zone based on postal codes
- Using wildcards
Below we've included a few examples of how to set up zones, classes, and rates for everyday situations.
State/Province with a Single Tax Rate
First, we'll create a zone based on a state with a single tax rate. In our example, we're using Texas.
1. In the basic tax settings area, click on the Tax rates and zones tab, then click Add a tax zone.
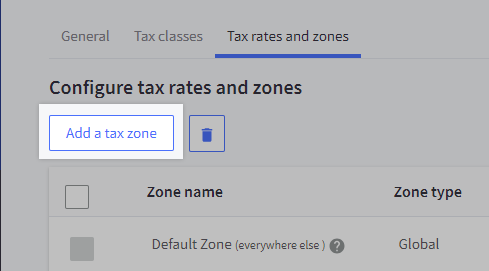
2. Name the zone "Texas", then select This tax zone is based on one or more Subdivisions.
3. Select United States in the Countries box, then select Texas in the Subdivisions box. Select Display prices exclusive of tax, as this is the normal expectation for US customers. Adjust any other settings to your preference, then click Save.
4. Once you’ve saved the new tax zone, click Add a tax rate on the Tax rates tab.

5. Name the tax rate, then type in the percentages for the appropriate tax classes. In this case, we only want to charge tax on products (not gift wrapping or shipping), so we will enter "8.25" into the field for Default tax class and "0" for the other tax class rates.
6. Save your changes. Your Texas zone is set up successfully.
Country With a Single Inclusive Tax Rate
For this example, we will create a zone based on a country with a single tax rate that displays pricing on the storefront with all applicable taxes included. With tax zones of this type, you will often see tax settings such as a default tax address used to offer a comprehensive shopper experience from the storefront homepage to order status emails. In the example below, we’re using the United Kingdom as our country.
1. In the basic tax settings area, click on the Tax rates and zones tab, then click Add a tax zone.
2. Name the zone "United Kingdom", then select This tax zone is based on one or more countries.
3. Select United Kingdom in the Countries box, then select Display prices inclusive of tax. Adjust any other settings to your preference, then click Save.
4. Once you’ve saved the new tax zone, click Add a tax rate on the Tax rates tab.
5. Name the tax rate, then enter in the appropriate percentages for your tax classes. To only charge tax on products (not gift wrapping or shipping), we will enter “20” for the Default tax class and “0” for the other tax class rates.
6. Save your changes. At checkout, taxes will now display as included in product prices for UK customers.
State/Province with Multiple Tax Rates
In our next example, we'll create a zone based on a province with multiple tax rates. In this example, we're using Quebec, which has both a federal and provincial tax.
1. In the basic tax settings area, click on the Tax rates and zones tab, then click Add a tax zone.
2. Name the zone "Quebec", then select This tax zone is based on one or more Subdivisions.
3. Select “Canada” from the Countries box, then “Quebec” under Subdivisions. Select Display prices exclusive of tax, as this is the normal expectation for Canadian customers. Adjust any other settings to your preference, then click Save.
4. Save the new tax zone, then click Add a tax rate on the Tax rates tab.
5. Give the tax an appropriate name. For this example, we will name the federal tax rate "GST" (Goods and Services Tax). To only tax products, enter "5" for Default Tax Class and "0" for the other tax class rates.
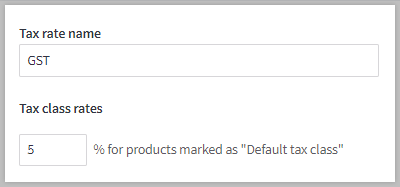
6. Leave the Calculation priority set at "0", as we want this rate calculated first. Save your changes.
7. Click Add a tax rate to add a second tax rate for provincial taxes.
8. For this example, name the provincial tax rate "QST" (Quebec Sales Tax). Enter "9.975" for Default tax class and "0" for the other tax class rates.
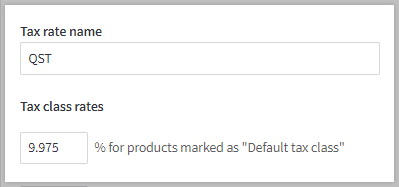
9. Set the Calculation priority to "1", so that it is calculated after the federal tax (GST) rate. Save your changes.
Zone Based on Postal Codes
Finally, we'll create a zone with a single tax rate, based on postal codes. In this example, we're using Florida, which has different tax rates based on your location within the state. Even though we are only creating a single 7.75% zone in this example, in practice, you'll want to create a zone for each different rate.
1. In the basic tax settings area, click on the Tax rates and zones tab, then click Add a tax zone.
2. Name the zone. In this example, it is named "Florida 7.75%". Select This tax zone is based on one or more postal or Postal codes.
3. Select United States from the Countries drop-down, then type in the postal codes that apply to your specified tax rate into the Postal Codes box. Type each postal code on a new line, as illustrated below:

4. Select Display prices exclusive of tax, as this is the normal expectation for US customers. Adjust any other settings to your preference, then click Save.
5. Once you’ve saved the new tax zone, click Add a tax rate on the Tax rates tab.
6. Give the tax an appropriate name. In our example, we're naming it “Florida 7.75% Postal Codes”. Enter the percentages for each of the tax class rates. For this example, enter "7.75" for Default tax class, and "0" for the other tax class rates.
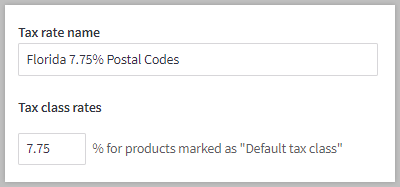
7. Once finished, click Save.
Using Wildcards
The Postal Codes field supports the use of the wildcards * and ?.
Using an asterisk (*) will capture all numbers from its position in the postal code all the way to the right. For example, entering 335* will capture all postal codes ranging from 33500 through 33599.
Using a question mark (?) will capture numbers 0-9 only in the position that the question mark is placed. For example, entering 335?1 will capture 33501 through 33591.
To capture all variations of a specific postal code, such as for ZIP+4 postal codes, enter the base code on one line, then the base code with an asterisk on the next line, like so:
- 53927
- 53927*
- 53934
- 53934*
- 53910
- 53910*
FAQ
How many tax zones can I create?
There is no limit to the number of tax zones you can create on your store.
How many postal codes can I add to a tax zone?
The Postal codes field is limited to 200 characters. If you need to add more, we recommend creating additional tax zones.
Do I have to create zones for everywhere I don’t charge tax?
No. There is a zone called “Default Zone (everywhere else). Do not create tax rates for this zone. This ensures that, by default, locations that you haven’t set up a zone for will not be charged taxes.
Why am I unable to select customer groups when specifying which groups a tax zone applies to?
When assigning customer groups to a tax zone, up to 1,000 customer groups are displayed in the list. If you see a “You have exceeded the limit of customer groups for this option.” message, your store has over 1,000 customer groups.
Existing customer group selections are still applied to the tax zone, but updates are not able to be made within the control panel. To update the zone, reduce the number of customer groups below 1,000 or use the Tax Zones API.

How do I collect a combination of local, state, and federal tax rates?
You may need to charge additional rates for a local jurisdiction in addition to a county, state, provincial or federal tax. However, an order will only be charged the rates of the zone it most closely corresponds to. In other words, if a customer’s postal code matches your city zone, it will take the city zone rates but not your state zone rates, even if the city is within that state.
To charge a combination of city and state rates, you will need to set up all applicable rates within each zone. So if customers within a certain city need to be charged both city and state rates, you will add both.
For example, if you are based in Dallas, Texas and had to charge both city and state taxes, you would create the following zones and rates:
- Texas (zone)
- State tax (rate)
- Dallas (zone)
- State tax (rate)
- City tax (rate)
This way, a customer based in Texas outside of Dallas will be charged the Texas zone rates: a state tax. A customer based inside of Dallas will be charged the Dallas zone rates: the state and city tax.
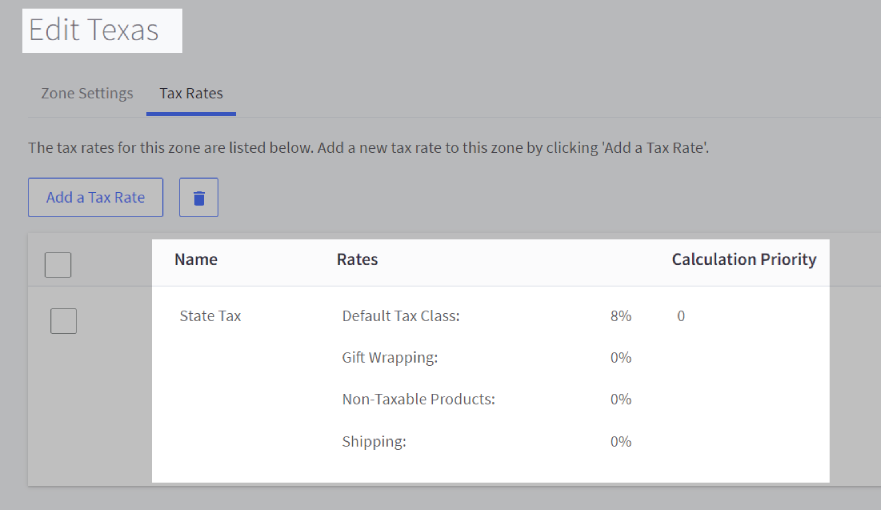 | 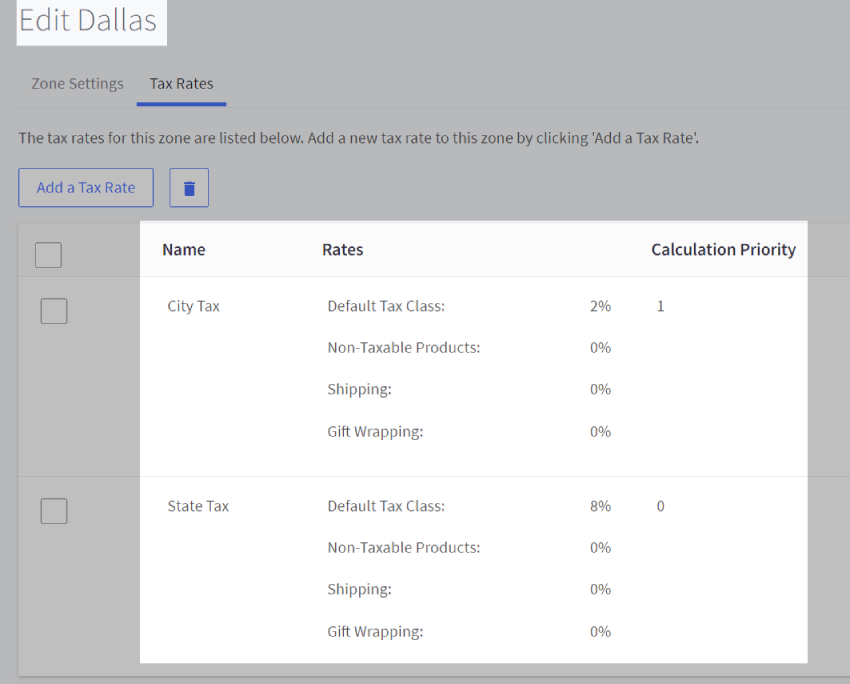 |
Can I restore my basic tax setup to its original values?
Yes, this can be done from the General tab in the basic tax settings area. Click the Reset Configuration button to restore tax classes, rates, and zones to their default values.

My sales tax amount is off by a cent. Is something wrong?
Basic tax calculation is done at the item line level. This can cause discrepancies when compared with tax calculated at the order level. See Tax Overview for more information.


