Stores on a Pro or Enterprise plan can install SSL certificates from third-party certificate issuers for single-storefront stores or multi-storefront default storefronts.
This can be useful if you purchased a domain from a third party and want to apply their SSL certificate, or if you are planning to use a multi-domain or wildcard SSL.
For additional native storefronts, once a domain is connected, a free SSL certificate is automatically installed. However, stores on all plans can install a third-party SSL certificate, if desired.
Single-storefront stores on a Standard or Plus plan can use the automatically enabled free SSL certificate or purchase one from BigCommerce.
Point your domain to BigCommerce before installing a third-party SSL certificate. If your domain is not directed to your store before installing the certificate, an installation error will occur. For more information on pointing your domain to BigCommerce, see Changing Domains.
How It Works
Third-party SSL certificates require generating a Certificate Signing Request (CSR). This gives the SSL certificate provider the necessary information to create a working SSL certificate.
Single-storefront and multi-storefront default storefronts generate the CSR through the account dashboard. For multi-domain or wildcard SSL certificates and additional native storefronts, the CSR must be generated from a third-party.
The CSR is provided to the SSL issuer and they will use it to generate the SSL certificate. Once your certificate(s) are generated, they are installed in the account dashboard for single-storefront and multi-storefront default storefronts or in Channel Manager for additional storefronts.
Requirements
- Only the Store Owner can access the account dashboard to generate a CSR or install an SSL certificate.
- To access Channel Manager, the Manage Channels permission must be enabled on your user account.
- To edit settings for individual storefronts, the Edit Channels permission must be enabled in your user account. Only the store owner can enable this permission for other users.
Generating a CSR (Certificate Signing Request)
You will need to generate a CSR (Certificate Signing Request) to provide your third-party certificate issuer before generating an SSL certificate. The CSR contains store and server information necessary for the SSL certificate to be installed successfully.
Note: This section only applies to single-storefront stores and multi-storefront default storefronts. See the sections on Installing a multi-domain or wildcard SSL certificate and Installing SSL certificates on additional storefronts.
1. Log into your store as the Store Owner, and go to Settings › SSL certificates.
2. Select your store domain from the drop-down menu, then click Generate a CSR.
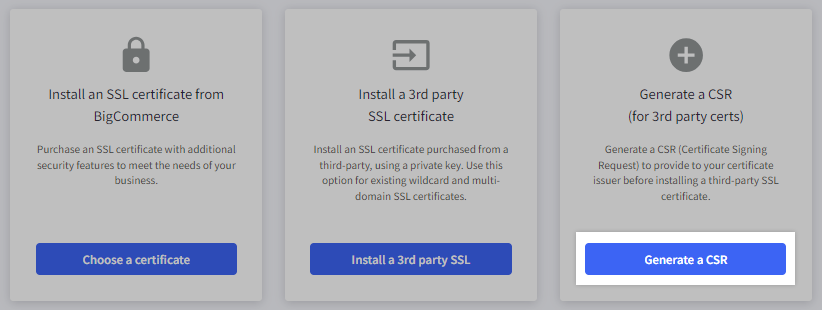
3. Complete the required information, then click Generate CSR.
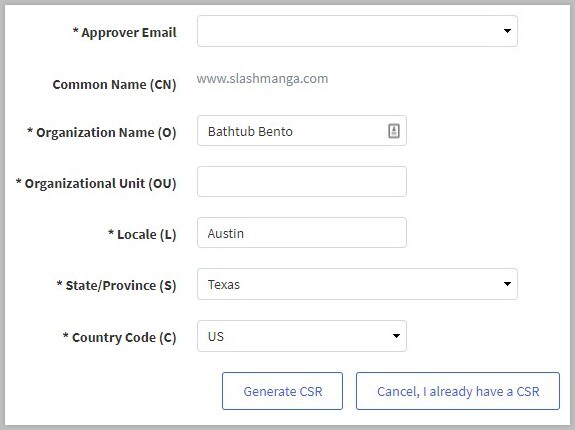
- Approver Email — an email address selected from the dropdown menu to approve the SSL request. You must have access to this email address to complete the SSL install process.
- Common Name (CN) — the fully qualified domain name you wish to secure (selected in Step 2)
- Organization Name (O) — usually the legal incorporated name of a company. It should include any suffixes, such as Ltd., Inc., or Corp.
- Organizational Unit (OU) — the department name (e.g. HR, Finance, IT)
- Locale (L) — city or town (e.g. Austin, San Francisco, Sydney)
- State/Province (S) — state, province, region, or county
- Country Code (C) — the two-letter ISO code for the country where your organization is located (e.g. US, CA, GB)
4. On the following page, you will be provided the CSR. Click anywhere in the box and copy the entire block of code, including the lines that contain -----BEGIN CERTIFICATE REQUEST----- and -----END CERTIFICATE REQUEST-----.
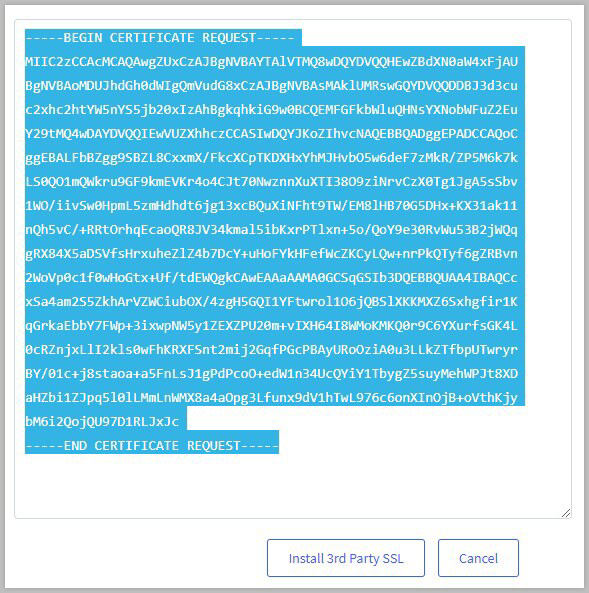
We'll also email the generated CSR to the Approver Email address. The message will have the subject line, A new CSR has been generated for your SSL certificate.
Generating and Installing the SSL Certificate
You can now generate your SSL certificate with your third-party provider, using the CSR from the previous section. If you've already received your SSL certificate before getting the CSR, reach out to your SSL certificate issuer for guidance on reissuing the SSL certificate.
1. Provide the certificate issuer with the CSR you previously copied.
2. Use the following settings when downloading your SSL certificate:
- Server type - Apache or Apache Mod (HTTP)
- Hash - SHA-2 (SHA 256)
- Bit Strength - 4096-bit or 2048-bit
3. You will receive two files: the SSL certificate and a bundle containing the intermediate certificate. If you receive them combined in a zipped file, extract them on your computer before proceeding.
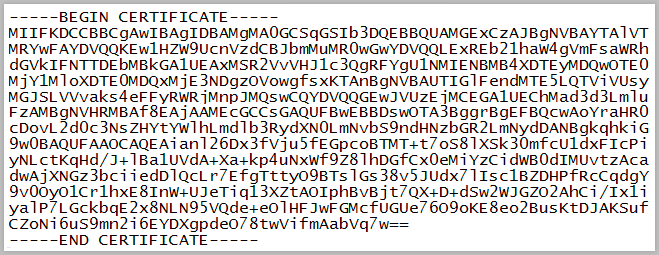
4. Open the certificates using a text editor, such as Notepad or TextEdit. You may need to launch the text editor first, then navigate to your certificate files. Copy the SSL certificate, including the lines that contain -----BEGIN CERTIFICATE----- and -----END CERTIFICATE-----.
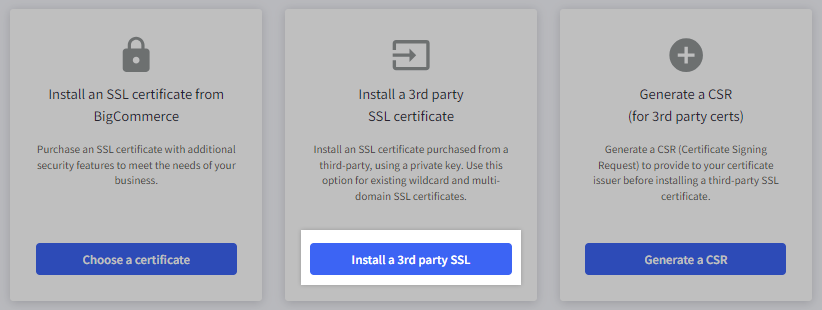
5. In the BigCommerce control panel, go back to Settings › SSL certificates, select your domain from the drop-down menu, then click Install a 3rd party SSL.
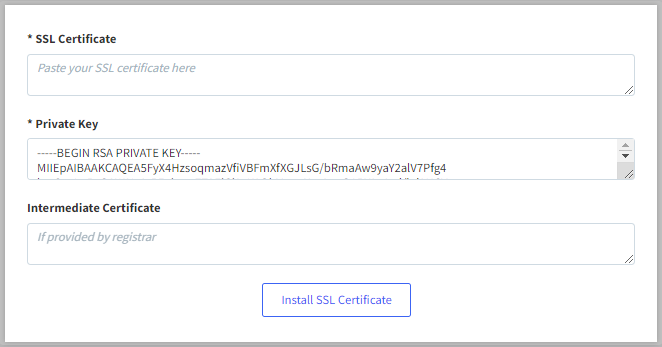
6. Paste your SSL Certificates into the appropriate fields. Ensure that there are no spaces before and after the dashes at the start and end of the certificate.
- SSL Certificate — the SSL certificate. It will not be labeled bundle, CA, or intermediate
- Intermediate Certificate — the SSL certificate that is labeled bundle, CA, or intermediate. It may consist of multiple blocks of code.
7. Click Install SSL Certificate.
Your SSL certificate will take approximately 20 minutes to install. After this time, you can use the tools listed below to verify that it was properly installed.
Update your DNS! Switching to a private SSL will change your IP address. If you are pointing to your store using an A record, you'll need to update the DNS at your registrar with your new IP address.
Installing a Multi-Domain or Wildcard SSL Certificate
Multi-domain and wildcard SSL certificates have the capacity to cover multiple domains or subdomains. As such, they can be very useful if you are running multiple stores or a single store with several sub-sites. Multi-domain SSL certificates will work with any domain name entered as the Common Name or SAN (Subject Alternative Name) when purchasing the SSL certificate.
Wildcard SSL certificates can be used for multiple subdomains of a single domain. For example, you could purchase a single wildcard SSL certificate to apply to www.domain.com, shop.domain.com, blog.domain.com, and so forth.
SSL certificates require a private key that matches the CSR used to generate them. BigCommerce does not provide private keys, and CSRs generated by BigCommerce cannot be used for a certificate that has a wildcard common name or a common name other than the domain/subdomain of the store. Therefore, when installing a multi-domain or wildcard SSL certificate, you will need to follow some additional steps to generate a private key beforehand.
1. Generate a CSR and private key using a CSR generator. Store the private key somewhere safe on your computer, and do not share it with anyone.
2. Provide the CSR to the certificate authority (CA) you purchased the wildcard SSL certificate from and have them reissue or regenerate the certificate. They will also provide you with an intermediate certificate.
3. In your BigCommerce store, go to Settings › SSL certificates and select your domain from the drop-down menu. Select Install a 3rd party SSL.
4. Enter the SSL certificate, private key, and intermediate certificate provided by your certificate authority. Click Install SSL Certificate.
5. You should see a success message. If not, check for any extra spaces before and after the SSL certificate, private key, and intermediate certificate.
Installing SSL Certificates on Additional Storefronts
Once a domain is connected to an additional multi-storefront native storefront, a free SSL certificate is automatically installed. However, stores on all plans can install a third-party SSL certificate, if desired.
1. Generate a CSR using a CSR generator.
2. In your BigCommerce control panel, go to Channel Manager, then under Storefronts, click your non-default storefront.
3. Click Domains in the left navigation, then click Add SSL certificate.

4. Enter the SSL certificate, private key, and intermediate certificate provided by your certificate authority. Click Save certificate.
Testing Your SSL Certificate
You can check your SSL using the following tools:
- SSL Shopper's SSL Checker - this tool will check that your domain is using a properly-installed SSL
- SSL Shopper's Certificate Decoder - this tool can help you check your SSL's information, such as its expiration date
- Why No Padlock? - this page checks individual secure URLs and provides specific security errors if it detects any problems
FAQ
Why am I getting the error "Failed to provision the rate plan for the service."?
This will occur if the SSL Certificate you are installing was issued before a CSR was generated. Use the above steps to generate a new CSR, then reach out to your certificate issuer to reissue your SSL certificate. This can also occur if there are spaces before or after the dashes at the start and end of the certificate after pasting it into the SSL Certificate field.
If you continue to receive this error after these troubleshooting steps, please contact our support team.
Why am I getting the error "Cert is not valid for domain"?
When purchasing a third-party SSL certificate, your SSL provider will prompt you to enter the domain names to include in the certificate. The WWW version (www.domain.com) and non-WWW version (domain.com) must be included in order for the SSL certificate to install properly on your store.
If you need to enter the WWW and non-WWW versions of your domain after you generated a CSR for your certificate, regenerate the CSR before installing the certificate in your store.
Why doesn't my email address appear in the Approver Email list?
The email addresses that appear in the Approver Email drop-down list are generated by your domain registrar and cannot be changed. If you do not have any of the email addresses in the list, we recommend setting up an email host to create an email address that can receive the approval email.


