Just about any business can benefit from offering free shipping in some form. Free shipping can boost conversion and reduce abandoned carts. When used with up-sells or cross-sells, free shipping can increase your average order value. This article will guide you through the different ways to take advantage of offering free shipping to your customers.
Be careful! Customers will receive an error at checkout if they don’t qualify for free shipping and you have no other valid shipping methods enabled.
By Destination
Using this method, you can:
- apply free shipping only to orders within a specified shipping zone
- limit free shipping to orders over a set amount
- offer free shipping as well as other shipping methods (such as expedited shipping or in-store pickup)
1. Go to Settings › Shipping and click Configure or Edit next to the shipping zone you want free shipping available in.

2. Toggle on the switch to the right of Free shipping.

3. In the Free shipping options pop-up, you can set a minimum order total threshold, whether the discounted order subtotal will be used for eligibility, and if products with fixed pricing should be excluded.
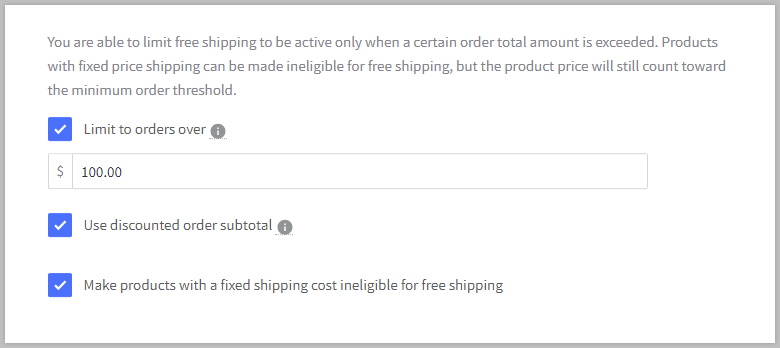
- Limit to orders over — limits free shipping to orders over a certain amount. If product prices include tax, tax will count towards the subtotal.
- Use discounted order subtotal — will use the order subtotal after discounts to determine eligibility for free shipping
- Make products with a fixed shipping cost ineligible for free shipping — will exclude products with a fixed shipping cost
4. Click Submit in the pop-up, then Done.
Your free shipping method is now up and active. If you need to disable it, simply toggle off the switch.
Pro Tip! Depending on your needs, you might consider using a Ship by method with a $0 shipping cost instead. This allows you to change the display name, specify costs for orders that don't meet the minimum order total for free shipping, or base shipping prices by order weight instead of total.
With an Automatic Promotion
Using this method, you can:
- apply free shipping automatically when certain conditions are met
- limit free shipping to customers who spend a minimum amount in a specific brand or category
- restrict free shipping to certain customer groups, currencies, shipping destinations, and days of the week
- offer free shipping as well as other shipping methods (such as expedited shipping or in-store pickup)
These instructions are for the standard promotion editor. To learn about creating an automatic promotion with the legacy editor, see Automatic Promotions (Legacy Editor).
1. Go to Marketing › Promotions, then click + Create and select With standard editor from the menu.
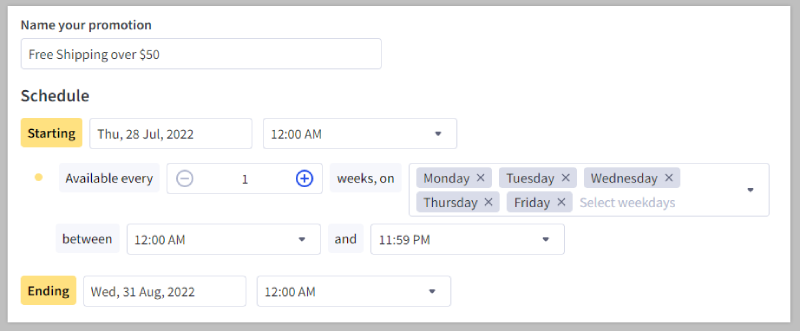
2. Enter a name for your promotion, then under Schedule set a starting date and time. You can optionally schedule an end date, and select days, weeks, ora time range that you want to exclude from the promotion’s availability.
3. Under Targeting, set the restrictions you want to apply to your promotion, including currency, customer group, and shipping destination. For example, if you want to create a free shipping promotion in the United States, you can restrict the currency to USD and the shipping destination to the United States.

4. To specify the conditions of your promotion, click + Add rule. In the discount template window, select Spend $100, get free shipping to begin with the pre-filled rules for a free shipping promotion, or select Custom rules if you want to start from scratch.

5. On the rules page, specify how your customers become eligible for the promotion. For example, you can grant free shipping to customers who spend at least $50, or to customers who buy at least 3 products from a certain category. For more information on setting up conditions, see Automatic and Coupon Promotions (Standard Editor).

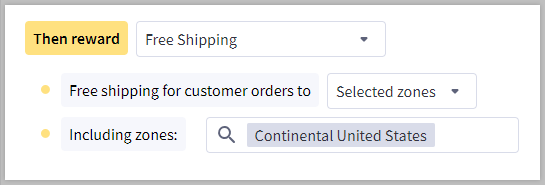
6. If it is not already pre-filled, select Free Shipping from the rewards dropdown. Additionally, you can restrict the promotion to one or more shipping zones.
7. After managing the promotion rules, click Add rule to promotion. This will take you back to the Create Promotion page where you can review your promotion's details and click Create promotion when you're ready.
With a Coupon Promotion
Using this method, you can:
- require customers to use a coupon code in order to obtain free shipping
- limit free shipping to customers who spend a minimum amount in a specific brand or category
- restrict free shipping to certain customer groups, currencies, shipping destinations, and days of the week
- offer free shipping as well as other shipping methods (such as expedited shipping or in-store pickup)
These instructions are for the standard promotion editor. To learn about creating a coupon promotion with the legacy editor, see Coupon Promotions (Legacy Editor).
1. Go to Marketing › Promotions and click on the Coupon tab. Then click + Create and select With standard editor from the drop-down menu.
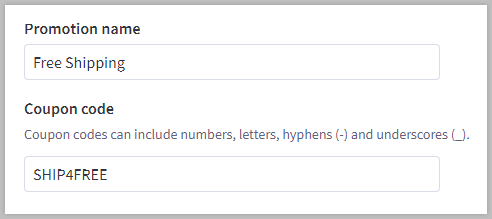
2. Enter a promotion name for internal reference. The coupon code that your customer enters at checkout is automatically generated, but you can customize it in the Coupon code field.
3. Under Schedule, specify the promotion's start date and time. You can optionally schedule an end date, as well as any days, weeks, or time range you wish to exclude.

4. Specify any currency, shipping destination, or customer group restrictions for your promotion in the Targeting section.

5. Click + Add rule to begin adding conditions and rewards to the coupon. In the discount template window, select Select $100, get free shipping to begin with pre-filled rules for a free shipping promotion, or select Custom rules if you want to start from scratch.

6. On the rules page, select the prerequisites for free shipping, such as minimum order value or product quantity. If it is not already pre-filled, select Free Shipping from the rewards dropdown, and specify any shipping zones you want to limit the promotion to.
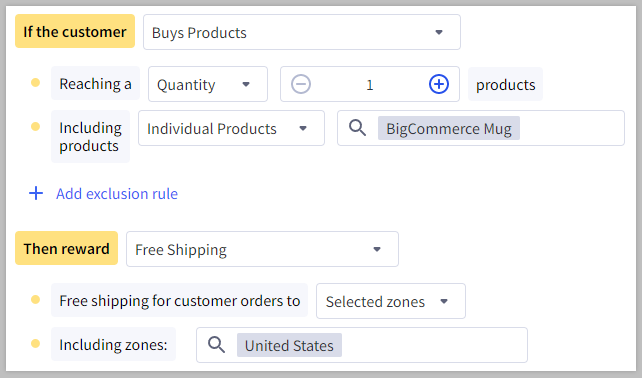
7. After setting up your rules, click Add rule to promotion. Review your coupon promotion's details and click Create promotion when ready.
Product-by-Product Basis
Using this method, you can:
- offer free shipping on a product for all enabled shipping zones
- remove individual products from shipping calculations on orders that also contain other products
- display "Free Shipping" on the product page when enabled in Store Settings
Be careful! Turning free shipping on for an individual product causes it to ship for free in all shipping destinations you have set up, regardless of any other shipping settings.
One product at a time
1. Go to Products › View, and click the name of the product you plan to ship for free.
2. Scroll down to the Shipping Details and check the box for Free Shipping.

3. Save your changes.
Multiple products at a time
1. Go to Products › View. Check the box to the left of the products you plan to ship for free. You can change the number of products that display per page by clicking View in the top-right of the menu.
2. Click Choose an Action at the top of the menu, select Bulk Edit, then click Confirm.

3. Locate the Free Shipping column to the far right, and check the box to enable free shipping for the products you plan to ship for free.
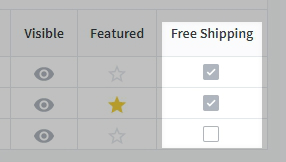
4. Save your changes.
Need more advanced shipping features? We recommend using our integration with ShipperHQ. ShipperHQ enables you to ship on a per product, per zone level as well as provide different shipping options based on customer group, shipping origin, and more.
Offering In-Store Pickup
The best online retailers offer a variety of ways for customers to receive their products. Traditional shipping options are certainly the most common, but by offering in-store pickup and payment, you combine the ease of shopping online with the promptness of purchasing from a local retailer.
By offering in-store pickup and payment, your shoppers can:
- avoid shipping costs
- make sure the product is available
- buy now and pickup later
Interested in Buy Online, Pick up in Store (BOPIS)? Use our BOPIS APIs to create a custom pickup experience in your store. We also support third-party solutions on our App Marketplace and Multi-Location inventory.
Setting up an "In-store Pickup" Shipping Method
These steps will cover how to set up a local pickup zone. This sets the geographical perimeter for which customers can pick up their order. See Offline Payment Methods for how to set up an in-store payment method.
Anyone whose shipping address falls inside this zone will be able to use any shipping methods you create for it. Keep in mind that they will only have access to the methods set up for this zone, so you will want to add your usual shipping methods in addition to the local pickup method.
Creating a Local Shipping Zone
1. Go to Settings › Shipping.
2. Click Add shipping zone, then select Add a custom zone.
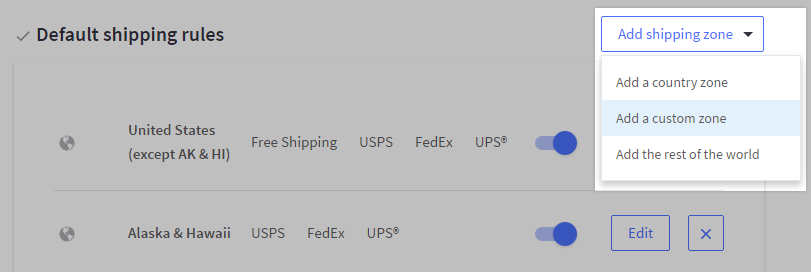
3. Fill out the following details:
- Name — the zone's name (e.g. "Local")
- Type — select Advanced selection, then select Multiple postcodes.
- Country — select your country
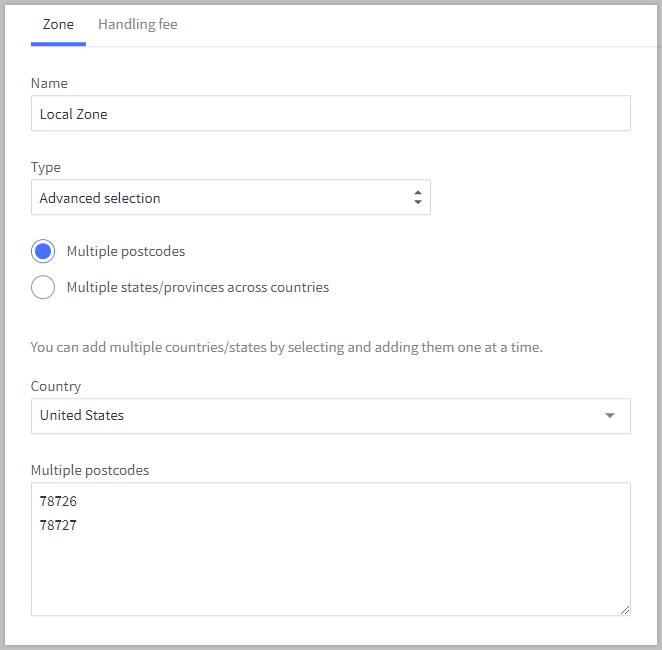
4. Enter the ZIP or postal code(s) in the text field under the country field. Each postal code must be on its own line.
See Shipping Zones for more tips on adding ZIP codes. For tools to help you create ZIP codes within a specific radius, city, or county, see Additional Resources.
5. Click Submit. You have now created a local zone.
Creating a state-based zone? If you want to open up in-store pickup to anyone within your state, change Type to Selection of states or provinces, then select your country and state. To open it up to anyone in multiple states, select Advanced selection › Multiple states/provinces across countries and select your preferred states.
Creating a local pickup shipping method
1. Click Configure for your newly created local shipping zone.

2. Toggle on the switch next to the Pickup In Store method.

3. On the pop-up window, enter a display name or use the default one provided.
4. Click Submit to save your changes.
Pro Tip! - Remember to include additional shipping methods in your local zone, so that customers in that zone can still opt to have their order shipped to them.
Managing Your In-Store Orders
Orders created with the in-store pickup and in-store payment methods require offline transactions to occur, so they will need to be manually updated.
Pay and pick up in store
Orders placed by customers using both the in-store payment and in-store pickup methods will be marked as Awaiting Payment in BigCommerce.
When the customer arrives, take payment using your normal brick-and-mortar payment processing.
After receiving payment, locate the order in the BigCommerce control panel under View Orders and change the order's status to Completed.

Pick up in store
Orders that have been paid for online will be assigned the Awaiting Fulfillment status.
When your customer arrives to pick up their products, locate their order in the View Orders section of your BigCommerce control panel. Change the order's status to Completed.

FAQ
Will a free shipping coupon only affect the category or products selected?
Coupons apply free shipping to and entire order if a shopper has a qualified item in their cart. This means that if they put in an item that is not qualified, so long as a qualified product is also in their cart, the order gets free shipping.
Apply free shipping at the product level or use ShipperHQ if you would like to remove a product from shipping calculations.


