Blueprint is the legacy theme platform available to stores created before November 2016. Stores created after that date were outfitted with Stencil, our current theme platform.
While Blueprint themes allow for the customization of page colors and fonts within the Style Editor, more complex customizations like displaying payment icons in the footer or adding third-party scripts must be implemented by editing the template files. In Stencil themes, many of these customizations are easily configured within the Page Builder. For a full comparison of features in Stencil and Blueprint themes, see The Stencil Theme Platform.
Thinking of switching to a Stencil theme? See our guide on Moving to the Stencil Theme Platform for more details and important factors to consider.
Using the Style Editor
The Style Editor allows you to quickly customize the look and feel of legacy Blueprint themes without having to touch the code.
To use the Style Editor go to Storefront › Themes. On the Current Theme section, click the Customize button to the right of the picture of your current theme. Your store will open in a new window, with the Style Editor panel to the left..
Saved changes will overwrite custom.css! Any changes made with the Style Editor are saved in the template file custom.css. It will overwrite any code you have already put in there when you Publish changes. It is recommended that you use Style Editor first, then make edits in custom.css.
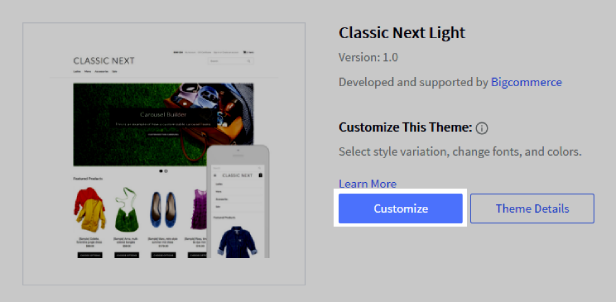
Customizations you can make within the Style Editor are determined by the individual theme, but include options like text and button colors, fonts, and other visual settings.
Changing Colors
Click on the color swatch next to the name of the area you want to change, then either pick a color or enter the hex color value. Click Choose to finalize your selection.

Changing Fonts
Some themes support the option to change the font. In the Backgrounds & Fonts section, click the arrow to the right of the type of text you wish to change and select a font.

Adding Product Columns
For some themes you can control the number of featured, new or sale products that appear per row. Scroll down to the Product Columns setting, click the arrow to the right of the current number (displays when you hover over the field), and adjust the number of columns.

When you are finished with customizing the theme, click Publish to apply your changes.
Want to make additional theme customizations? See Customizing Blueprint Themes for more information.
Enabling and Customizing the Mobile Theme
Some of our legacy Blueprint Themes are responsive, meaning they will automatically resize your store to fit any screen, from desktops to laptops to tablets and phones. For the themes that are not responsive, we highly recommend enabling the mobile theme.
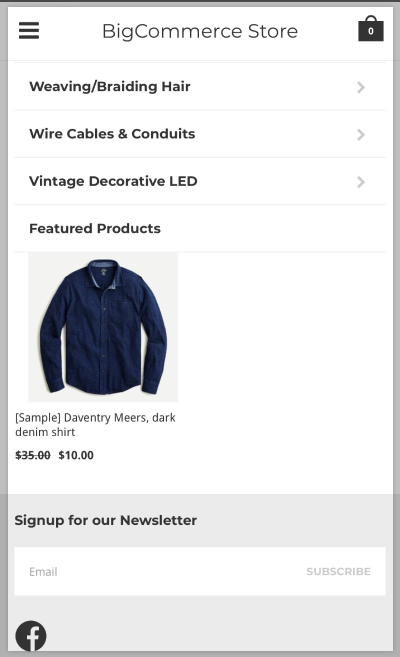
The mobile theme gives your users a clean, mobile-friendly shopping experience that loads quickly. In order to provide an optimized experience, the mobile theme does not support certain desktop storefront features, such as the home page carousel or collapsed category lists. If these features are important to you, consider switching to a responsive Stencil theme.
Enabling the Mobile Theme
To enable the mobile theme, go to Storefront › Mobile Theme Settings, then check the box marked Yes, enable the mobile theme.

Once checked, the following options will appear:
- Download Mobile Theme — Downloads your mobile theme's template files so that you can customize and re-upload them.
- Enable on These Devices — Allows you to select which types of mobile devices your mobile theme should be used for.
- Mobile — Displays the mobile theme when customers are shopping from an Apple iPhone/iPod Touch, Android Phone, or Windows 8 Phone.
- Tablet — Displays the mobile theme when customers are shopping from an Apple iPad, Android Tablet, or Windows 8/RT Tablet.
- Mobile Theme Logo — Click Choose File to upload a mobile-specific version of your logo to be used when customers are shopping from mobile devices.
Customizing the Mobile Theme
To customize the mobile theme, you must first have a WebDAV client such as CyberDuck installed on your computer. For more information see File Access (WebDAV).
Download your mobile theme from Storefront › Mobile Theme Settings by clicking Download Template Files. It will download in a single .zip file, which you can then move to a new folder on your desktop and unzip using a program such as 7-Zip or WinZip.
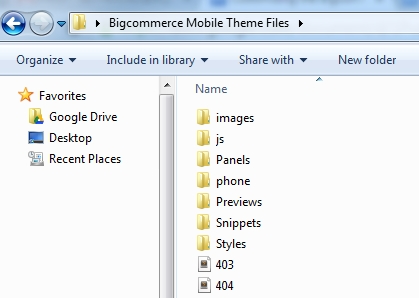
Customizing the BigCommerce mobile theme requires making changes to the HTML and CSS files on your computer using a plain text editor such as Notepad or TextEdit. As always, we recommend saving an unmodified copy of the files you are modifying so that you can revert any unwanted changes.
For more information on customizing template files, see Customizing Blueprint Themes or our Blueprint Developer Documentation.
Uploading Mobile Theme Customizations
Once you have made the desired changes to the mobile theme files, connect to WebDAV in order to upload your customizations.
Upload any customized files to the mobile_template directory. Be sure to follow the same template structure as exists in the file you originally downloaded. For example, since default.html exists outside of all of the other folders in the download file, it should be uploaded outside of the other mobile_template folders in WebDAV as well.
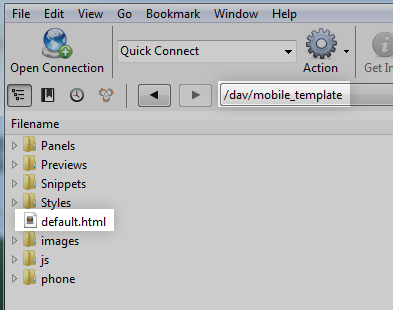
If you are uploading a file that is in a folder, such as Panels, then it should be uploaded in that same folder in WebDAV. If the folder does not exist, you must create it.
Customizing Blueprint Themes
In this section, we’ll provide a basic overview of the various types of template files that make up our legacy Blueprint Themes. For additional documentation, please see our Blueprint Developer Documentation.
Blueprint themes are built using a template system that enables designers and developers familiar with HTML and CSS to modify the presentation and structure of a BigCommerce storefront. If you need assistance with editing the HTML and CSS in your template files, use our Agency Design Request form to get in touch with a Certified BigCommerce Design Partner.
BigCommerce Technical Support is unable to directly assist with editing code. See the BigCommerce Design Policy for more information.
Always create a backup of your current template files before attempting to make any changes to them.
Template File Structure
Blueprint template files have three main components: layouts, panels, and snippets.

Layout files, such as default.html, provide the HTML structure that holds the page content of your website.For a full list of layout files and more information on each one, see Blueprint Theme Layouts.
You can also add custom layout files by following the steps in the Customizing Template Files section of this article.
Panels, such as Header.html, provide reusable blocks or dynamic sections of content, which are generally referenced directly in layout files. For a full list of panels and more information on each one, visit Blueprint Theme Panels.
Snippets, such as PageMenu.html, contain a small section of HTML that can be used multiple times on a single page. They can be placed within a panel or layout file. For a full list of snippets, and more information on each one, visit Blueprint Theme Snippets.
Built-In HTML Editor
You can view and edit your theme’s template files using the in-browser template file editor. We recommend it for quick, simple changes such as adding a script from a third-party app. Anything you save on the editor goes live to your store immediately.
To access the template file editor, go to Storefront › Themes, then click Edit HTML/CSS. You can only access the template files if the Blueprint theme is the theme active on your storefront.

The left sidebar panel contains two lists of files, Files used by this template and Other Template Files.
- Files used by this template — contains a list of Panels and Snippets which are referenced in the template file you are currently editing
- Other Template Files — contains a list of all of the HTML and CSS files which make up your theme, organized by file type; Style Sheets, Layouts, Panels and Snippets
The File contents for [current file] section displays the HTML or CSS code for the file you have selected. Make your code changes in this section and click Save to apply them to your live store.
The top row of the template file editor contains buttons which perform the following actions.
- Save — saves and applies your template changes to your live store
- Close — closes the template file editor and takes you back to your control panel
- Close & Refresh — closes the template file editor and refreshes your control panel
- Toggle Editor — enables syntax highlighting and row numbers in the File contents section of the screen
- Recent Files — displays a list of recently viewed files when clicked
- Revert to Original — restores the contents of the current file to its original state, prior to any customizations being applied. Note that this does not revert the file to its most recently-saved version.
Need to edit the JavaScript files? The JavaScript files listed in the template files are read-only. To make changes to the JavaScript files, you must use this method.
Each of the layout, panel, and snippet files use variables or placeholders, to serve specific content on a page. Variables are always enclosed within %%, such as %%Panel.Footer%%, and can be one of five types:
- global variables
- string variables
- panel references
- snippet references
- file include
Do not delete Global Variables! Removing a global variable can break core functions of your store. Always keep backups of the template file before making large changes.
For more information on template syntax, each of the five types of variables, and how to reference custom theme assets, visit Template Syntax.
Customizing Template Files
For larger customizations or adding custom templates, you can download the theme and upload your modified template files via WebDAV.
Customizing the checkout page? If you have enabled Optimized One-Page Checkout on your store, you can use optimized-checkout-webdav.css and the steps below to change the styling of the checkout page.
To create a custom template file in your theme, go to Storefront › Themes, then click Download Theme. It will download in a single .zip file, which you can then move to a new folder on your desktop and unzip using a program such as 7-Zip or WinZip.
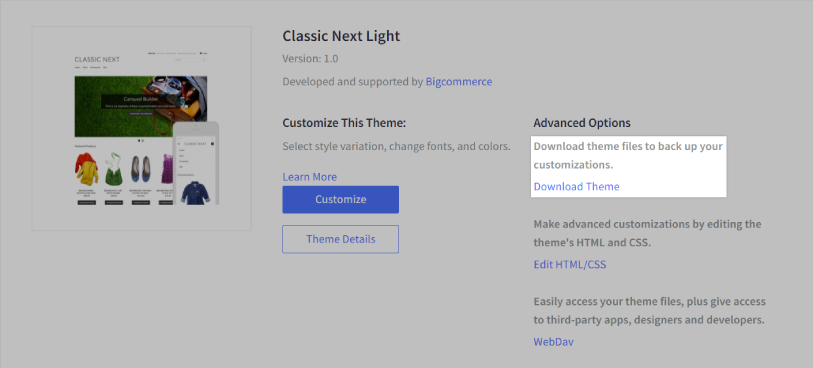
You can now make changes to the HTML and CSS files on your computer using your desired text editor.
When you’re ready to upload your changes, connect to your store through WebDAV. You should see the Template folder in the list of folders.

Drag and drop the folder from your computer to the template folder into your WebDAV client. When the upload finishes, the changes will be applied to your storefront.
Blueprint-Specific Settings
There are several Blueprint-only settings throughout the control panel. Below is a list of these settings with descriptions of how they affect your store.
- Display settings
- Category settings
- Quick View settings
- Image settings
- Search settings
- Carousel settings
- Social media settings
- Banner settings
- Blog settings
- Comment settings
- ShipperHQ settings
- Payment settings
- reCAPTCHA settings
- WebDAV settings
- Site seal settings
- Backup settings
Display Settings
The following Blueprint-only display settings can be found in Settings › General, under the Display tab:
- Featured Products — determines the number of featured products to display on your store's homepage
- New Products — determines the number of new products to display on your store's homepage
- Sale Products — determines the number of sale products to display on your store's homepage (not supported on all themes)
- Recent Blog Posts — determines the number of blog posts to display in your store's footer (not supported on all themes)
- Top Selling Products — determines the number of top-selling products to display on your homepage
- Products Per Page — determines the number of products to display on category, brand, and search results pages
- Product Reviews Per Page — determines the number of reviews to display on each product page before displaying next and previous buttons to browse any additional reviews
- Cart Quantity Boxes — determines whether quantity boxes are displayed as a dropdown list or a text box
- Dropdown List (Default) — allows customers to choose quantities 1 - 30 from a list
- Text Box — allows customers to enter any quantity they'd like into an open text field
- 'Add to Cart' Action — determines what occurs after a customer places an item in their cart
- Show Confirmation in a Popup Window — displays the Add to Cart confirmation message in a popup window without leaving the product page
- Take Them to Their Shopping Cart — leads client directly to your store's shopping cart page
- Enable Tag Clouds? — This is no longer in use.
- Show Thumbnails in Cart? — determines if product thumbnail images displayed on the shopping cart page
- Enable 'Customers Also Viewed?' — determines if customer viewing patterns should be tracked and used to create lists of related products on each product page. See Related Products Panels to learn more
- Products Related By Views — determines the number of products to show on the product page in the 'Customers Also Viewed' section. Set to 0 to track customer viewing patterns, but not show related products
- Enable Quick Search? — determines if the storefront search field displays results as customers type
- Enable Product Tabs? — determines if product details should be displayed in individual tabs on the product page or in an accordion. (not supported on all themes)
Category Settings
You can use the following settings to control how your product categories are presented on the storefront. These settings can be found in Settings › General, under the Display tab.
- Category Display Mode — determines how products are listed on category pages. The available options are:
- Show products in a grid — Products are displayed left to right with multiple products per row. (based on theme)
- Show products in a list — Products are displayed top to bottom, one product per row, and each listing includes a portion of the product's description.
- Category Menu Style — determines how product category navigation menus should display. The available options are:
- Show categories in a flyout menu
- Show categories in a simple list
- Menu Fade Timeout — determines how long the flyout menu should display after moving your mouse away from it
- Show Shop by Price menu? — determines whether or not the Shop by Price menu is displayed on category pages
- Show Shop by Brand menu? — determines whether or not the Shop by Brand menu is displayed on category pages
Additionally, Blueprint themes add the Similar Products by Category panel on product pages. This displays the names and links of categories that your product belongs to.
Quick View Settings
While on a category, brand, or search results page, the Quick View feature allows customers to see product information in a popup window without having to leave the page they are on. These settings are located in Settings › General, under the Display tab.
- Use Quick View? — This determines whether or not a “Quick View” button appears when a customer hovers over a product on a category or search results page.
- Button Color — This determines the background color of the Quick View button. (Not supported on all themes)
- Gradient Color — This determines what color the background color of the Quick View button should fade to. (Not supported on all themes)
- Text Color — This determines the color of the Quick View button’s text. (not supported on all themes)
- Button Text — This determines the text that appears on the Quick View button. This default is "Quick View". (not supported on all themes)
Note: These settings are not supported on all themes, as some themes require CSS customization to update the quick view button's styling.
Image Settings
Legacy Blueprint themes handle image thumbnails by preserving the grid and distorting the image until it fits in the predefined box. This often results with pages having uniform grids, but distorted images.
Image sizes can be changed in Settings › General, under the Images tab.
Product Image Sizes
- Storewide Thumbnail — sets the dimensions for the storewide thumbnail image (width x height in pixels). This is the image used on Category, Brand, and Home pages of your store. The recommended size differs between themes.
- Product Page Image — sets the dimensions for the Product Page image (width x height in pixels), the main image on your product page. The recommended size differs between themes.
- Product Page Thumbnail — sets the dimensions for the small thumbnails (width x height in pixels) below your product image on the product page. Product Page Thumbnail also controls the size of product images included in Abandoned Cart Emails.
- Product Zoom Image — sets the dimensions for your product image when the shopper selects the Zoom action. We recommend using the maximum dimensions, 1280 x 1280, so that your shopper can clearly see the product. This setting must be larger than your Product Page Image setting, or there will be no visual difference.
- Show Tiny Thumbnails — determines whether or not the small thumbnails below the main product image on individual product pages display
- Enable Image Zoom — determines whether or not the large zoom image should display when customers hover their mouse cursor over the product image
- Display Product Images — determines how large versions of the product image should be displayed; in a lightbox or in a separate window when clicked on
- Default Product Image — determines what image, if any, should be used for your products if no other image is uploaded
Category & Brand Images
- Categories Per Row — determines the number of categories to display per row if category images are being used. On some themes, this also changes how many products are displayed per row inside of categories. Category images can only be applied to subcategories, not top-level categories.
- Brands Per Row — determines the number of brands to display per row on the All Brands page. On some themes this also changes how many products are displayed per row inside of brands.
- Category Image Dimensions — sets the dimensions of subcategory images (width x height). Subcategory images are not supported by all themes.
- Brand Image Dimensions — sets the dimensions of Brand images (width x height)
- Default Category Image — determines what image should be used for your categories if no other image is uploaded
- Default Brand Image — determines what image should be used for your brands if no other image is uploaded
Category image dimensions are applied when the category image is uploaded. If you change your category image dimensions, you'll need to re-upload your category image to see the changes.
Search Settings
The following search settings can be found in Settings › General, under the Search tab:
- Product Display Mode — the layout of product search results in either grid or list
- Results Per Page — sets how many search results to display before creating paged navigation to see additional results
Carousel Settings
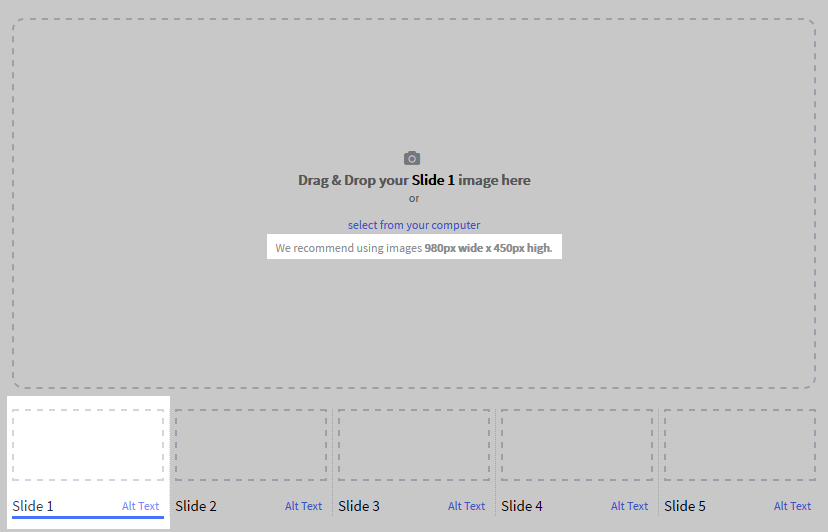
You can change the color of their carousel text from Storefront › Home Page Carousel. You can also view the recommended image dimensions here by clicking on an empty slide.
Social Media Settings
On Blueprint themes, you can switch between Theme or Standard social media icons at any time from Storefront › Social Media Links.
![]()
Theme icons are designed by the theme's developer to match your theme.
![]()
Standard icons are the original icons from the social media platforms.
![]()
Pro Tip! Customizations for social media icons on Blueprint themes can be found in the SocialLink.html snippet file. See Customizing Blueprint Themes for more information.
Styling the Facebook Like Button
When enabling Facebook Likes, you can control the following settings from Settings › General, under the Share tab.
- Layout Style — Select Standard (for logged in users, displays the names of other Facebook friends who have liked the product or post) or Count only (displays the total number of likes).
- Button Position — determines if the button displays above or below your product details
- Text to Display — determines if the button action reads “Like” or “Recommend”
- Show Faces? — Select to show the profile picture of any Facebook friends who have liked or recommended the product under the button itself.
Banner Settings
Stores with Blueprint themes can have banners of any height, but they have recommended banner image widths. This list includes free legacy Blueprint themes only. For recommended banner image sizes for paid themes, please reach out to the theme's developer.
| Theme | Maximum Banner Image Width |
|---|---|
| Classic Next | 1,000px |
| Beautification | 980px |
| Bedazzled | 940px |
| Bride to Be | 980px |
| Classic (White) | 980px |
| Classic Hip | 980px |
| Fun N Games | 980px |
| Grease Monkey | 980px |
| Health & Beauty | 980px |
| Hipster | 980px |
| Home IQ | 980px |
| Munchen | 980px |
| Musik | 980px |
| Outdoor | 1,020px |
| Runway | 980px |
| Wine Store | 980px |
Blog Settings
If you are using a Blueprint theme, you can use Disqus for blog comments from the Blog Settings page. Turn on Disqus Comments and enter your Disqus Shortname.

Comment Settings
Stores with Blueprint themes can enable Disqus Comments or IntenseDebate for product reviews and other comment options. Go to Settings › Comments and select your preferred comment system, then Save your changes.

Once saved, a tab will appear for the comment system you selected. Click the tab, then follow the instructions on the page to complete setup of the comment system.
ShipperHQ Settings
If you use ShipperHQ, and use YRC Freight and/or FedEx LTL to provide real-time freight shipping quotes to your shoppers, it requires the city value to properly return freight shipping quotes, as the Estimate Shipping & Tax button on the cart page will not return quotes for these services unless the City field is included.
Before making any changes, back up your theme customizations.
Adding the HTML to Panels/CartContent.html1. Go to Storefront › Themes, then click Edit HTML/CSS.
2. In the list of Other Template Files on the left, locate and click on CartContent.html, under Panels.
Pro Tip! Use Ctrl F or Command F to quickly locate template files in the list.
3. Add the following two lines of code between the State and Zip/Postcode fields. Please note that the class may require some theme-specific customization, and should be made to match the surrounding fields in style.
<dt>%%LNG_City%%:</dt>
<dd><input type="text" class="Textbox" name="shippingZoneCity" id="shippingZoneCity" value="%%GLOBAL_ShippingCity%%" /></dd>
Before:

After:

4. Save your changes.
Adding the HTML to cart.htmlIf your store was created before February 8, 2016, use the following instructions to add the required HTML to your template. If your store was created after this date, the required code is already included, and you can skip this section.
1. In the list of Other Template Files on the left, locate and click on cart.html.
2. On or around line 3, replace %%GLOBAL_TPL_PATH%%/js/cart.js with the following:
%%ASSET_js/cart.js%%
Before:

After:

3. Save your changes.
Adding the Javascript to js/cart.jsIf your store was created before February 8, 2016, use the following instructions to add the required HTML to your template. If your store was created after this date, the required code is already included, and you can skip this section.
1. Connect to your store using a WebDAV client.
2. Navigate to the template folder, then open the js folder.
3. Download cart.js to your computer, then open it in a text editor like Notepad or TextEdit.
4. Locate w: 'getShippingQuotes', and paste the following code on the line immediately after it.
city: $('#shippingZoneCity').val(),
Before:

After:

5. Save the file, then re-upload it back to the template/js folder in your store.
Confirming InstallationIf completed correctly, you should now be able to see the optional City field on your store’s cart page. To test that it is working correctly, fill in State, City and Zip/Postcode fields, then click the Estimate Shipping & Tax button to confirm you are receiving freight quotes via ShipperHQ.
Note that your freight shipping rules must already be configured in your ShipperHQ account.
Payment Settings
Installing the Afterpay Banner
Part of the Afterpay experience is displaying the Afterpay banner on product pages. Access your template files and locate Panels/ProductDetails.html, then copy and paste the script below:
<!-- Begin Afterpay Blueprint Snippet for BigCommerce v2.0.1 -->
<afterpay-placement></afterpay-placement>
<script>
    (function(){
        const supported = ["AUD", "NZD", "USD"];
        const currency = '%%GLOBAL_CurrentCurrencyCode%%';
        if (supported.indexOf(currency) > -1) {
            let priceSelector = '.ProductDetailsGrid .VariationProductPrice';
            let cachedAmount = '%%GLOBAL_RawProductPrice%%';
            const locales = {
                AUD: 'en_AU',
                NZD: 'en_NZ',
                USD: 'en_US',
            };
            const placement = document.querySelector('afterpay-placement');
            placement.dataset.locale = locales[currency];
            placement.dataset.currency = currency;
            placement.dataset.amount = cachedAmount;
            const script = document.createElement('script');
            script.src = "https://js.afterpay.com/afterpay-1.x.js";
            script.dataset.min = "1.00";
            script.dataset.max = "2000.00";
            script.onload = function () {
                setInterval(() => {
                    if (cachedAmount != document.querySelector(priceSelector).innerText) {
                       cachedAmount = document.querySelector(priceSelector).innerText;
                       placement.dataset.amount = cachedAmount;
                    }
                }, 400);
            };
            document.head.appendChild(script);
        }
    })();
</script>
<!-- End Afterpay Blueprint Snippet for BigCommerce v2.0.1 -->
Installing the Clearpay Banner
You can also install the Clearpay banner on product pages. Access your template files and locate Panels/ProductDetails.html, then copy and paste the script below:
<!-- Begin Clearpay Blueprint Snippet for BigCommerce v2.0.1 -->
<afterpay-placement></afterpay-placement>
<script>
    (function(){
        let locale = 'en_GB'; // 'fr_FR' || 'es_ES' || 'it_IT'
        const supported = ["GBP", "EUR"];
        const currency = '%%GLOBAL_CurrentCurrencyCode%%';
        if (supported.indexOf(currency) > -1) {
            let priceSelector = '.ProductDetailsGrid .VariationProductPrice';
            let cachedAmount = '%%GLOBAL_RawProductPrice%%';
            const placement = document.querySelector('afterpay-placement');
            placement.dataset.locale = locale;
            placement.dataset.currency = currency;
            placement.dataset.amount = cachedAmount;
            const script = document.createElement('script');
            script.src = "https://js.afterpay.com/afterpay-1.x.js";
            script.dataset.min = "1.00";
            script.dataset.max = "1000.00";
            script.onload = function () {
                setInterval(() => {
                    if (cachedAmount != document.querySelector(priceSelector).innerText) {
                       cachedAmount = document.querySelector(priceSelector).innerText;
                       placement.dataset.amount = cachedAmount;
                    }
                }, 400);
            };
            document.head.appendChild(script);
        }
    })();
</script>
<!-- End Clearpay Blueprint Snippet for BigCommerce v2.0.1 -->
You can modify the script so that the banner will only display a price breakdown if the product meets your order minimum and maximum thresholds.
To do so, you will need to edit the following values within the script and set the minimum and maximum values to mirror your Clearpay account settings:
script.dataset.min = "1.00";
script.dataset.max = "800.00";
Amazon Pay Button Styling
The following store-wide global variables need to be present in the appropriate template files for the Amazon Pay buttons to show up in the right places.
- Check Panels/HTMLHead.html for %%GLOBAL_AdditionalScriptTags%%
- Look for %%GLOBAL_AdditionalCheckoutButtons%% in the following template files:
- Panels/CartContent.html
- Panels/CartHeader.html
- Panels/SideCartContents.html
- Snippets/FastCartThickBoxContent.html
%%GLOBAL_AdditionalCheckoutButtons%% controls where the button shows up. If it's missing in any of the above files, paste it into the appropriate file. You can then adjust the styling by editing the styles.css template file.
reCAPTCHA Settings
All of our legacy Blueprint themes use reCAPTCHA v1 by default. This can cause issues with your account signup and product review forms if not updated to reCAPTCHA v2. See Enabling reCAPTCHA for more information.
To upgrade to v2, follow the instructions included in our Blueprint development documentation. If you are using the mobile theme, be sure to update reCAPTCHA in the mobile theme files as well.
WebDAV Settings
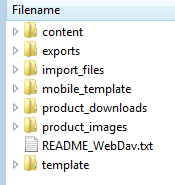
Stores using legacy Blueprint themes have access to the following folders in WebDAV:
- template — Store custom assets for your store's theme. All custom assets should be placed inside their designated subfolders. By default, this folder will be blank.
- mobile_template — Store custom assets for the mobile template. As with the template folder, this folder will be blank, and all custom assets should be placed inside their designated subfolders.
If you need to upload a custom theme image to the template or images folder, your store will begin pulling all theme images from WebDAV. This will cause your store to display broken images for any images not already uploaded to WebDAV.
Site Seal Settings
If you have purchased a GeoTrust SSL certificate, you have the option to add a site seal to your store's footer. After locating the site seal code, follow the instructions below to add it to your template files.
1. Go to Storefront › Themes and click the Edit HTML/CSS button on the Themes page.
2. Scroll to the bottom of the list in the top left called Files used by this template, and click on Footer.html.

3. Where you will place this code may vary from theme to theme.
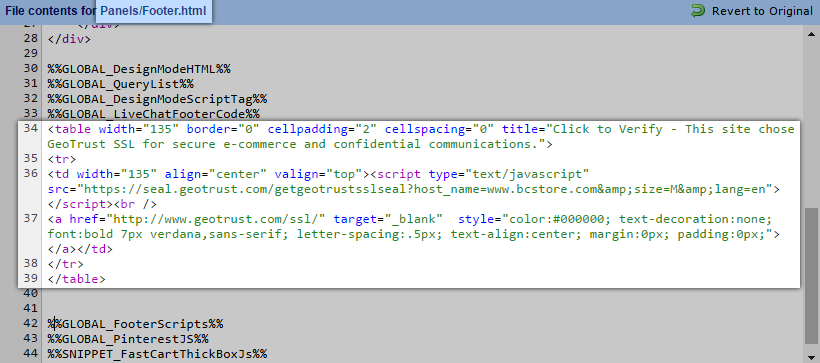
4. Save your changes. You can now open your store and see the GeoTrust seal in the footer.
Backup Settings
To create a backup of the customizations to your Blueprint theme, follow the steps below.
1. Go to Storefront › Themes and click Download Theme.
2. Select whether you want to download Customized files only or All files. You will want to choose Customized files only if you have made changes to your theme.

3. Save the zip file to your computer.
Once you have backed up your theme files, you can use the following steps to restore your customizations at any time.
1. Extract the files from the zip file.
2. Connect to your store using WebDAV.
3. Drag and drop the contents of the template folder on your computer into the corresponding folders in WebDAV.
4. Refresh your storefront. You should see your customizations take effect immediately.
FAQ
Is it safe to update my Blueprint theme using the built-in Update button in the control panel?
Clicking the Update button on your Blueprint theme could have unintended consequences and end up breaking your storefront. Since Blueprint themes are no longer supported by BigCommerce, our support team would be unable to assist. We recommend contacting a developer to perform any necessary updates.
Where can I get help with customizing my template files?
You can use our Agency Design Request form to get in touch with a Certified BigCommerce Design Partner, who can assist in editing the HTML and CSS in your template files. Due to our Design Policy, our Technical Support is unable to edit code or make design changes.
If my theme is responsive, can I still use the mobile theme?
Since responsive themes offer a better experience, we don’t recommend using the mobile theme if your theme is responsive.
Is the mobile theme unique for every theme?
No, it is theme-agnostic.
Can I change the folder names?
No, because folder names are referenced throughout the theme and changing the folder names could have unintended consequences. However, it is possible to add new folders to the template folder.
Does my Blueprint theme support the Style Editor/font changes/product column changes?
This table lists the Blueprint themes that support each type of customization:
| Theme Name | Supports Font Changes in the Style Editor | Supports Product Column Changes in the Style Editor |
|---|---|---|
| Alaska | ||
| Artify | ||
| Ascend | ✓ | |
| Athletic | ✓ | ✓ |
| Beautification | ||
| Bedazzled | ||
| Black Beauty | ||
| Bride to Be | ||
| Bright & Bold | ✓ | ✓ |
| Classic | ✓ | |
| Classic Hip | ✓ | |
| Cookies & Cream | ✓ | ✓ |
| Dusk & Dawn | ✓ | ✓ |
| Fun N Games | ✓ | |
| Grease Monkey | ✓ | |
| Health and Beauty | ✓ | |
| Hipster | ✓ | |
| Home IQ | ✓ | |
| Indiana | ||
| Munchen | ✓ | |
| Musik | ✓ | |
| Outdoor | ✓ | |
| Rise | ✓ | |
| Runway | ✓ | |
| Sugar & Mint | ✓ | ✓ |
| Wine Store | ✓ |
How do I reference product panels in a Blueprint theme?
You can use our developer documentation to locate the variables associated with product panels like Featured Products or Top Sellers. Product panels are designed to appear on the home page; you will have to customize it for any other usage.
Can I create custom template files for brands pages?
No, the ability to customize template files for brands is exclusive to Stencil themes.
Why are my analytics not tracking?
The %%GLOBAL_AdditionalScriptTags%% variable has likely been removed from HTMLHead.html in your template files. See Troubleshooting | Ecommerce Analytics for other potential causes.
Can I use B2B Edition or B2B Ninja with a Blueprint theme?
While B2B Edition requires a Stencil theme to deliver its storefront functionality, you can use B2B Ninja in a Blueprint store by adding the app script into the HTMLHead.html template file, as if it were a headless storefront. See B2B Ninja’s JavaScript API documentation for more information.


