Stencil Themes
BigCommerce's Stencil themes combine current best practices in technology, design standards, conversion, and SEO, and are designed to support businesses in various industries. You can choose from beautiful, fully responsive templates or build a completely custom storefront with BigCommerce Partners. Stencil themes are optimized for various catalog sizes, verticals, promotions, and content across mobile, tablet, and desktop browsers.
With Page Builder, you can tailor your storefront so it more closely reflects your brand by allowing you to customize various elements of your theme such as colors, text sizes, the number of featured products, and more, without leaving the control panel. The ability to drag and drop content onto pages, like text blocks, images, banners, carousels, buttons, and blocks of custom HTML, allow you to showcase your products in a way that is visually rich and engaging.
After making your changes, you can save without publishing them live on your storefront. The changes will only appear on your storefront when you click Publish.
For information about customizing our legacy Blueprint themes, see Using the Style Editor.
Using Page Builder
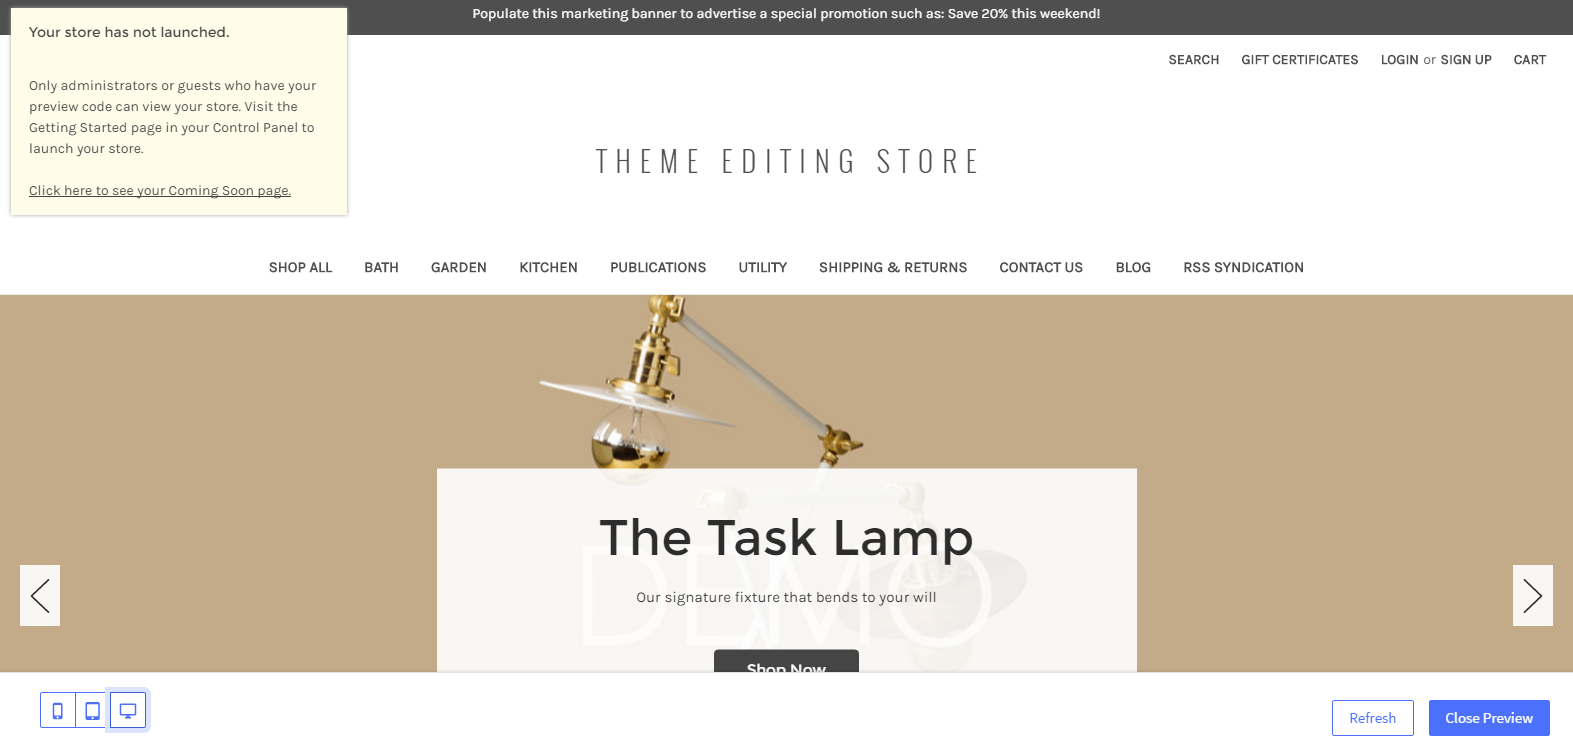
To get started, go to Storefront › Themes, then click Customize.
Using Multi-Storefront? Each storefront's themes are located in the storefront-specific settings within Channel Manager. See Single-Storefront vs. Multi-Storefront for more information.
For more information about adding content widgets and customizing your store's style, see Page Builder.
Downloading and Uploading Custom Themes
You can download the source files to customize themes in Storefront › Themes section of the control panel.
Before you download! Customizing Stencil themes requires in-depth knowledge of web development and use of the Stencil CLI. Per our Design Policy, our technical support team is unable to provide assistance with custom themes. See the Dev Center for support resources.
Downloading your theme from the control panel allows you to have a copy on your computer. You will need a copy if you choose to develop a custom theme using the Stencil CLI. Making changes to your theme in CLI gives you full access to JavaScript files that are not available when using the theme editor in the control panel. It also acts as a backup of your current theme set up.
Downloading a Theme
After you purchase a Stencil theme (or acquire a free theme), it's available in Storefront › Themes. From there, you can download the theme and customize it.
1. Under Themes, click on the Advanced drop-down of the current theme or the Action Icon on an inactive theme.
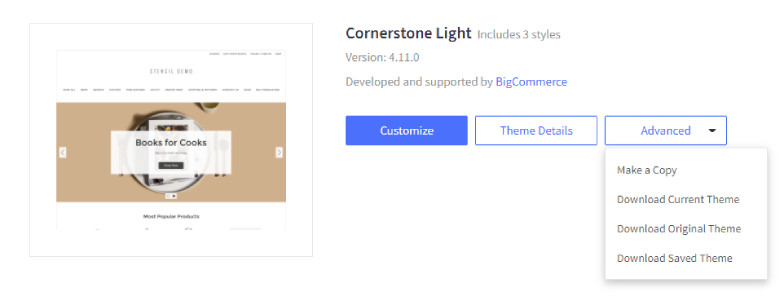
2. Select the option that best suits your needs.
Download current theme* — downloads any edits you have made in Page Builder and currently have live on your store
Download Saved Theme — downloads the most recent edits you have made in Page Builder but is not live on your store
Download Original Theme — downloads the default theme without any edits made in Page Builder
* This option will only appear in the dropdown menu if you are downloading a theme that is currently live on your storefront.
3. Save the .zip file to your computer. You need Stencil CLI to unzip the file.
Did you know? Clicking the theme thumbnail image is an alternative way to download your theme. Once you are on the theme details page, click on Theme Options. From there, you can select to download your latest customizations, or download the theme file. Contact our Support team for further assistance.
Customizing the Downloaded Files
Making customizations to Stencil themes requires the use of the Stencil CLI. This requires in-depth knowledge of web development. For installation details, please see the Stencil CLI developer documentation. For specifics on unzipping downloaded themes and working with them, see the Download a Theme section.
Don't upload a customized theme to another theme marketplace or sell it privately. While you are free to customize and change the code for your own store, the original creators of the theme retain the rights to the theme.
Custom Theme Upload Requirements
- A maximum of 20 custom themes may be uploaded to the Themes section. This includes any themes created via Make a Copy.
- Custom themes can be deleted to make room for more uploads if you reach your max.
- Custom themes must be compressed and uploaded in ZIP file format, using Stencil CLI.
- Custom theme ZIP files must be equal to or less than 50MB in file size.
- For a complete list of upload requirements, error codes and warnings, check our Dev Center articles on Bundling and Pushing a Theme and Troubleshooting Theme Uploads.
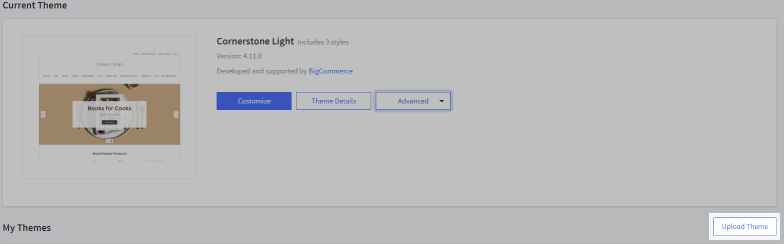
Uploading a Custom Theme
1. Go to Storefront › Themes.
2. Click the Upload Theme button by the Themes heading below the Current Theme.
3. Drag the ZIP file into the Upload Theme pop-up window, or you can Select theme from your computer.
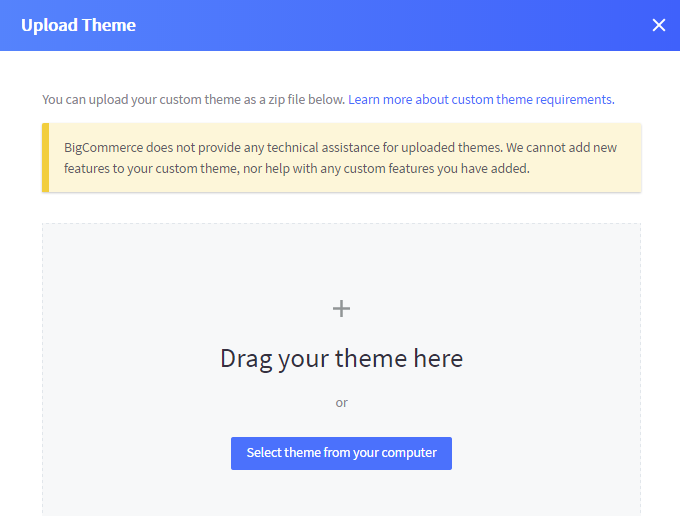
4. Once the ZIP file has uploaded, a theme card will appear under Themes showing theme processing progress. Click Cancel if you want to halt processing and start over.

5. After processing, a new custom theme card will appear under Themes. If your theme was unable to be successfully processed, you will be presented with a screen detailing any errors encountered. Ensure your theme meets all the custom theme upload requirements.
Custom Theme Actions
1. Go to Storefront › Themes.
2. Under the Themes heading, click the theme you want to rename. Only non-active themes (themes not currently applied to your store) that you have uploaded or copied can be renamed.
3. Click the Action Icon to see the drop-down, then click Rename.
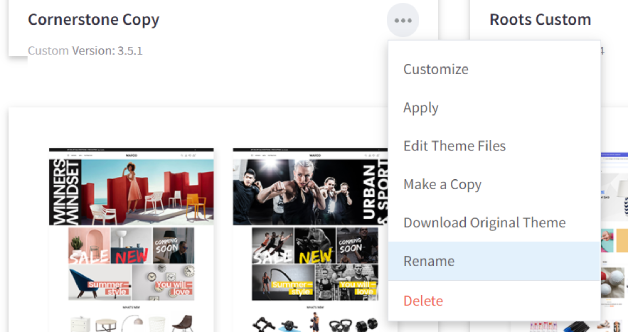
4. In the pop-up window, enter the new name for your theme, then click Rename Theme.
5. You will be returned to the control panel with a message that the theme was successfully renamed.
Deleting a Custom Theme
1. Go to Storefront › Themes.
2. Under the Themes heading, click the theme you want to delete. Only non-active themes (themes not currently applied to your store) can be deleted.
3. Click the Action Icon drop-down, then click Delete.
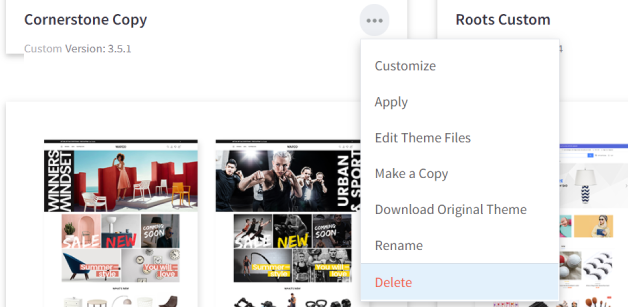
4. In the pop-up window, confirm you want to the delete the theme by clicking Delete Theme.
5. You will be returned to the control panel with a message that the theme was successfully deleted.
Custom Template Files
Custom Templates allow you to change the layout of brand, category, product, and web pages from the default layout to best suit your store and brand.
Creating custom templates involves advanced Web development. If you are not comfortable writing and editing code, we recommend getting in touch with one of our BigCommerce Partners.
Creating a Custom Template
Creating custom templates requires editing the HTML files, then using Stencil developer tools to package and upload them to the appropriate location.
For more detailed instructions, please see our Stencil developer documentation in the Dev Center on Custom Themes.
Applying a Custom Template
A custom template can be applied to brand, category, product and content web pages from your store's control panel.
It is not possible to assign a template layout via bulk import.
Brands
1. Go to Products › Brands, then select the brand or create a new brand to apply the custom template.
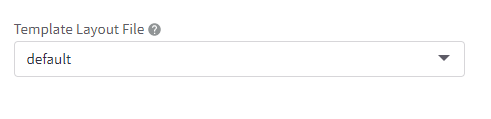
2. In the Template Layout File section, select the name of the custom template file.
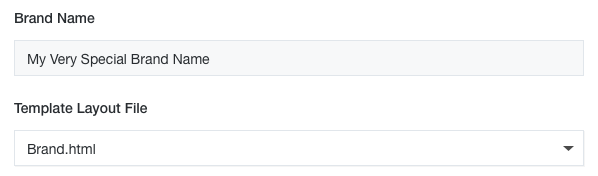
3. Save your changes.
Categories
1. Go to Products › Categories, then select the category or create a new category.
2. In the Template Layout File section, select the name of the custom template to apply.
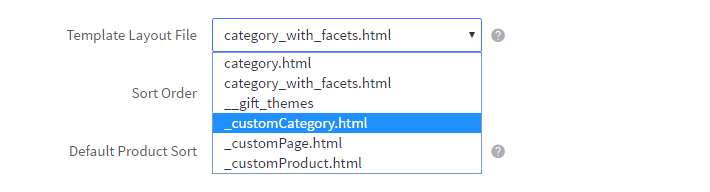
3. Save your changes.
Product
1. Go to Products › View, then select a product or create a new product.
2. Click Storefront Details in the menu navigation, under Storefront.
3. Click on the Template Layout File drop-down, and select your custom template.
4. Save your changes.
Web Page
1. Go to Storefront › Web Pages, then select a web page or create a new one.
2. Scroll to the Template Layout File drop-down, and select your custom layout file.

3. Save your changes.
Editing Stencil Theme Files
Stencil themes support the option of direct browser access to the code that makes up the theme, without having to install Stencil CLI. This is ideal for making minor adjustments to the theme that cannot be done directly within Page Builder, or for adding scripts to integrate apps that cannot be done through the Script Manager.
This is an advanced feature. It requires knowledge of HTML/CSS and Handlebars. For major design adjustments or new theme development, we recommend that you or your developer use Stencil CLI, which provides access to all theme files. See Getting Help for avenues of assistance.
Limitations
The following features are not available with Edit Theme Files:
- Editing assets like font files, .SVG files, or other image files
- Editing a theme’s config.json or schema.json configuration files (although you can view their contents)
- Editing any JavaScript files
- Concurrent editing is not supported. For a given store, only one instance of the editor should be opened at any time.
Accessing Edit Theme Files
To access Edit Theme files, you need to be working on a copied version of the theme. It is not accessible from the default theme from the marketplace. Copied themes are considered custom themes and will not receive Marketplace Theme Updates.
1. Go to Storefront › Themes and click on the Advanced drop-down menu of the current theme.

2. Select Make a Copy.
3. You will be prompted to name the copied theme. Type in a name, then click Save a Copy.
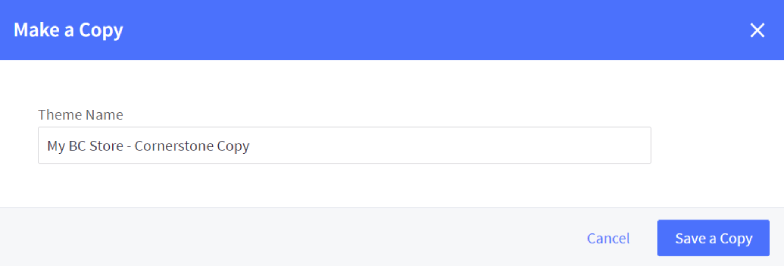
It may take a few seconds for the theme to be copied.
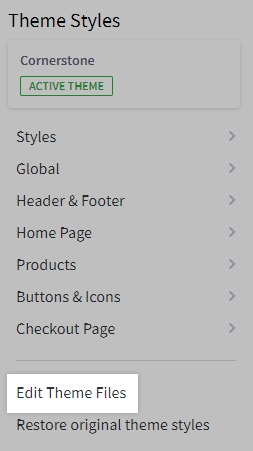
4. Click on the action icon of your copied theme, then click on the Customize option to open it with Page Builder or Edit Theme Files to open the in-browser editor directly.
If you selected Customize, click Theme Styles. Click Edit Theme Files to open the code panel.
5. In Page Builder, click the Edit Theme Files tab to open the code panel.
Using Google Chrome? If you are trying to open Edit Theme Files in Google Chrome, check your pop-up blocker and set it to allow pop-ups on this page.
Editing Theme Files
When you click Edit Theme Files in Page Builder, it replaces the preview panel with the theme’s underlying code. The tab’s left-hand side shows you the theme’s files, in a tree of nested folders. Files and directories that should only be edited by the original theme developer are hidden from this view. To edit those files, you will need to use Stencil CLI.
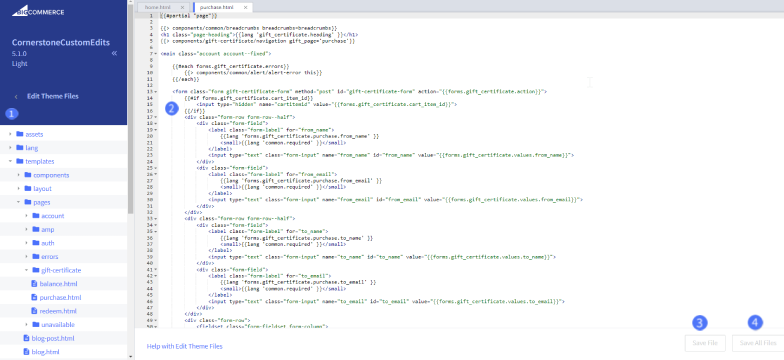
- Theme Files — these are the folders and files that make up your theme. Click on a blue folder to open it. Click on a blue .html or .scss file to edit it. Greyed-out files are Read-Only. They can be altered only using Stencil CLI.
- Code Panel — this is where you edit the code of the selected file
- Save File — will save the file currently open and recompile the theme
- Save All Files — will save all open files and recompile the theme
The file editor color-codes elements within your source HTML for easy identification, and it will auto-suggest HTML as you type. It also includes the ability to Undo and Redo edits. The file editor allows for a mix of HTML, Handlebar statements, SCSS, and JavaScript tags in your theme’s template files. See our Dev Center reference on Handlebars Helpers.
Pro Tip! You can search for elements within a file by pressing Ctrl+F or Cmd+F.

Saving Theme Files
When you click the Save File or Save All Files button, it will recompile and repackage the theme files with your changes. You can then preview the revised theme and (if you choose) apply it to your store. Saving and compiling might take a few minutes to complete, depending on the complexity and number of the changes.

Once saved, you can preview the theme by clicking the Preview button.
Applying New Theme to Storefront
When you are happy with your changes, click Save to repackage the edited theme.
1. Navigate to Storefront › Themes, then scroll down to the list of your themes.
2. Click on the action button on the theme you copied and edited.
3. Select Apply and go through the prompts.
Check your storefront to see your changes in action.
Getting Help
Don't feel comfortable adjusting your design or want to work with an expert? Check out our BigCommerce Partner Directory, or consider using our Agency Design Request program to work with a Certified Design Partner. Due to our Design Policy, our Technical Support is unable to edit code or make design changes.
Adding Custom Scripts to Stencil Themes
Many third-party applications and services rely on the ability to inject custom scripts into a website’s footer in order to function. Most apps will automatically inject these scripts in the correct location. On some occasions, it may require copying and pasting the script.
Using the Script Manager
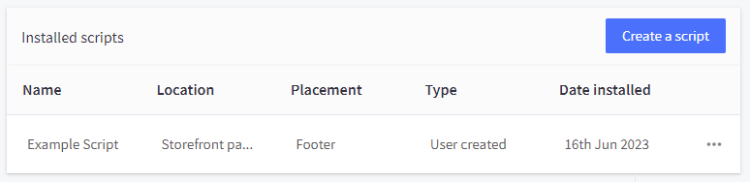
The Script Manager records injected code or scripts from apps. This makes organizing your installed scripts convenient to view and edit individually. To access the Script Manager, go to Storefront › Script Manager. If you need to copy a script, click the Create a Script button, give it a name, specify a location, then select Script as the Script Type. See Using Script Manager for more details.
Can I add custom HTML code outside of my site’s footer? It is possible to paste code in other template files using Edit Theme Files. Keep in mind that the script may not be compatible with the Stencil framework. For further assistance, check out our BigCommerce Partner Directory.
Handlebars in Stencil Footer
In addition to HTML and custom scripts, you can paste the templating language Handlebars into the footer of Stencil themes via Edit Theme Files. This allows for more robust customizations.
Handlebars is a templating language used to develop and customize Stencil themes. For example, you can use Handlebars to reference theme-wide variables like your store’s name or logo. Third-party apps could use Handlebars to reference customer information, in order to display loyalty offers specific to the person logged in.
To learn more about using Handlebars in Stencil themes, see the section on Using Handlebars in the Dev Center.
Analytics and Conversion Tracking Scripts
Analytics and conversion tracking scripts are usually added to the header or checkout. See our articles on Setting Up Google Analytics and Passing Order Data to Affiliate Conversion Tracking Programs for more information
FAQ
Don't see the customize button?
If you see the buttons Customize Update and Update, it means there is an update available for your theme. See Marketplace Theme Updates for more information.
Why do I have to make a copy of the theme?
Creating a copy of your theme allows you to make changes to your storefront design and still retain a "clean" working version of the theme. You can edit a copied theme even if it is live on your storefront by selecting Edit Theme Files from the Advanced drop-down menu.
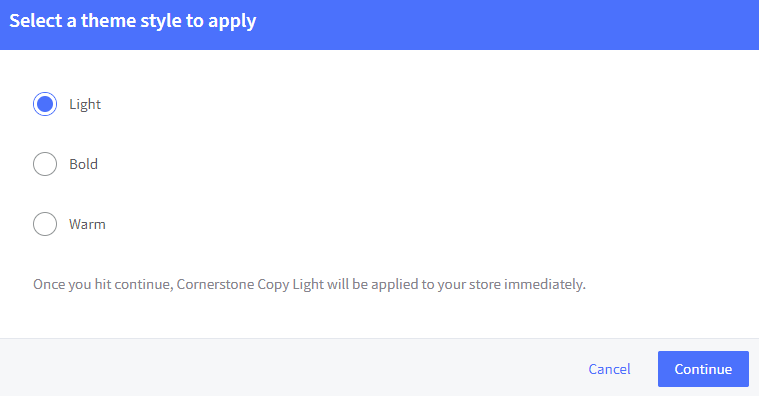
How do I edit a theme variation?
When you copy a theme, it will bring up its default variation when you click Customize. To make edits to a variation, click on Theme Styles in Page Builder. Click on Styles, then select the theme variation from the pop-up.
Can I add JavaScript files?
While you can add JavaScript tags to web pages, you cannot add or edit JavaScript files with the built-in file editor. To add or edit JavaScript files, you must use Stencil CLI.