ShipperHQ
We’ve integrated with ShipperHQ to provide you with advanced tools to control what shipping options to offer your customers during the checkout process. ShipperHQ enables you to do things like:
- Per product per zone shipping options
- Different shipping options based on customer groups
- Different shipping options based on different shipping origin addresses; useful for those with warehouses in multiple locations and those using dropshippers
- You can define what box sizes you ship with, as well as how many products you can get into different boxes.
- Support for freight carriers
How the Integration Works
When one of your customers goes through the checkout flow, BigCommerce will reach out to ShipperHQ via an API call and ask ShipperHQ what shipping rates to offer to your customers. ShipperHQ will return a set of values in the API response and BigCommerce will use those values to display them to your customers.
As a part of the API request to ShipperHQ, BigCommerce will include basic information about the order that ShipperHQ needs in order to determine what shipping rate to offer your customer. The information we send includes product information such as:
- weight
- dimensions
- quantity
- price
- customer group (if any)
- free shipping (on or off)
- fixed shipping price (if assigned)
You can then set up shipping rules in ShipperHQ that offer specific shipping options to your customers, based on this data. Note that since ShipperHQ is controlling your shipping settings, shipping related discounts created within BigCommerce (coupons and Automatic Promotions) will not apply to the shipping options ShipperHQ presents during checkout.
Product Shipping Attributes
There are three fields available for you on the product level in BigCommerce that are included in the information we send to ShipperHQ to determine what shipping options to show your customers. Note that these fields are not visible or available when editing products until after you install the ShipperHQ app.
The specific fields available for you to define in your BigCommerce product catalog are:
You can also define these fields using the legacy and modern Product Import/Export tool.
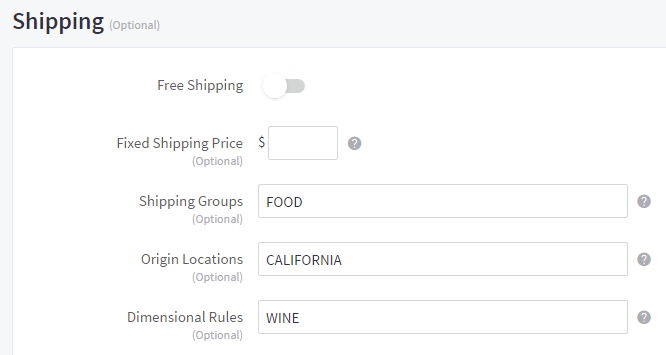
If your store is using the v2 Add Products experience, ShippingHQ fields appear under the Shipping section under the Details tab.
If your store is using the v3 Add Products experience, ShipperHQ fields appear in the Shipping Details section under Show Advanced Shipping Fields.
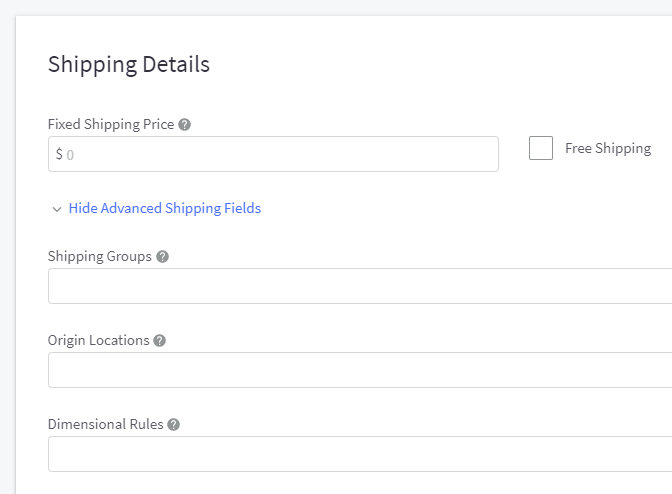
Shipping Groups
Shipping Groups allow you to offer different shipping options based on the product being purchased. Some examples would be perishable products which have restrictions around how long they can be in transit, bulky products which may need to be shipped via LTL freight, or situations where you're offering a special shipping promotion on certain products. Here is a ShipperHQ doc showing an example setup.
You'll need to set up your Shipping Groups in ShipperHQ, then assign them to your products here. Make sure the values entered here exactly match the Shipping Group names in ShipperHQ, and use a hash (#) symbol to separate multiple values.
Origin Locations
ShipperHQ will use the default shipping origin whenever a product doesn't have a specific Origin applied to it. So if you ship everything from a single location, you don't need to enter in any shipping origins. If you ship the majority of your products from a primary shipping origin, then you only need to add an Origin Location to the products that ship from your secondary location.
Make sure the values entered here exactly match the Origin names in ShipperHQ, and use commas to separate multiple values.
For more information, see ShipperHQ's Origin Configuration doc.
Dimensional Rules
By setting up Dimensional Rules, you can configure a different way of handling certain products when ShipperHQ is calculating order dimension information. For example, some of your products may always ship separately from the rest of your products and never get packed into a box with other products.
Once you've set up your Dimensional Rules in ShipperHQ, you can enter the Rule Name in this field. Only one Dimensional Rule can be applied per product. In most cases, you will only need to enter Dimensional Rules for a subset of your products which are packed differently from the rest of your products.
Customer Groups
In addition to the three product shipping attributes mentioned above, we also include the customer group that the customer checking out belongs to. This enables you to offer different shipping options to different customer groups by defining shipping rules for customer groups in ShipperHQ.

Requirements
- Only the Store Owner can install or launch the ShipperHQ app.
- The Manage Shipping user permission is required to navigate and update shipping settings.
- The Manage Products, Import Catalog Entities, and Export Catalog Entities user permissions are required to import and export products.
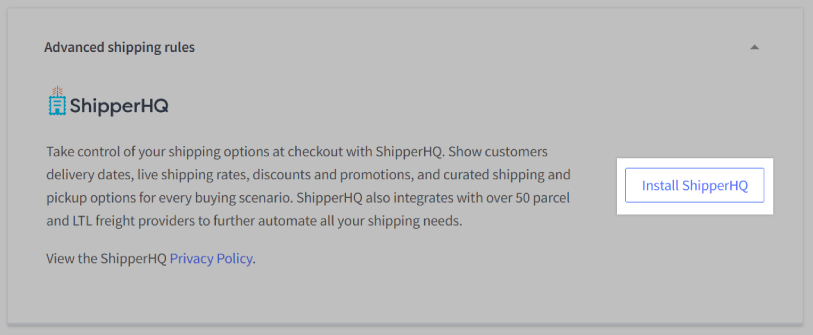
Installing the ShipperHQ app
The ShipperHQ app is available for you to install in your control panel and in our App Marketplace. Installing the ShipperHQ app will not be enabled nor have any immediate impact on your BigCommerce store’s checkout flow. This gives you time to configure your shipping settings.
To install ShipperHQ, go to Settings › Shipping › Advanced Shipping Rules click Install ShipperHQ.
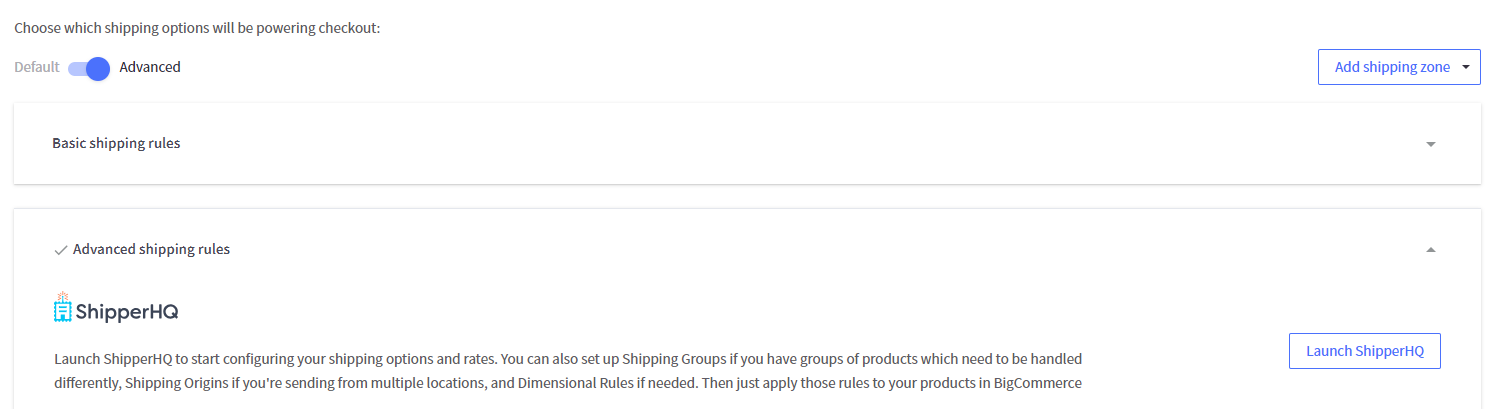
After you’ve configured all your settings, you can turn on ShipperHQ from your BigCommerce Control Panel in the Shipping page. This will cause ShipperHQ to control what options are displayed to your shoppers during the checkout flow instead of the options you’ve configured in BigCommerce.
Turning on ShipperHQ
Once you are done configuring all of your shipping settings in ShipperHQ and have applied the appropriate shipping attributes to your product catalog, you can turn on ShipperHQ, so that it starts controlling what shipping options are shown to your customers during the checkout flow.
This is done in your BigCommerce Shipping page. Navigate to Settings › Shipping. In the Checkout Shipping Options section, you’ll see a toggle to enable Advanced shipping rules. Once enabled, ShipperHQ will immediately start powering your checkout shipping options.
Upon enabling ShipperHQ, all of your previous settings for Basic shipping rules will be saved, but they will have no impact on your checkout shipping options. If you go back to Basic shipping rules all of your previous settings will immediately go into effect and ShipperHQ will have no impact on your checkout shipping options. This allows you to go back and forth between the two systems as needed while you conduct testing to make sure you have everything working properly.
Preview Advanced Shipping
By clicking Launch ShipperHQ Preview Mode, the shipping rates and quotes generated by ShipperHQ at checkout can be previewed by store users logged into the control panel before enabling them live for your shoppers. This is useful for confirming that your settings within ShipperHQ have been configured correctly before publicly surfacing them to your shoppers.
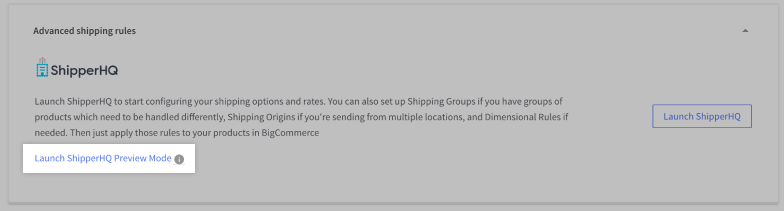
Your shoppers will not be impacted by this preview — they will continue to see the Basic shipping rules previously configured. Once you are satisfied with the quotes being generated, you are ready to use ShipperHQ. To activate ShipperHQ, click the toggle to enable Advanced Shipping Rules (see Turning on ShipperHQ).
Note: Preview Advanced Shipping is only available if ShipperHQ is already installed, ShipperHQ is not currently powering checkout, and Basic shipping rules is enabled.
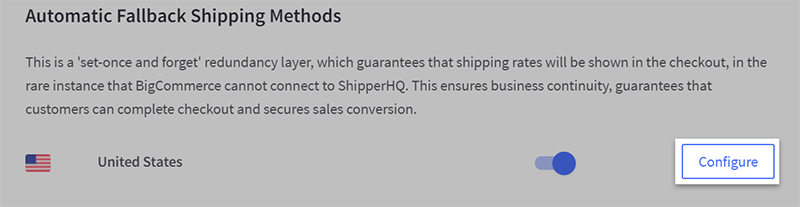
Fallback Shipping Methods
To provide extra peace of mind, you can set up Fallback Shipping Methods which will only trigger if there is an issue communicating with ShipperHQ. This means that customers will always see shipping options during checkout. Created shipping zones are listed under the Fallback Shipping Method section. Click the Configure button and set up the shipping methods that should be used as a fallback option.
ShipperHQ Supported Carriers
| Small package carriers | LTL freight carriers |
|---|---|
|
|
Getting Help
The ShipperHQ support team is available if you need any help figuring out how to set up your shipping rates with ShipperHQ. To contact the ShipperHQ team:
- Email: support@shipperhq.com
- Twitter: @ShipperHQ
- ShipperHQ Overview (video)
- Getting Started Video Walkthrough
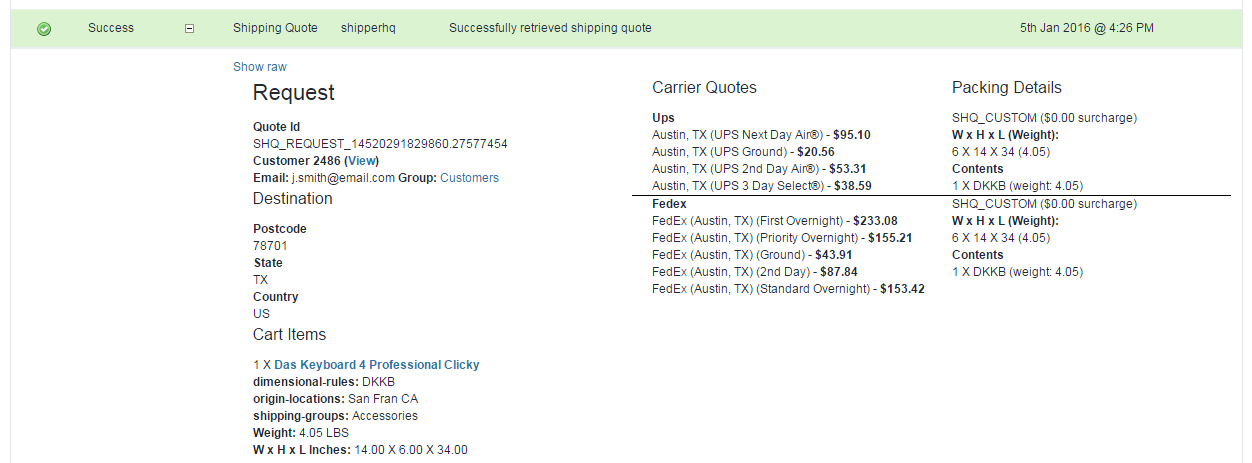
ShipperHQ carrier and packing details are included in your Store Logs. This information can be useful when first configuring your ShipperHQ settings. See ShipperHQ documentation for more information on how to configure ShipperHQ.
Applying Attributes to Products via CSV Import/Export
If you're using ShipperHQ, you can save time by applying Shipping Groups, Shipping Origins, and/or Dimensional Rules to multiple products at the same time. You can do this by using our Import/Export feature to add this information via spreadsheet and importing it into your store.
Note that if your store is using the modern Import/Export experience, you cannot create custom export templates. Instead, we recommend exporting your products, editing them in the spreadsheet of your choice, and re-importing to update your products.
New to our Import/Export feature? Brush up on importing products and exporting products. For a quick overview of updating products with this feature, see Product Import/Export Overview.
Creating a Shipping Export Template
Since the shipping attributes are not included in the default or bulk edit export templates, you'll need to create a custom export template in order to export and re-import these details. The steps below will cover creating a customized export template that includes the shipping attribute fields.
1. Go to Settings › Export templates.
2. In the Action drop-down next to Bulk Edit, select Choose an Action › Create a Copy.

3. Rename your custom template (we used "Shipping"), then click on the Products tab.
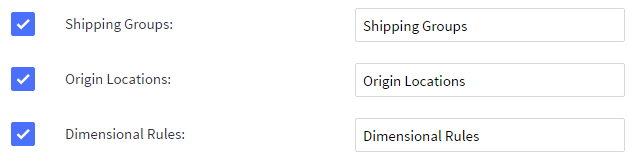
4. You will be brought to a list of product attributes. Click the checkbox next to Export this field to deselect all fields, then reselect the following fields:
- Item Type
- Product ID
- Product Name
- Product Code/SKU
- Category String
- Shipping Groups
- Origin Locations
- Dimensional Rules
If you prefer, you can keep the other fields selected; they will just make it slightly more difficult to locate the shipping attributes in the spreadsheet.
5. Click Save & Exit.
Exporting Your Products
Make a sample! Before exporting your products, edit a product and add the shipping attributes. (They can be found in the Details tab, under Shipping.) This way, you'll have a live example of how these fields are formatted in the spreadsheet, making it easier to apply them to the rest of your products.
1. Go to Products › Export.
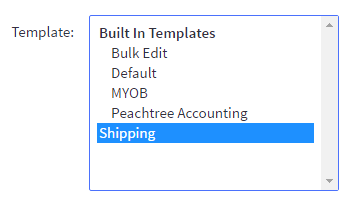
2. Under Template, select the shipping template that you created.
3. Click Continue and follow the prompts to download your CSV file. Open the spreadsheet using your spreadsheet editor of choice.
4. Add your shipping attributes to the Shipping Groups, Origin Locations, and Dimensional Rules columns. For standalone products, update the fields in the row with the Product Item Type. For product variants, update the fields in the row with the SKU Item Type.

5. Save your spreadsheet when done. Do not change the file type from CSV, since only CSV files can be re-imported.
6. Re-import your spreadsheet. Double-check some of your updated products to make sure the data was imported accurately.
FAQ
How can I add the "City" field to the cart page?
If you use ShipperHQ, and use YRC Freight and/or FedEx LTL to provide real-time freight shipping quotes to your shoppers, it requires the city value to properly return freight shipping quotes, as the Estimate Shipping & Tax button on the cart page will not return quotes for these services unless the City field is included.
This field is included by default in all Stencil themes. If your store is using a legacy Blueprint theme, see Blueprint Themes for instructions on customizing your template files to add the City field.