Shipments
Shipping is a key piece of every online business. In this article, you'll learn how to create a shipment, how to print a label using our USPS by Endicia integration, where to view your shipments, and how to import tracking numbers. We've also provided additional resources where you can learn more about building a shipping and order management strategy that's right for you.
Requirements
- To access View Orders and View Shipments, the Manage Orders user permission is required.
- Creating shipments requires the Manage Shipping permission.
Ship Items
When you're ready to ship an item, you can use the Ship items action from the View Orders screen to:
- adjust the quantity of each item to include in this shipment
- adjust the weight and dimensions of the package
- confirm the "shipping to" address
- add notes to the packing slip
- print the packing slip
- update the order status
- notify the customer of the status update
- create a shipment

You also have the option to split an order into multiple shipments. You may have to create multiple shipments if a customer is having their order shipped to more than one location, or the order is too large for a single shipment and requires multiple packages. Another scenario would be if a particular item in an order is on backorder and must be shipped at a later date.
If you’re using USPS by Endicia to print shipping labels, in addition to all of the above features, you're also able to:
- select your package type and shipping service
- add Signature confirmation
- add Endicia Parcel Insurance by U-PIC and adjust the insured value for a shipment
- print a shipping label on an 8.5x11 inch paper using a standard office printer or a 4x6 inch label with a DYMO printer
The Create a shipment screen can be broken down into nine fields.

1. Quantity to ship — You can adjust the quantities of each item in the order. If sending multiple shipments, Left to ship on the right displays how much quantity is still needed to completely fulfill the order. If you don’t want to ship a given item in this shipment, set the quantity to 0.
2. Package weight and dimensions — These can be adjusted if your package weight and dimensions are different than what was automatically generated.
3. Shipping to — Confirms the shipping address of the customer. This will be included on the printed shipping label if you’re using USPS by Endicia. It can be revised by editing the order.
4. Packing Slip Notes — A customer-facing note section. This can be used for package instructions or a simple “Thanks for your business!” message.
5. How would you like to ship? — Choose which carrier you’re using for the shipment from this drop-down menu. If you’re using USPS by Endicia, this is a list of package and service combinations that your shipment qualifies for. The next time you create a shipment, this will default to whatever you last set it to.
6. Other Tracking Carrier Options — This field only appears when you select Other for How would you like to ship. Type at least 2 characters to begin searching, then pick from the list of carriers. If a tracking ID is entered, the shipping status email will include a clickable link from which customers can check the progress of their shipment.
7. Tracking ID — If you’ve created a label with a service other than USPS by Endicia, enter a pre-created Tracking ID here.
8. Shipping Method Description — Displays the shipping method chosen by the customer. This field appears on the packing slip and can be edited to include additional information about the shipping method.
9. Update the order status to Shipped — Change this setting if you don’t want to trigger the Shipped status, which may send a customer a status notification email, depending on your Order Notification settings.
If you are not using our USPS by Endicia integration to print labels, click the Create shipment button to complete the shipment and return to the View Order screen. If you are using our USPS by Endicia integration to print labels, you will have additional options available. See Additional Fields below to learn more.
Additional Fields
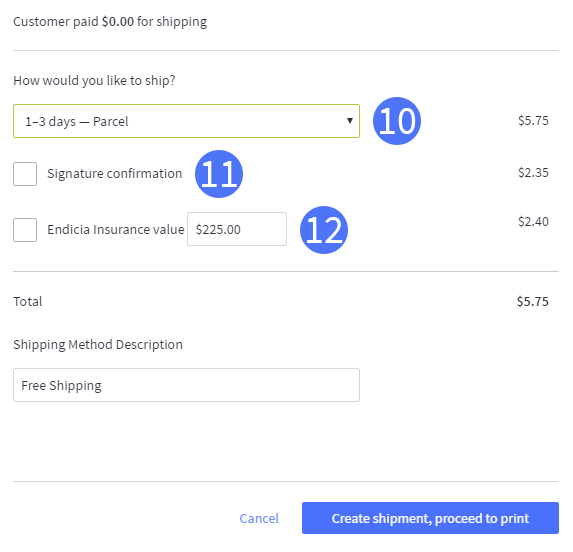
10. How would you like to ship? — This is a list of package and service combinations that your package qualifies for, and that you’ve enabled in your USPS by Endicia settings. This will default back to the last selected service.
11. Signature confirmation — Select to purchase the Signature confirmation service.
12. Endicia Insurance value — Select to purchase insurance for the shipment. You can adjust the value, if necessary, which will update the insurance quote to the right.
Insurance must be enabled on your Endicia account. To request enablement, contact Endicia Support at 1-800-576-3279 ext. 270 between 6 AM and 6 PM PST Monday - Friday.
Click Create shipment, proceed to print when you are ready. You can now print your shipping label if USPS by Endicia is enabled.
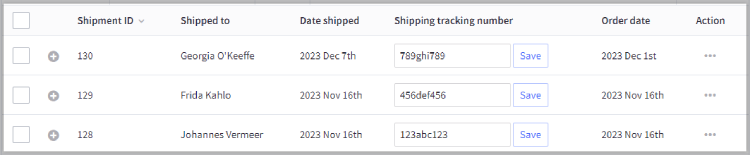
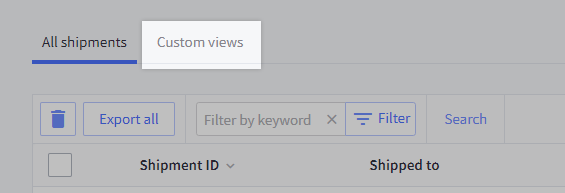
Viewing Shipments
To view all shipments, go to Orders › Shipments. Click the + icon to the left of the shipment to expand and view its details. A packing slip can be printed from the action menu. If a partial shipment was created, then only those items will be displayed in the packing slip.
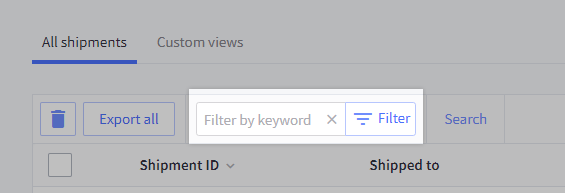
You can refine your view with the Filter by keyword field. Enter a keyword in the box and click the Filter button. Click the X in the field to undo the filter.
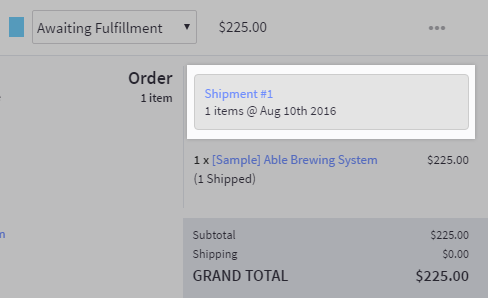
To view shipments for a particular order, go to Orders › View, click the + icon to the left of the order, then click the Shipment Number in the order column on the right. You can also select View shipments from the order’s action menu. From here, you can reprint your label, if necessary.
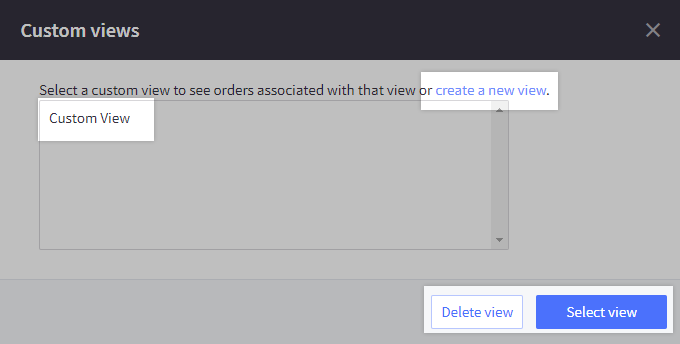
Custom Views
Custom views allow for more advanced shipment filtering and are saved for quick access in the future. You can filter your shipments by:
- Keywords
- Shipment ID range
- Order ID range
- Shipping date range
- Order date range
To create a new view or select or delete an existing Custom view, go to Orders › Shipments and click Custom views.
Click on an existing view in the list, and either Delete view to remove it from the list or Select view to apply it to your shipments.
Click create a new view to open the New shipment view page. Select your desired attributes and click Save to apply it to your shipments and add it to the list of saved Custom views.
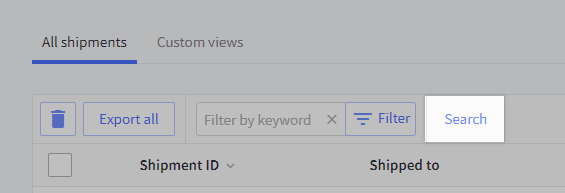
Searching Shipments
The Search button provides the same filtering and sorting methods as Custom views, but without saving for future use. To search shipments, go to Orders › Shipments and click Search.
Select your desired attributes and click Search to apply it to your shipments.
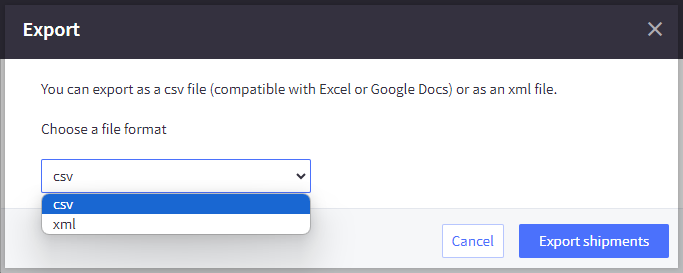
Exporting Shipments
Shipment details can be exported and saved to a file from Orders › Shipments.
Click the Export all button to begin the export.
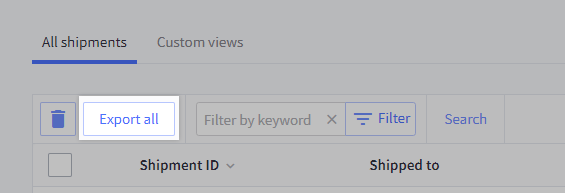
On the pop-up window, choose either csv or xml file format. Clicking Export shipments will export all shipments and download them to your computer.
Importing Tracking Numbers
Importing tracking numbers for your orders is an excellent way to speed up your order fulfillment process. Instead of having to manually enter the tracking numbers on each order, which leaves room for human error, you can enter them on a spreadsheet (CSV) and use the import tool to associate them with the correct order.
This feature is not meant for:
- orders with multiple shipping addresses
- orders requiring multiple shipments
For these orders, we recommend manually adding the tracking numbers through the control panel.
Creating an Import File
Download You can download the tracking-number-import.csv file to see how an import file is correctly formatted.
The CSV file should have three columns: order_number, tracking_number, and tracking_carrier. Fill each column out with the following information.
- order_number — should contain the order number for the order you are updating
- tracking_number — the tracking number for the order
- tracking_carrier — the code for the shipping and tracking service that provided the tracking number. The carrier can be any of the 300+ carriers we support.
When the tracking carrier field is filled in, the shipment notification sent to the customer will link the tracking number to AfterShip's tracking status page. Be sure to save the file to your computer as a CSV (Comma-Separated Value) file when you are finished.
Shipping Service Codes
Our tracking number import supports over 300 shipping carriers. See our public GitHub repository for a full list.
Importing Your File
1. Go to Orders › Tracking Numbers.
2. Select which order status the orders in your import file should be updated too. If you do not want the statuses to be changed, select Do Not Update.
3. Click Browse or Choose File, select your import file from your computer, then click Next.
4. On the following page, match each field to its corresponding column header. For example:
- Match Order Number with order_number
- Match Tracking Number with tracking_number
- Match Tracking Carrier with tracking_carrier
Click Next when done.
5. Click the Start Import button. Once complete, you will see a confirmation message indicating tracking numbers were successfully imported and updated.
Carrier Codes
The values below should be used as the tracking_carrier when importing tracking numbers. When an order is updated with a tracking number and the order status changed to Shipped, the resulting customer order notification will include a link to the carrier's tracking page.
We have listed the codes for the most popular shipping carriers below. If yours is not on this short list, see our public GitHub repository to find the carrier code for the shipping carrier you are sending your package through.
- USPS by Endicia — usps
- UPS — ups
- Fedex — fedex
- Australia Post — australia-post
- Canada Post — canada-post
Shipment Apps
Our App Marketplace offers a variety of integrations that can help with your shipping and order management. Several marketplace apps plug directly into your store, ranging from fulfillment to order management to shipment tracking.
FAQ
Why do I see an AfterShip URL after I have created my shipment?
If you select Other during the carrier selection step of creating a shipment, the tracking code link will show as an AfterShip URL.
How do I fulfill an order placed using an in-store pickup method?
If an order was placed using a pickup method, the Ship Items action is replaced with Ready for Pickup.
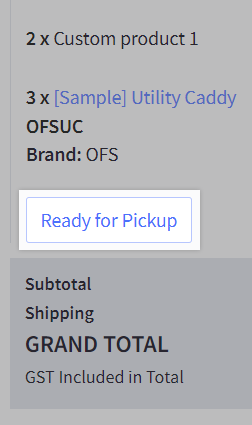
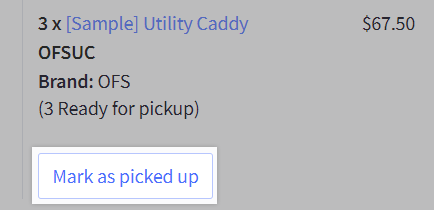
This action opens a window where you can review pickup details like the location and contact, update the order status to Awaiting Pickup, and email the customer that their order can be retrieved.

When your customer has picked up their order, use the Marked as picked up action to update the order status to Completed.
Can I fulfill orders from more than one pickup location (also known as multiple consignments)?
Currently, an order can only be fulfilled from a single pickup location.
Can I fulfill an order by shipping certain line items and offering in-store pickup for others (also known as mixed consignments)?
No, mixed consignments are currently not supported in a single order. Separate orders must be placed for shipped and in-store pickup items.