Managing DNS
What We'll Cover
DNS (Domain Name System) helps computers connected to the internet to communicate with one another. Sometimes different parts of a domain, such as email hosting or a subdomain, may be hosted by different servers. BigCommerce allows you to add and configure DNS records for your store's domain from the control panel. This allows you to accomplish tasks in your control panel such as verifying your site with Google, adding verification records for your hosted email, and setting up subdomains.
Be careful! DNS records are vital to ensuring that your store is accessible by your customers. For this reason, only experienced users should make DNS changes.
Mail Servers
The Email & DNS Records section is where you will manage your domain, subdomain, and email records in your control panel. To get started, go to Settings › Email & DNS records.
The Mail Servers tab is where you will edit your Mail Exchange (MX) records. MX records control email hosting by pointing to the mail server(s) responsible for accepting and sending email messages.
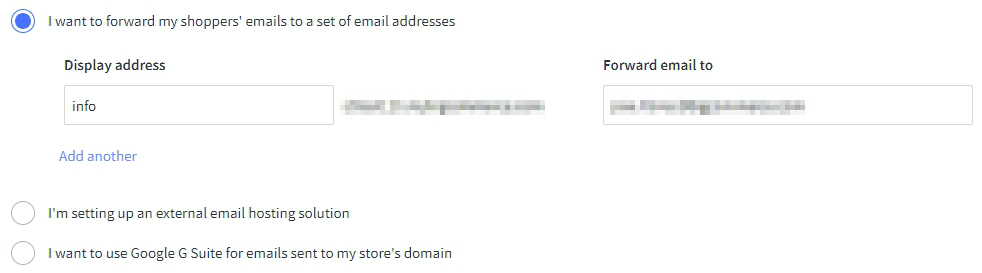
Select I want to forward my shoppers' emails to a set of email addresses to set up a forwarding email address. You can create up to 5 forwarding addresses, and they can all forward to the same email. See Email in BigCommerce to learn more.
Select I'm setting up an external email hosting solution to use a third-party email host, like GoDaddy or Zoho. See Third-Party Email Hosting to learn more.
Select I want to use Google Workspace for emails sent to my store's domain if you are using Google Workspace as your email host.
Web Hosts
The Web Hosts tab is where you will edit your DNS records. The three most commonly used record types are A records, CNAME records, and TXT records.
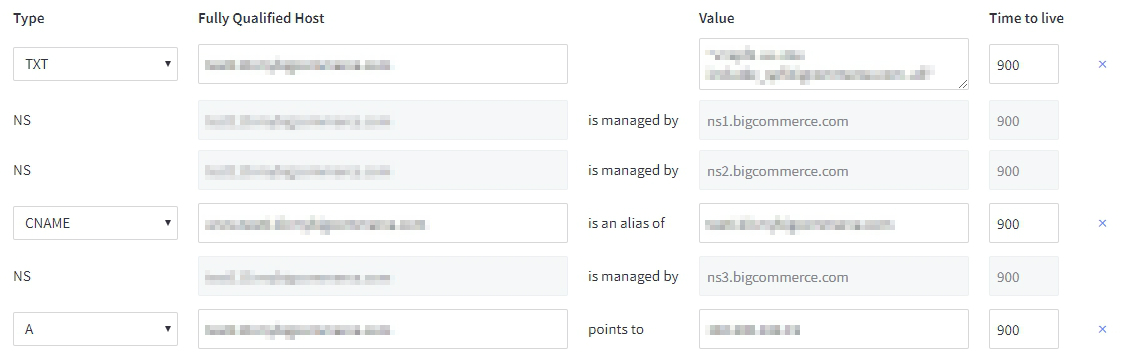
The most basic type of DNS record is the A (address) record, which is used to point a domain name to a specific IP address. Domains purchased through BigCommerce will have this record automatically created for you. If you purchased a domain from a third-party, it can be pointed to BigCommerce via an A record. See Creating an A Record for more information on the advantages and limitations of using this method.
Another commonly used type of DNS record are CNAME (canonical name) records. CNAMEs are typically used to point a subdomain or domain to another root domain. You can point a subdomain to BigCommerce via a CNAME record to connect your store to an existing domain without changing where it is hosted.
For example, if you have a WordPress site at mydomain.com and you want your BigCommerce store to be located at shop.mydomain.com, you can point your subdomain (shop.mydomain.com) to BigCommerce via CNAME to keep the root domain (mydomain.com) with your existing WordPress site and have your store located on the subdomain. See Creating a CNAME to learn more.
Text (TXT) records are used to store free form text-based information about a domain, such as who is hosting it and their contact information. Most commonly they are used to create a Sender Policy Framework (SPF) record. SPF records help reduce email spam and allows BigCommerce to send mail on your store's behalf.
Often, these records will be supplied to you by your third-party mail provider. See Third-Party Email Hosting to learn more.
Editing DNS Records
Existing records can be edited by changing the record type from the Type drop-down menu and by changing the contents of the Fully Qualified Host, Value, and Time to live fields. To delete a record, click the X to the right of that record. When you are finished making changes, click Save.

Adding DNS Records
Begin creating the DNS record by clicking Add another located at the bottom of the list. Then select the record type from the Type drop-down menu and fill in the DNS record fields accordingly. When you are finished, click Save.

Zone Details
The Zone Details tab is where you can edit the Start of Authority (SOA) record, which controls the various timing elements of the DNS zone file. Note that you will only be able to edit some aspects of the zone file, and in most cases you will not need to change the default settings at all.
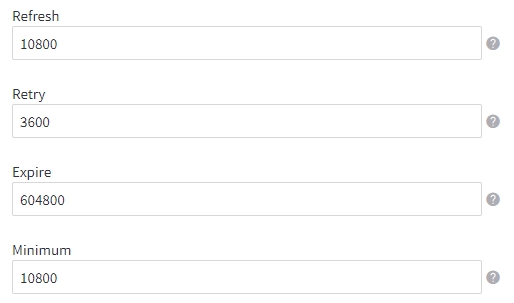
The Refresh interval is how often (in seconds) secondary DNS servers check with the primary server to see if any changes have been made to the domain's zone file. The default value is three hours (10800 seconds).
The Retry interval is the time (in seconds) a secondary DNS server waits before checking the primary server again after a failed attempt to check for a zone file update. This time is typically less than the refresh interva, and recommended values will typically vary from 180 (three minutes) to 900 (15 minutes) seconds. The default value is one hour (3600 seconds).
The Expire interval indicates when the zone data is no longer valid when the primary nameserver cannot be contacted. Applies to secondary servers only. The default value is one week (604800 seconds).
The Minimum (negative caching time to live) is the time (in seconds) during which a secondary server should cache a negative response. The maximum value allowed by BIND 9 for this parameter is 3 hours (10800 seconds). The default value is three hours (10800 seconds).