Importing and Exporting Products (v2)
Exporting and importing your products is an efficient way to update your product catalog. Whether you're adding new products or making changes to existing ones, importing allows you to make those changes in bulk. You can update options, images, inventory, and create categories.
Exporting your products is also a great way to backup your catalog. All export templates include details like the product name, but you can get more granular by building an export template from scratch or customizing a copy of one to suit your needs.
Look different? This article covers the legacy importing and exporting product experience. See our Modern Product Import/Export guide for help with the latest experience.
How it Works
Products can be exported to a CSV or XML file so you can back up your catalog or make changes before importing a copy of the file. This allows you to update your catalog in bulk. Product options and images are also able to be managed through exporting and importing. Export templates can be created to customize the fields in your export to suit your needs.
Exporting and importing SKUs allows management of product SKUs for fields such as stock level, UPC/EAN, and dimensions, among others.
Requirements
- You'll need access to a spreadsheet program that supports either CSV or XML files such as Excel, Numbers, or Google Sheets.
- We recommend using the CSV format when exporting your files if you plan on importing the exported data back into BigCommerce. Any other file type will not import.
- To import and export products, you will need the following user permissions enabled on your user account:
- Manage Products
- Import Catalog Entities
- Export Catalog Entities
- When creating new products, the CSV will need to include the Product Name and Category fields.
- The Category field must be included, but the values can be left blank.
- The Product ID field must be blank or not included, or else the product will not be created.
- When importing product images, file name characters are restricted to a-z, 0-9, -, and _. File names cannot contain any spaces or special characters and are case-sensitive.
- Additionally, image files must be JPEG/JPG, GIF, WebP, or PNG.
- TIFF, BMP, or PDF file formats are not supported.
- When importing SKUs, the Product SKU and Stock Level fields are required.
- The file size limit for uploaded CSV files is 20 MB.
Choosing an Export Template
An export template determines what product information you are exporting. All export templates will include details like the product name, but you can include additional details like price and dimensions.
BigCommerce comes with a few product export templates built in:
- Bulk Edit (recommended) — the bulk edit template was made for updating your product information. It includes the majority of exportable fields and has specifically named columns that let you skip steps in the importing process.
- Default — the default template includes only basic product details such as name, weight, description, and price.
You can also create custom export templates, and select only the product fields you want to include.
Exporting Products
1. Go to Products › Export.
2. Select your export settings.
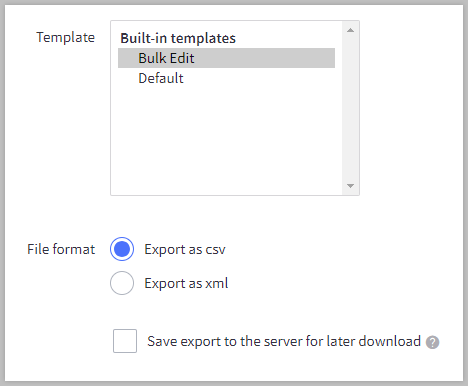
- Template — We recommend Bulk Edit if you are not using a custom template.
- File Format — You can export your file as a CSV or XML. We recommend CSV as any other file type will not import.
- Save export to the server for later download? — Select this option to save the file to your exports folder in WebDAV (recommended for exporting 1000+ products).
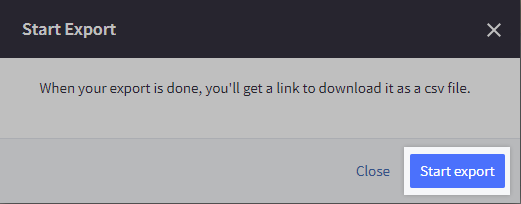
3. Click Continue, then click Start export in the pop-up window. The export will begin to process.
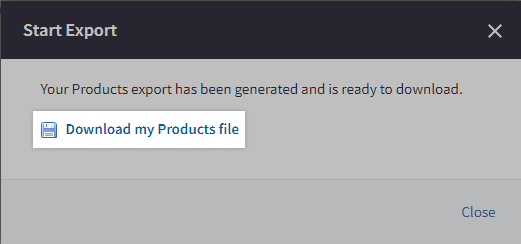
4. When the export is complete, select Download my Products file. The file will be saved to your computer, usually in your Downloads folder.
Once you've exported the CSV, you can then edit the spreadsheet to fit your needs, such as creating categories, adding options, updating product images or adding additional fields.
Make a backup! After exporting your products, it's a good idea to make a copy of the original export as a backup. This way, if something goes wrong during an import, you can quickly restore your products to their previous state.
Importing Products
Be careful when importing products. The options for Delete existing images and Delete existing downloads should not be enabled unless you know what you are doing. These settings can delete your existing product images and digital product files. There is no way to recover these files from BigCommerce. We recommend keeping a local backup of your files or using a backup-and-restore app like Rewind for automatic backups.
Updating products via CSV import is a common way to adjust inventory, revise product descriptions, and add products to new categories. Before importing, ensure that your CSV file contains the following:
- Product ID
- Product Name
- Category
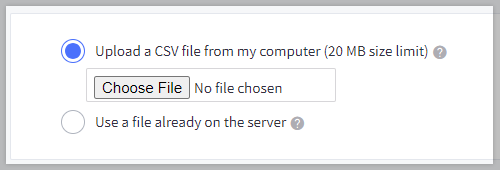
1. Go to Products › Import.
2. Under the Import Products via CSV section, upload your CSV file directly from your computer by selecting Choose File. Select Use a file already on the server if you previously saved the file to the WebDAV import_files folder.
3. Fill out your preferred settings under Import Options. We recommend the following:
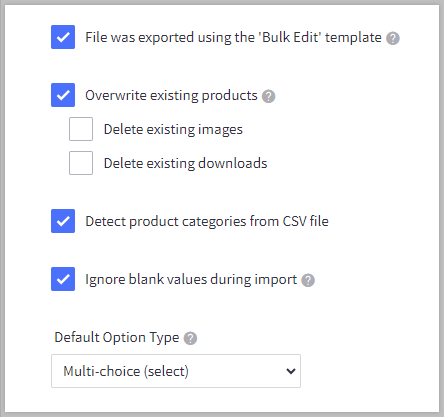
- File was exported using the 'Bulk Edit' template — Select this if you exported your file using the Bulk Edit template, or by using our sample CSV, or are using the same column names as listed in the table of supported fields below. This will preselect the rest of the Import Details settings and allow you to bypass the Matching Fields step.
- Overwrite existing products — If checked, your products will be updated upon import. Since this is generally why you're importing your products, you should select this.
- Delete existing images and Delete existing downloads — These will delete all of your product images and digital product files. Once they are deleted, there is no way to recover them from BigCommerce. Enabling this setting is not recommended for most import cases.
- Detect product categories from CSV file — Enable this if you want the import to auto-detect category names. If you neglected to fill in the Category field in your CSV, however, you can opt to have all of your products get added to a category in this list.
- Ignore blank values during import — Unchecking this setting will delete the data associated with any blank field in your import file. Because of this, we strongly recommend keeping this setting enabled. For example, if you left a product’s description blank and unchecked this setting, the product’s description would be deleted from your store without any alert.
- Default Option Type — This is used if you’re trying to create options via import and you haven't specified the option type correctly in the file. It will allow you to select a single type of option to use, but we recommend specifying the option type in your CSV file.
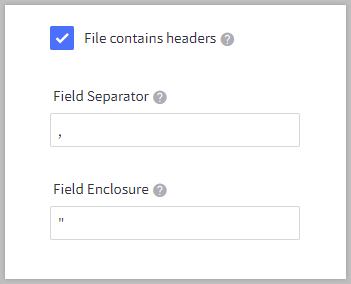
You can typically leave the following settings alone. They are used if you are uploading a spreadsheet and need to specify the import settings.
- File contains headers — Does the file contain column headings?
- Field Separator — what character is used to separate the fields?
- Field Enclosure — what character is used to tie phrases together (such as "Socks and Shoes")?
4. Click Next when done.
5. Link import fields to make sure all of the data you're importing has been matched to its equivalent field in BigCommerce. If you selected File was exported using the 'Bulk Edit' template, you can skip this step. For a list of available fields, see Table of Supported Fields.
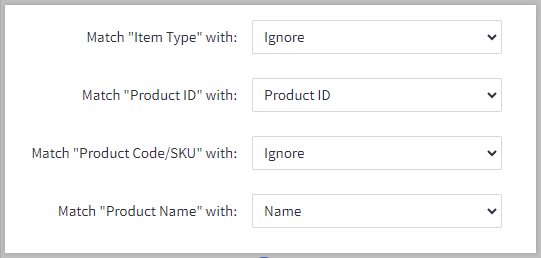
Be careful for data loss! "Ignore" means that the data has not been matched and will be considered blank. If the Ignore blank values during import setting is unchecked, existing data associated with any blank field in your import file will be deleted. We recommend leaving the setting checked.
6. Click Next when done.
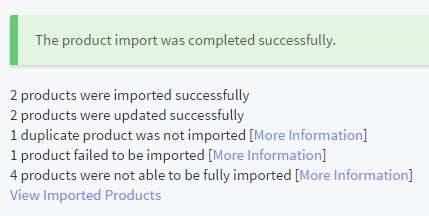
7. Click Start Import to begin importing your products. When the import is complete, you will see an import summary.
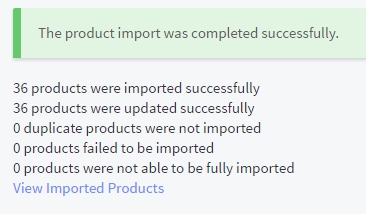
Click More Information to see any warnings generated during the import.
Creating New Products via Import
Whether you're creating new products from scratch or importing a CSV file from a distributor, importing is the fastest way to add new products to your store. To import new products, you will need to list their details in a CSV file. See Import/Export Overview for more information about CSV files.
Need an example? You can use our sample template to get started. Feel free to leave out any columns that you don't need. As long as you have the required fields listed below, the file will import successfully.
Required Fields
To create a product with a CSV file, you must include the following fields (column headers):
- Product Name
- Category (the field must be included, but the values can be left blank)
The following field must be blank or not included, or else the product will not be created.
- Product ID
Import File Formatting
If you are creating an import file from scratch, you can use our sample template.
If you're using a third-party distributor's CSV file, the file's columns will not match up with BigCommerce's product attributes exactly. You will need to do one of the following to ensure your product data imports successfully.
- Using the sample template as a guide, change your CSV's column headers to match the BigCommerce's column headers, or
- On the Link Import Fields step, match the column header with the corresponding product attribute
Importing Tips
Here are a few tips on making sure your import runs smoothly.
- To prevent the occurrence of stalled imports, reduce the number of complex products in your CSV. Products with many variants, images, or files can contribute to longer import runtimes. See Troubleshooting | Data Import/Export for more information.
- If you use the sample template, you can select File was exported using the 'Bulk Edit' template during the import process. This will preselect the recommended import settings and let you skip the Link Import Fields step.
Importing Product Options
To create product variants tied to product options, you will need to add sub-product SKUs with those attributes. If you need to link an action to the SKU/option, such as adjusting the price or showing a different image, you will also need to add rules. The easiest process is to create the base product first, export it, then add the SKUs and rules. See Importing Product Options (v3) for more information. If you have an older store and are using the v2 product experience, see Importing Product Options (v2)
Importing Product Images
Including product images in your product import is the fastest way to attach images to your products. This can be accomplished in one of two ways:
- If the images are already on the internet and you know the URL, you can import them using the image path in the CSV file.
- If the photos are on your computer, we recommend uploading them through WebDAV instead.
Image Requirements
Images must meet the following requirements. Attempting to import or upload an image that does not meet these requirements can cause products not to have images.
- Image file names are restricted to a-z, 0-9, - and _.
- Image file names cannot contain any spaces or special characters.
- Image file types must be JPEG/JPG, GIF, WebP, or PNG.
- TIFF, BMP, and PDF file formats are not supported.
- The optimal size for your product images is 1280 x 1280 pixels. Other product images (like thumbnails) will be created from the original image you upload.
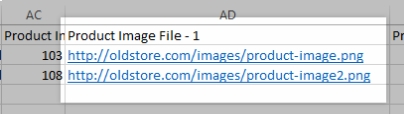
Using the Image Path
If your product images are already online, you can specify the full image path in your CSV file to import them along with your products.
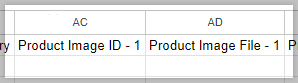
Locate the product image column in your CSV file. If you are using the Bulk Edit template, this column will be called Product Image File - (#). If you are importing new products or images, be sure to leave the Product Image ID column blank.
Be careful! When updating existing products, if your CSV contains product image IDs but no product image file information, the images tied to those products will be removed.
Enter the full path (such as http://oldstore.com/images/product-image.png) of the image for each product. Non-http URLs are not supported.
To upload multiple images for a single product, create a new column with a heading of Product Image File - # (increasing the number each time you make a new column). To include any of the other information for that image (such as descriptions), make a new column with the appropriate heading and same number as the corresponding image.
For example, if you wanted to import a product with two images, you would create extra columns and label them:
- Product Image ID - 2
- Product Image File - 2
- Product Image Description - 2

When you are ready, import your products. If you are using a template other than Bulk Edit, match your Product Image fields to the correct field on the Link Import Fields step of the import.

Uploading through WebDAV
With the upload method, you will upload images from your computer to your store using WebDAV, then specify the image by file name in the CSV.
Begin by connecting to your store through WebDAV. Open the product_images folder, followed by the import folder. Then drag and drop the images from your computer into the import folder.

In your product CSV, locate the column for product images. If you are using the Bulk Edit template, this column is called Product Image File - (#). Enter the file name (such as image.png) of the image file. If you've created a subfolder in product_images/import and added images to it, you must include that folder's subdirectory with the file name (like folder_name/image.png).
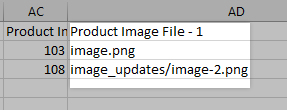
Be careful! WebDAV is case-sensitive, so make sure that your file names (including the extension) match those in the import folder. Characters are restricted to a-z, 0-9, - and _.
To upload multiple images for a single product, create a new column with a heading of Product Image File - # (increasing the number each time you make a new column). To include any of the other information for that image (such as descriptions), make a new column with the appropriate heading and same number as the corresponding image.
When you are ready, import your products. If you are using a template other than Bulk Edit, match your Product Image fields to the correct field on the Link Import Fields step of the import.
Exporting Specific Products
There are three ways to export specific products:
- Select individual products
- Export products based on a search or view
- Export products belonging to a particular category
Select individual products
1. Go to Products › View.
2. Click the checkbox to the left of the product or products you want to export.
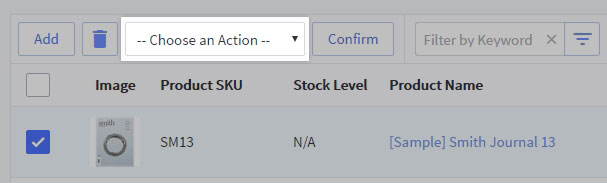
3. Under Choose an Action, select Export These Products, then Confirm. You will be taken to the Export page.
Export products based on a search or view
1. Go to Products › View.
2. If you already have a custom view, open it under Custom Views. If not, create one or click Search to perform an advanced search.
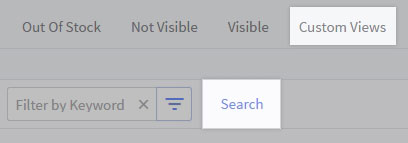
3. Once your view or search results are up, go to Choose an Action and select Export These Products, then Confirm. Selecting individual products from this list will only export those products; otherwise, all products that came up in the view or search will be exported.
Export products from a particular category
1. Go to Products › Product Categories.
2. Locate the category you want to export, and click Action › Products.
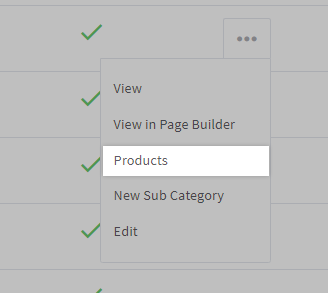
3. Under Choose an Action, select Export These Products, then Confirm. Selecting individual products from this list will only export those products; otherwise, all products in that category will be exported.
Creating a Custom Export Template
Customizing your template is the best way to ensure your product export has exactly what you want. You can build an export template from scratch or customize a copy of one to suit your needs.
We recommend using a copy of the Bulk Edit template and modifying it for your needs. This will let you bypass manual settings and field mapping when you go to re-import it later.
To start, go to Settings › Export templates. Use the Action menu to Create a Copy of the Bulk Edit template.

Type a name for your template in the Template Details section. Since this template will be for products, ensure Enable Products Exporting is the only option selected under Export Options. Notice that the tabs listed along the top update with your selections.

Customize the rest of the template settings to fit your needs. When you're ready, click the Products tab at the top to view the available export fields.
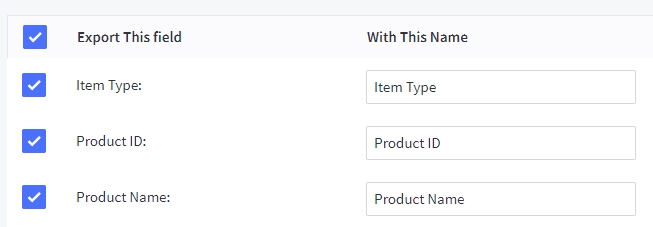
Go through and check or uncheck each field as needed. Click Save & Exit when you have made your changes. You can now export your data using your new template.
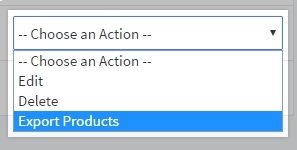
Table of Supported Fields
Below is a table of all fields that are exportable and importable via a CSV file using the Bulk Edit Template. If a field is not in the list below (such as bulk pricing), it cannot be imported, exported, or created manually. Fields in bold are required or recommended.
See Manually Entered Fields for a list of fields that are not included in the Bulk Edit template but can still be added manually and re-imported.
| Field | Description | Format / Additional Information |
|---|---|---|
| Item Type | Defines the item as a Product, SKU, or Rule | Type in product for products, SKU for SKUs, and rule for product rules. |
| Product ID | The system-generated product identifier; cannot be created manually | This field is required for updates, but must be blank for creating new products. |
| Product Name | The name of your product; no two can be the same | Maximum length of 250 characters. |
| Product Type | Defines whether the item is physical or digital | Type in P for physical products, and D for digital products. |
| Product Code/SKU | Stock-keeping unit number you use for inventory | This field is alphanumeric. Maximum length of 255 characters. |
| Bin Picking Number | Identifies where in a warehouse the item is located | Maximum length of 255 characters. |
| Brand Name | The brand or manufacturer of a product | |
| Option Set | The option set name | If you are on the v3 product experience, you should delete this field or create a custom export template that excludes it, as it can cause duplicated options upon import. |
| Option Set Align | Determine whether the options are to the right or below the product image | Type in right to display product options to the right of the product image, or below to display options beneath the product image. If you are on the v3 product experience, you should delete this field or create a custom export template that excludes it, as it can cause duplicated options upon import. |
| Product Description | A description of your product | This field can contain text or HTML. |
| Price | Your product's base price | Use numbers only (24.99), but no units. Note: Pricing changes can take up to 10 minutes to appear on the storefront. See our FAQ on price changes for more information. |
| Cost Price | The cost of the product for you (accounting purposes only) | Use numbers only; no units. Note: Pricing changes can take up to 10 minutes to appear on the storefront. See our FAQ on price changes for more information. |
| Retail Price | The retail price (MSRP); if entered, it will appear next to your base or sale price | Use numbers only; no units. Note: Pricing changes can take up to 10 minutes to appear on the storefront. See our FAQ on price changes for more information. |
| Sale Price | The sale price; if entered, it will replace the base price | Use numbers only; no units. Note: Pricing changes can take up to 10 minutes to appear on the storefront. See our FAQ on price changes for more information. |
| Fixed Shipping Cost | The price to ship one unit of your product; the product will ship at that price internationally, regardless of all other shipping settings | Use numbers only; no units. |
| Free Shipping | Your product will ship for free; if enabled, this intentionally overrides any other shipping settings | Type in Y to enable free shipping, or N to disable free shipping on the product level. |
| Product Warranty | Product warranty information | This field can contain text or HTML. Maximum length of 65,535 characters. |
| Product Weight | Product weight (physical only) | Use numbers only; no units. |
| Product Width | Your product's width for calculating shipping | Use numbers only; no units. |
| Product Height | Your product's height for calculating shipping | Use numbers only; no units. |
| Product Depth | Your product's depth for calculating shipping | Use numbers only; no units. |
| Allow Purchases? | Allows the product to be purchased from your store | Type in Y to allow the product to be purchased or pre-ordered, or N to indicate that the product cannot be purchased or pre-ordered on the storefront. |
| Product Visible? | Allows the product to be visible in your store | Type in Y to allow the product to be visible on the storefront, and N to disable product visibility. |
| Product Availability | A brief description of how long it takes for your product to ship | Use text only. |
| Track Inventory | Enable or disable inventory tracking on the product. If enabled, track by option or by product | Type in none to disable inventory tracking entirely, by product to track inventory on the product level, or by option to track inventory by SKU. |
| Current Stock Level | Number of units in stock (only applies if tracking inventory) | Use numbers only. |
| Low Stock Level | Inventory level at which you are sent a notification to restock (only applies if tracking inventory) | Use numbers only. |
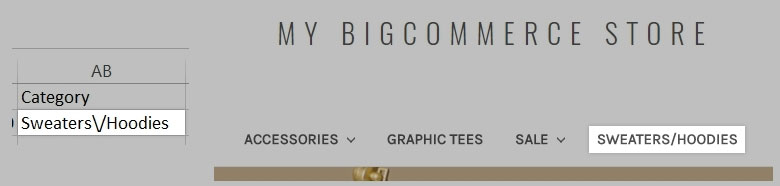
| Category | Categories and sub categories applied to product | Use the format Category1; Category2/Subcategory1;Category2/Subcategory2. If your category name starts with a slash (/), denote it with \/ (like Mittens\/Gloves). Maximum 1000 categories per product. |
| Product File - 1 | The file name of your digital product (digital products only) | Use the file name and extension, such as filename.pdf. |
| Product File Description - 1 | A description of your file | |
| Product File Max Downloads - 1 | The maximum number of times a single customer can download their purchase | Use numbers only. |
| Product File Expires After - 1 | The period after which the download link will not work for your customer | Use # Days, # Weeks, # Months, # Years, or Never. |
| Product Image ID - 1 | The system-generated product image ID | |
| Product Image Description - 1 | The alt tag for the product image | Maximum length of 255 characters. |
| Product Image Is Thumbnail - 1 | If there is more than one image for the product, specify one to be the thumbnail | Type in Y to select this image to be used as the product thumbnail, or N to deselect the image. You can only select one image per product. |
| Product Image Sort - 1 | If there is more than one image for the product, specify which order they should appear in (lower numbers appear earlier) | Use whole numbers only. |
| Search Keywords | Keywords for your store's search | Keywords must be separated by commas. Maximum length of 65,535 characters. |
| Page Title | Your product's page title; will default to the product name if left blank | |
| Meta Keywords | Meta keywords; if left blank will default to those entered in the Website Settings | Keywords must be separated by commas. Maximum length of 65,535 characters |
| Meta Description | Meta description; if left blank will default to what's entered in the Website Settings | Maximum length of 65,535 characters. |
| MYOB Asset Acct | Settings if using MYOB | |
| MYOB Income Acct | Settings if using MYOB | |
| MYOB Expense Acct | Settings if using MYOB | |
| Product Condition | Product condition for Google Shopping | Type in New, Used, or Refurbished. |
| Show Product Condition? | Show the product condition on your product page | Type in Y to display the product condition field on the product page, or N to not display that field. |
| Sort Order | The order in which a product appears on a category page relative to other products; default is 0 | Use whole numbers only. You can use negative numbers. |
| Product Tax Class | The tax class applied to a product | Maximum length of 255 characters. |
| Product UPC/EAN | Product's Universal Product Code (UPC) or European Article Number (EAN) | Maximum length of 32 characters. |
| Stop Processing Rules | For Rules, stop processing all rules placed below that rule | Type in Y to stop processing rules, or N to continue to process rules. |
| Product URL | The relative path of your product's URL on your store; if left blank it will default to the product name | Use this format: /new-relative-url/. Maximum URL length of 1,024 characters. |
| Redirect Old URL? | If you change the product URL, you can select whether or not to create a 301 Redirect | Type in Y to create a 301 redirect, or N to not create a redirect from the old product URL. |
| Global Trade Item Number | Product's Global Trade Item Number (GTIN) identifier | |
| Manufacturer Part Number | Product's Manufacturer Part Number (MPN) identifier | |
| Tax Provider Tax Code | Product's unique tax ID; use only if you have automatic tax calculation enabled. See Charging Product-Specific Tax Rates | |
| Product Custom Fields | Name of custom field=Name of value;Name of custom field #2=Name of value #2 |
Use this format: name=value (like Color=Blue;Material=Cotton). Maximum length of 255 characters per each field name or value. A maximum of 200 custom fields per product.
|
Manually Added Fields
The following fields are not included in the Bulk Edit template by default, but can be added manually and re-imported using Bulk Edit Re-Import. They will also be matched automatically in the Match Fields section.
| Field | Description | Format |
|---|---|---|
| Brand + Name | The brand or manufacturer name and the product name | |
| Calculated Price | The calculated price shown on the storefront | |
| Product Not Visible | Enable to set the product as not visible in your store | Use Y for yes, and N for no. |
| Product Inventoried | Enable to track the product for inventory | Use Y for yes, and N for no. |
| Date Added | The date the product was added to the store. | Use the format MM/DD/YYYY. |
| Date Modified | The date the product was last modified. | Use the format MM/DD/YYYY. |
| Product File Path | The file location in WebDAV | |
| Product File Total Downloads | The number of times the file has been downloaded | |
| Category Details | The category ID, Name and URL path | |
| Product Image File - 1 | Image file name (if stored in WebDAV) or full URL | Use the file name and extension (imagename.jpg), or the URL path (l_http://fullurl.com/imagename.jpg_). Maximum URL length of 1,024 characters. A maximum of 1,000 images per product. |
| Product Image URL - 1 | Image full URL | Use the URL path (http://fullurl.com/imagename.jpg). Maximum URL length of 1,024 characters. |
| Minimum Purchase Quantity | Setting this value will enforce a minimum quantity limit, on a per-order basis, when customers are ordering this product from your store | Use numbers only. |
| Maximum Purchase Quantity | Setting this value will enforce a maximum quantity limit, on a per-order basis, when customers are ordering this product from your store | Use numbers only. |
| Shipping Groups | Product's unique ShipperHQ shipping group; only available if ShipperHQ is enabled | |
| Origin Locations | Product's unique ShipperHQ origin group; only available if ShipperHQ is enabled | |
| Dimensional Rules | Product's unique ShipperHQ dimensional rule group; only available if ShipperHQ is enabled |
FAQ
Can categories be created and updated via the API?
Yes. For information on creating and editing category information via the API, see our Catalog API documentation in the Dev Center.
How do I create a category with a product import?
A category is created whenever it is listed in the Category column when importing a product and it does not currently exist. If it is listed by itself, it will be created as a top-level category.
If your product category contains a slash (/) character, use a backslash (\) before it to avoid creating subcategories. For example, if you want to create a category labeled "Sweaters/Hoodies", it should be formatted as "Sweaters\/Hoodies" to avoid creating a parent and child category.
How do I put a product into multiple categories?
If your product belongs to multiple categories, they should be separated with a semi-colon (;) without a space. For example: Graphic Tees;Sale/Graphic Tees.
How do I put a product into a subcategory?
If your product belongs to a subcategory, list both the parent category and the subcategory, separated by a forward slash (/). Listing the subcategory by itself will create an additional top-level category by that name. For example, "Accessories/Watches" will add the product to the Watches subcategory, but not the Accessories category.
Can I export just my product SKUs?
Yes. Exporting SKUs is similar to exporting products. To get started, go to Products › Export Product SKUs and select the SKU Inventory Management template.
Can I update SKU inventory and dimensions without importing all of my product details?
Yes. Product SKUs can be imported using the SKU Inventory Management template. It can be found under Products › Export Product SKUs and imported under Products › Import Product SKUs.
Your SKU import file must contain the Product SKU and Stock Level fields. The Product Weight field can be added manually by customizing the SKU Inventory Management template. Note that a product can have a maximum of 600 SKUs, and as always, be sure to make a copy of your original export as a backup.
Why do I keep getting warnings after a successful import?
Some products may have been imported, however not all information may have imported successfully. This often occurs when the Track Inventory column has been left blank.
Be sure to set the value to none if you do not plan on tracking inventory for your products. Import warnings can also be caused by a change in the product. For example, a product's image may have been changed since it was last exported.
Can I import product videos?
YouTube videos cannot be imported or exported using a CSV file and can only be added by editing products in the control panel or through the Catalog API. Alternatively, product descriptions are a supported field for CSV files, and they can be used to include embedded videos and can be imported using a CSV file.
Can I use a CSV import to manage inventory updates across multiple locations?
Yes, you can opt-in to use the inventory template that is specifically designed for this purpose. See Importing and Exporting Multi-Location Inventory for more information.
Why does Excel convert my SKUs into scientific notation?
See Troubleshooting | Data Import/Export to learn how to prevent Excel from making alterations to your CSV file.