Managing Customer Accounts
Customer account creation allows your customers to create storefront accounts to manage orders, create wish lists, save shipping addresses, and store payment methods for quicker checkout. It also provides you with the ability to view individual customer order data, give store credit, send order messages, and segment your customers into groups for store discounts and tax purposes.
When new customers complete checkout in your store, they have the option of creating an account. Their details, like their name, email, and other address information, are saved to a new customer record. New customer records can also be created manually through the control panel or importing in bulk.
Requirements
- In order to manage different aspects of customer accounts, you must have the following permissions enabled on your user account.
- To view, search, and log into customer accounts:
- Manage Channels
- Manage Customers
- To add new customer accounts in the control panel:
- Manage Channels
- Manage Customers
- Add a Customer
- To edit existing customer accounts:
- Manage Channels
- Manage Customers
- Edit Customers
- To delete customer accounts:
- Manage Channels
- Manage Customers
- Delete Customers
- To add store credit to a customer account:
- Manage Channels
- Manage Customers
- Edit Customers
- Manage Customer Store Credit
- To enable or disable account creation on the storefront:
- Manage Settings
- To manage customer password and account settings:
- Manage Settings
- Manage Customer Privacy Settings
- To view, search, and log into customer accounts:
- In order to add your customers to one or more customer groups, your store must be on a Plus plan or higher.
- To enable stored payment methods, your store must be on a Plus plan or higher.
Enabling & Disabling Account Creation
You can enable and disable customer account creation from the control panel, and set whether you would like accounts to be created automatically for guests.
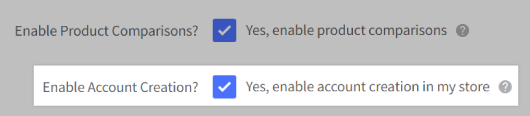
Go to Settings › General, then click the Display tab.
Scroll to the Display Settings section, then check or uncheck the Enable Account Creation? option.
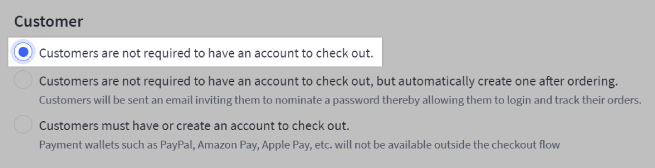
To allow manual account creation while disabling automatic account creation for customers who check out as guests, go to Settings › Checkout and select Customers are not required to have an account to check out.
Viewing & Searching Customers
To view and manage your customers, go to Customers › View.
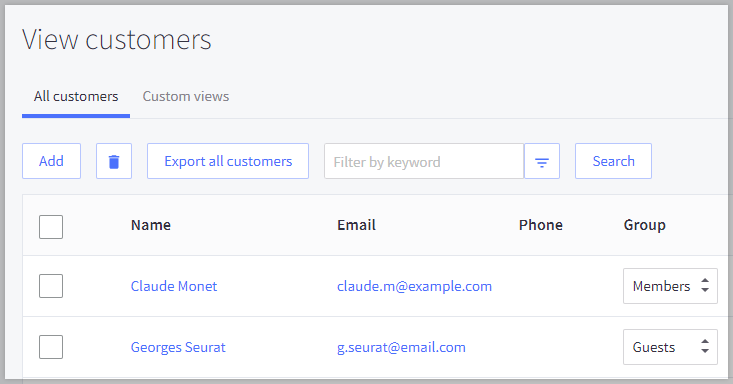
The Filter by keyword field can be used to filter your customer list. If searching for a full name, wrap your search term in quotes, or click Search to refine your query with the Advanced Search.

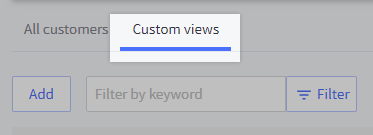
The Custom views tab allows you to create and save preset, sorted lists of customers based on customer details, like country, number of orders, date joined, and customer group.
Advanced Search
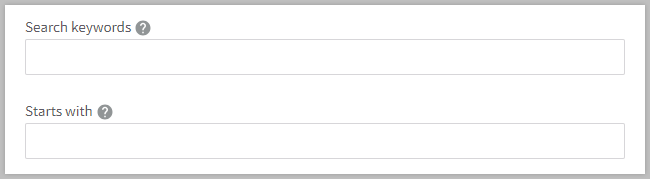
- Search keywords — Searches your customers' first name, last name, email, and company fields for matches to the terms you enter.
- Starts with — Searches for any customers whose last names begin with the letter/number you've selected.
- Phone — Searches customers' phone number fields.
- Country — Restricts search results to customers in the country you've selected.
- State/Province — Restricts search results to customers in the state you've selected. This field auto-populates with a drop-down list of states, based on the Country you choose.
Search by Range

- Customer ID — Searches for customers whose ID falls within the range you define.
- Number of orders — Searches for customers whose number of orders falls within the range you define.
- Store credit — Searches for customers whose current store credit total falls within the range you define.
Search by Date

- Date joined — Restricts search results to customers who joined within the defined range you select. Options include:
- Today
- Yesterday
- Last 24 hours
- Last 7 days
- Last 30 days
- This month
- This year
- Custom period
Search by Group

- Customer group — Restricts search results to customers in the selected customer group. The customer group feature is available on select BigCommerce plans.
Sort Order

- Customer — Determines which customer data will be used to sort search results. Available options are:
- ID
- Last name
- First name
- Phone
- Date joined
- Orders
- in — Determines whether search results are displayed in Ascending or Descending order.
Adding & Editing a Customer
Customer accounts can be added manually on behalf of a new or existing customer. For example, if you're a brick-and-mortar store entering into ecommerce, you can add your in-store customers to your online store. Likewise, if you receive an order over the phone, you can add that customer to your store before creating their order.
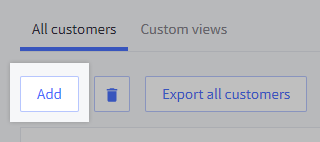
To add a customer, click on the Add button when viewing your customer list. You can also navigate to Customers › Add.
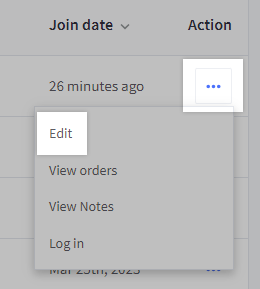
To edit an existing customer account, click on the customer's name or click Edit from within that customer's action menu.
Whether adding or editing a customer, you'll be able to change the following fields:
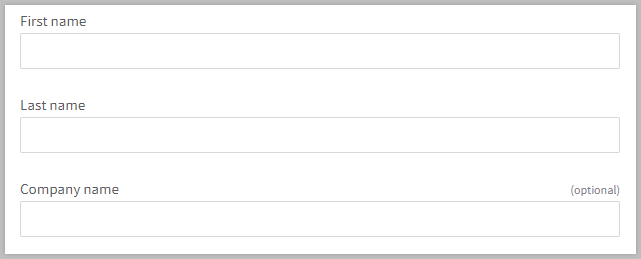
- First name — the customer's first name
- Last name — the customer's last name
- Company name — the customer's company
- Email address — the customer's email address
- Customer group — specify which group the customer should be placed. See Customer Groups.
- Phone — the customer's phone number. This field is optional when adding a customer manually, but required when a customer creates an account on the storefront.
- Store credit — specify the amount of store credit the customer should have. See Giving Customers a Store Credit.
- Receive ACS/review emails (Yes/No) — specify whether the customer should receive Abandoned Cart Saver (ACS) or product review emails
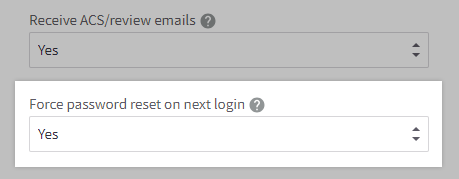
- Force password reset on next login (Yes/No) — used to force a password reset. See Forcing Customers to Reset Their Password.
- Tax exempt code — used in conjunction with automatic tax calculation
- Any additional form fields — if you've added fields to the account signup form, they will appear under Customer sign up form fields
Data Collection Consent
If you have Cookie consent tracking enabled in your store's Security & Privacy settings, these categories will represent this customer's preferences regarding scripts/cookies used by your store. These reflect the script categories for scripts in Script Manager. Essential scripts cannot be disabled, so there's no setting for them.
We recommend changing a customer's data preferences only if you've received a request from a verified customer to do so.
Password
You can set a new password through the New Password and Confirm Password fields. If you're adding a customer, we recommend forcing a password reset to allow them to choose a password that works for them. Password complexity can be configured in your Security & Privacy Settings.
A customer will receive an email when their account email address or password is changed. The email will automatically send when a customer's email address or password is edited in the control panel or in their storefront account settings. The contents of this email can be viewed and edited in Marketing › Transactional Emails within the Account Settings Edited template.
Customer Address Book
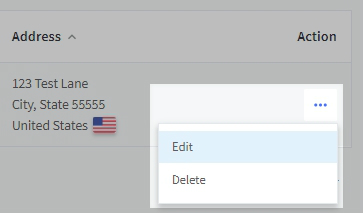
To add a customer's address, you'll first need to save the customer account. Once saved, click the Customer address book tab, then click Add an Address.
If you need to edit a customer's address, click the Customer address book tab, then click Edit in the action menu to the right of the address you'd like to update. You can also select Delete to remove the address.
Deleting Customer Accounts
To delete a customer account, go to Customers › View and check the box next to the name of the customer record you want to delete. Click the delete button (trash can icon), then click OK in the confirmation pop-up.
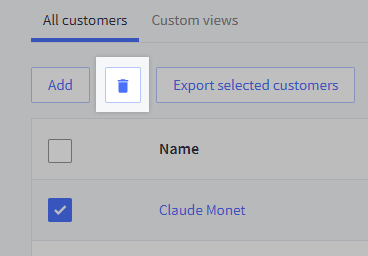
You can delete customer accounts in bulk by checking more than one customer account at a time. Use the built-in customer filtering and search functions to find specific customer accounts you wish to delete.
Note that customers can only be deleted from within the control panel and not via CSV import/export. Additionally, deleting a customer account will not remove the orders the customer has placed. Those records are still accessible from the View Orders screen.
Logging in as a Customer
You can view your customers' storefront accounts by logging in as a customer from your control panel. There are several reasons you might want to log in as a customer, such as:
- viewing a customer's wish lists
- checking the products that a customer has recently viewed
- verifying product visibility and discounts set by a particular customer group
- troubleshooting account or storefront issues reported by a customer
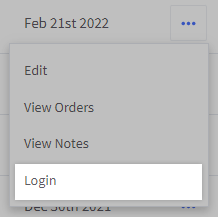
To log into a customer's storefront account, go to Customers › View and click Login in the customer's action menu.
Once logged in, you can view their storefront account information, as well as any customer group-defined categories and discounts. When you are done, click Sign Out in your store's header to log out of the customer's account.

Using the Abandoned Cart Saver? We recommend clearing out any products added to the cart before logging out of a customer account so that you don't accidentally trigger an abandoned cart email.
Customer Password Settings
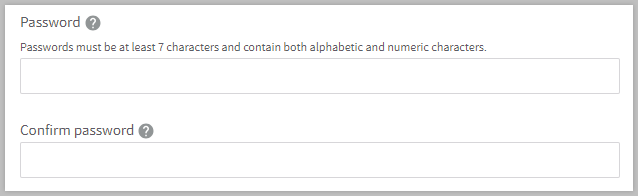
By default, customer passwords must have at least seven characters with at least one letter and one number. You can modify your store’s password requirements from Settings › General, under the Security & Privacy tab.

Once enabled, you can specify the minimum password length, lower/upper case requirements, and whether it should contain numbers or special characters.
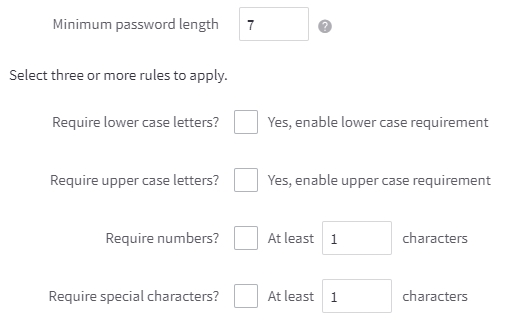
A minimum of seven characters is required when changing minimum password length. The following special characters are allowed for password creation: ! ' " # $ % & \ ( ) * + , . / : ; < > = ? @ [ ] \ ^ - _ ` { } | ~. Spaces are also allowed.
Pro Tip! Existing customer passwords will not be forced to use the stricter requirements until they update their passwords. Therefore, we recommend forcing customers to reset their password on their next login.
Forcing Customers to Reset Their Password
In some cases, such as changing your store’s password requirements or migrating customers from an old store to your BigCommerce store, it may be necessary to force a customer to reset their password the next time they attempt to log in. This can be done when either adding a new customer or editing an existing one.
Note that this setting is enabled in your control panel and not able to be managed via CSV import/export. You can also use the API to force customers to reset their password.
1. Go to Customers › View, then either add or edit a customer.
2. Select Yes from the dropdown menu labeled Force password reset on next login.
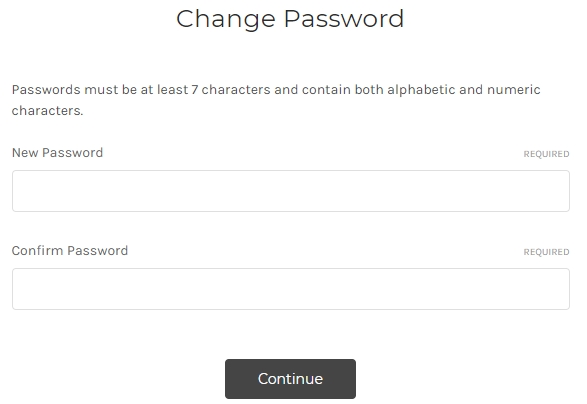
The next time your customer attempts to log in, they will receive a message explaining that they must reset their password before logging in, and an email containing a link to the password reset page will be sent to their customer account email address.

The password reset page will prompt them to enter and confirm a new password for their account. Once they’ve completed this step, they will again be able to log into their customer account.
Customer Account Settings
In addition to managing customer password complexity, you can configure the following shopper security settings from Settings › General in the Security & Privacy tab.
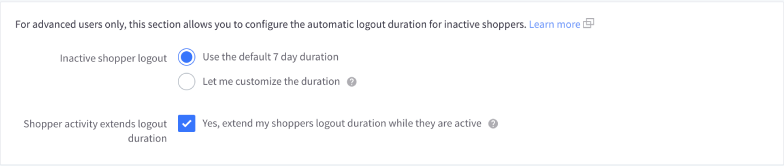
Inactive Shopper Logout
The Inactive shopper logout setting allows you to control when your shoppers will be automatically logged out for inactivity. For merchants that don’t require a specific inactivity timeout, the storefront will default to BigCommerce’s recommended security policy of seven days.
You can extend the inactive logout time with the Shopper activity extends logout duration setting. For example, if your inactive logout is set for seven days and your shopper clicks to view a product the day after starting a cart, they will have six days plus the set extended logout duration before they are logged out for inactivity. If the setting box is not checked, the customer will be logged out after seven days
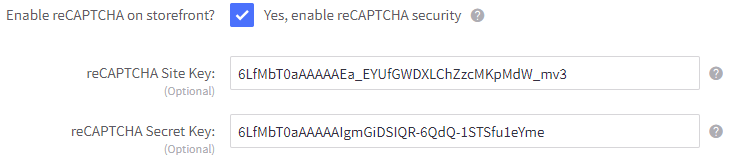
reCAPTCHA
reCAPTCHA can be enabled to force customers to fill out a reCAPTCHA form when submitting contact forms, product reviews, account sign-up forms, and password reset requests. This setting does not enable reCAPTCHA on the checkout page. If you would like to enable reCAPTCHA for the checkout, see General Checkout Settings.
If you would like to see reCAPTCHA data in Google Analytics, enter your reCAPTCHA API key pair via the Site Key and Secret Key fields. This setting is entirely optional. If these keys are not specified, the BigCommerce reCAPTCHA keys will be used instead.
Failed Login Lockout
The Failed Login Lockout setting gives you the ability to set a number (seconds) in which the customer is locked out after four failed login attempts. The maximum lockout time is one hour (3600s).

Customers will receive a banner informing them of the lockout before they are allowed to try another four times. This cycle repeats itself infinitely, as the customer is never really locked out of their account.

Your Customers' Privacy
These settings help you to comply with local privacy laws like GDPR and CCPA by giving your shoppers the opportunity to opt out of certain categories of cookies or scripts that may be used by the store.
Localized Store Experiences: This cookie consent tracking banner can be displayed in any of our supported languages. For more information on the default language store setting, see Store Profile Settings.
Custom scripts and scripts installed from third-party apps can be categorized using Script Manager.
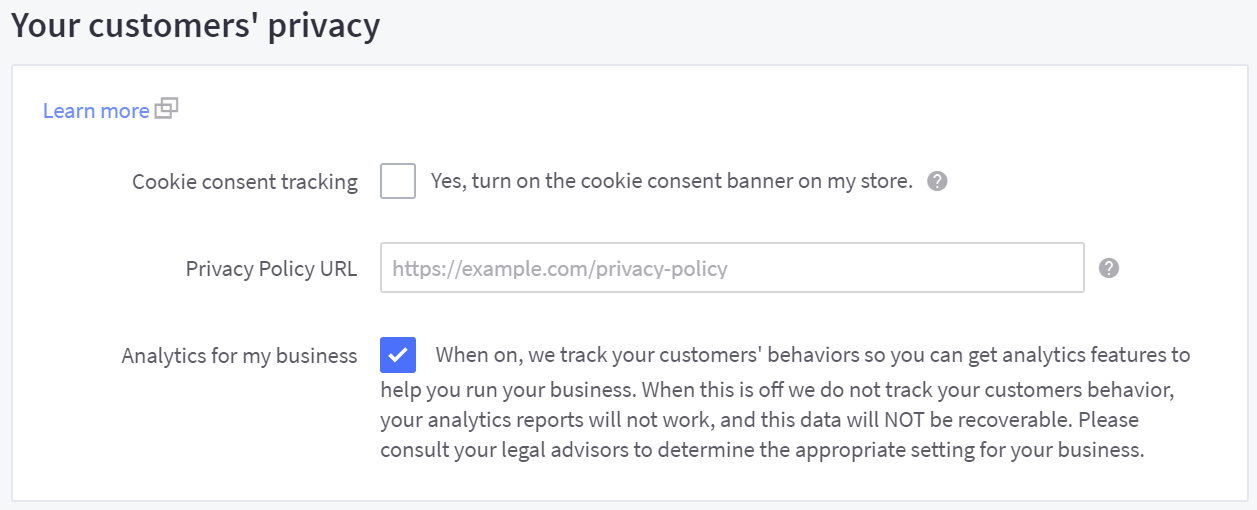
- Cookie consent tracking — When enabled, this will show a banner on your storefront, prompting your shoppers for their consent to use cookies and other technologies while shopping on your storefront. BigCommerce will respect their preferences when loading analytics features, as well as scripts that have been added to your store in the Script Manager.
- Privacy Policy URL — The consent banner includes a link to your privacy policy for users who want to learn more about how your store uses cookies. Enter the fully-qualified URL to your privacy policy here (for example, https://mystore.com/privacy).
- Analytics for my business — When enabled, we track your customers’ behaviors so you can get analytics features to help you run your business. While this is disabled, we will not track customer behavior, analytics reports will not work, and this data will not be recoverable.
Did you know? If Analytics for my business is disabled, you will not receive Analytics reports for your store. Turning it on will not recover the missed data.
FAQ
Can I view all the orders from a particular customer?
Yes. To view a customer's order history, click View Orders from the action menu of the customer you'd like to see.
Why do I see "Loading data Error" whenever I view customers in the control panel?
This is caused by your user account missing some of the required permissions. Ensure that Manage Channels and Manage Customers are enabled on your user account, then logout and log back into the control panel. For actions such as adding and editing customers, you will need additional permissions.
Can I add notes to a customer account?
Yes. To add a note to a particular customer account, click View Notes from the action menu of the customer you'd like to update, and enter your desired notes. Then click Save to save them.
Users with the Manage Customers permission will be able to view customer notes but not edit them. To update customer details, users will need to have the Edit Customers permission.
How do Customer Attributes appear in the UI?
Customer Attributes only appear in the control panel after the customer has been created and you have created them by means of API. They do not appear on storefronts and require specific integrations and widgets. For more information, refer to our developer documentation on Creating Customer Attributes.
New customers are automatically set to not receive Abandoned Cart Saver and product review emails in my store. How can I change this?
If Require Consent is enabled in your store's Miscellaneous settings, the default behavior for Receive ACS/Review Emails will be set to No, unless the customer manually opts in to receive them through the Exclusive Offers — I would like to receive updates and offers checkbox found on the storefront account setup and account settings pages. This setting is also found on the checkout page for new customers.
If you would like to send product review and Abandoned Cart Saver emails to all new customers by default, you can do this by simply disabling Require Consent. Keep in mind that you may need to leave this setting enabled in your store for CCPA and GDPR compliance.
When my customer is automatically logged out, will they lose the content of their carts?
No. Customer carts are stored in a customer’s browser cache for 7 days. If you have Persistent Cart enabled, the cart will instead be stored in the customer account for 30 days.